4 Principle
A cyclic tensile test with a constant load range is imposed on a cylindrical specimen under suitable test conditions within the stress range where SCG is achieved. A circumferential notch is machined in the center of the test specimen to enable crack initiation and SCG to the final failure of the specimen. The number of cycles until final failure, Nf, is recorded as a function of the stress range, Δσ0, at the initial crack length, aini. The specimen geometry ensures quick crack initiation and short testing times due to the high constraint and low plastic deformations along the crack tip.
NOTE Crack initiation can be monitored by the use of extensometers if required
5 Apparatus
5.1 Test machine
5.1.1 Loading system
The loading system shall be capable of imposing and recording a cyclic load varied by time between accurately defined limits (load control mode) with a specific waveform. Servo-hydraulically driven test
machines with electronic control are generally suitable for this purpose. However, mechanically driven machines may also be used if they meet the requirements.
The cyclic load shall follow a sinusoidal waveform which is characterized by the maximum load, Fmax, and the load ratio, R. The maximum and minimum loading values shall be constant during the entire test with an accuracy of ±1 %.
5.1.2 Load-cycle frequency
The load-cycle frequency (test frequency), f, shall not exceed 10 Hz with an accuracy of 1 %. The hysteretic heating at a frequency of 10 Hz usually causes no significant influence on Nf.[2] If extraordinary hysteretic heating at the crack tip is suspected, the frequency shall be reduced to 5 Hz or 1 Hz with an accuracy of 1 %.
5.1.3 Grips
The machine shall be equipped with grips suitable to clamp cylindrical specimens. It shall be ensured that the load distribution is in alignment with the specimen axis.
5.1.4 Temperature chamber
For testing at temperatures other than (23 ± 2) °C, the test machine shall be equipped with a suitable chamber that contains the environment and ensures complete immersion of the specimen. The chamber shall be constructed of materials which do not affect the environment and which are not affected by it. The temperature of the environment shall be controlled in order to maintain the test specimens within ±2 °C of the specified temperature.
5.2 Microscope
A microscope or an equivalent device shall be used to measure the initial crack length after the finished cyclic tests with an accuracy of 0,01 mm.
5.3 Notching apparatus
The device used shall be capable of producing a razor-sharp notch of accurately defined depth at the circumference of the cylindrical specimen. The notch tip radius produced shall be less than 10 μm. Usually, razor blades meet this requirement. A conventional lathe and a razor blade tool may be suitable for this purpose. Bending of the razor blade shall be avoided and notching perpendicular to the specimen axis shall be ensured.
6 Test specimen
5.1 Specimen geometry and dimensions
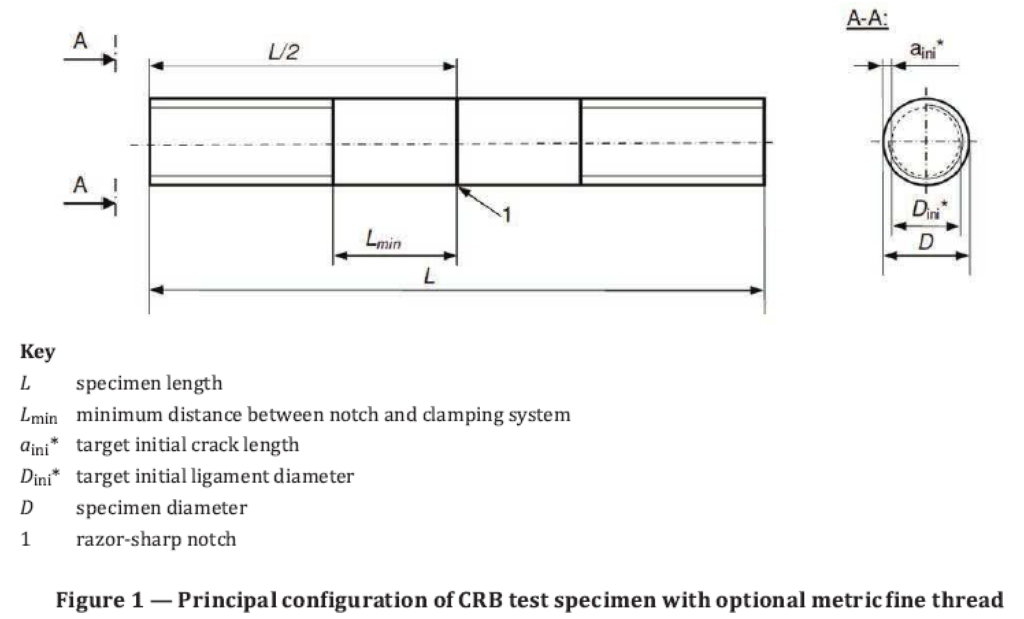
The specimen configuration of the cracked round bar (CRB) specimen is shown in Figure 1. A cylindrical bar of length, L, and diameter, D, is prepared with a circumferential razor-sharp notch with a depth of aini* (target initial crack length) in the middle of the specimen resulting in a target initial ligament diameter, Dini*.
Preferred specimen dimensions are L of 80 mm to 100 mm and D of 14 mm. The initial crack shall be perpendicular to the specimen axis with a target crack length of aini* of (1,50 +0,15/-0,0) mm. To avoid clamping effects at the crack tip, the notch distance, Lmin, shall be at least 20 mm from the grips. To support specimen clamping, the specimen may be manufactured with, for example, M 14 × 1,0 metric fine thread.
NOTE Alternative dimensions can be used, but results are to be compared by the stress intensity factor range instead of the stress range (see Annex A) ,
5.2 Test specimen preparation
The test specimens can be machined from compression moulded sheets or from pipe or fittings. Conditions for compression moulding of test specimens are given in Table 1. The use of different moulding conditions may affect the results. The specimens shall be machined in accordance with ISO 2818.
6.3 Specimen notching
Specimens shall be notched at an ambient temperature of (23 ± 2) °C with a notching apparatus according to 5.3. Select a sufficiently low driving speed and feed to avoid frictional heating that may lead to notch tip damage such as blunting and introduction of residual stresses. Favorable values for the specimen notching are a driving speed of 80 rpm up to 100 rpm and a razor blade feed of approximately
0,03 mm/rotation. Special attention shall be paid to notching perpendicular to the specimen axis. A
razor blade shall be used for no more than 10 notches.
7 Test procedure
6.1 Measurement of specimen dimensions
Before testing, the diameter, D, shall be recorded on both sides of the notch at a distance of 1 mm to 2 mm from the notch with an accuracy of at least 0,1 mm. An average of the two measurements shall be taken. Measuring the diameter directly at the notch shall be avoided.
7.2 Specimen mounting
7.3 Test atmosphere
Depending on the clamping system, the specimen shall be mounted into the test machine without inducing additional forces. Bending or twisting of the specimen shall be avoided. The distance from the grips to the notch shall be of a sufficient length, Lmin, (see Figure 1) to avoid any clamping effects at the crack tip.
Test is preferably carried out at condition 23/50, Class 2 according to ISO 291, unless specified otherwise in a referring standard. In case of testing at elevated temperatures, the unloaded specimen shall be conditioned at the test temperature for at least 2 h after mounting in the test apparatus.
7.4 Calculation of test load
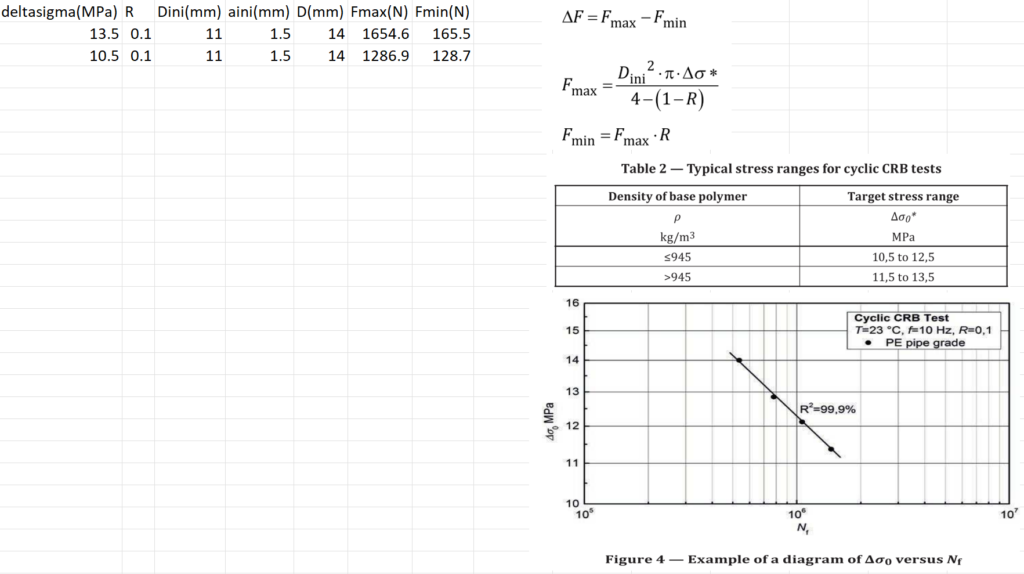
The test loads shall result in brittle failure by slow crack growth and specimens that fail in a predominantly ductile manner shall be excluded (see Figure 3). Specimens shall be tested with a load ratio, R, of 0,1 at different target stress ranges, Δσ0*, levels between 10,5 MPa and 13,5 MPa depending on the density of the base polyethylene according to Table 2[3] , unless specified otherwise in a referring standard. The target stress range of Δσ0* above 13,5 MPa is to be avoided as this may result in ductile failure.
A comparison of different materials is only allowed for the same specimen geometry and test parameters. If CRB specimens of different diameters to 14 mm are tested, the comparison of the results shall be made using the stress intensity factor range (ΔKI ) as described in Annex A.
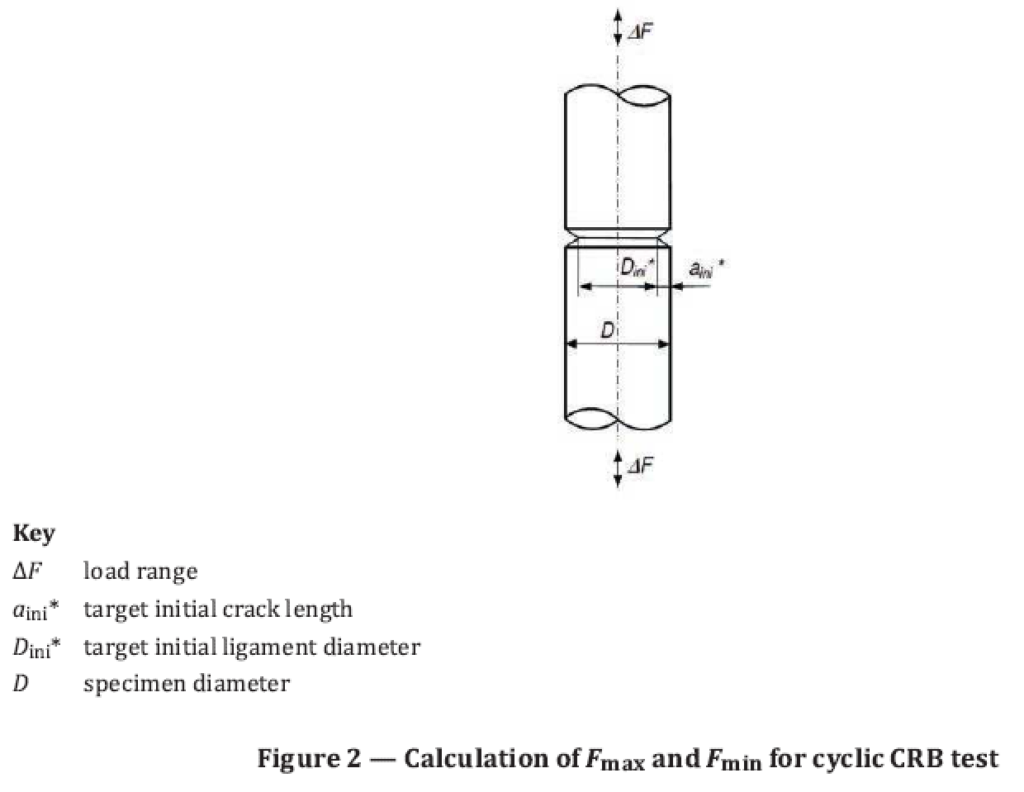
At least four specimens shall be tested each at each different applied target stress range, Δσ0*, regularly spread over the above specified load range. If an unknown material is tested, preliminary tests are recommended to ensure failure by slow crack growth and ductile behavior is not occurring. The calculation of the maximum load, Fmax, and the minimum load, Fmin, shall be carried out according to Figure 2 and Formulae (1) to (3).
For product specifications, it should be possible to establish a single point test requirement using one load range.
6.5 Load application
After mounting and conditioning of the specimen, the cyclic load shall be applied immediately with the defined load-cycle frequency without exceeding the maximum load, Fmax. Static loading prior the test shall be avoided as this may cause creep at the notch tip of the test piece. Simultaneous to the load application, the load-cycle counter shall be started for data acquisition. The cyclic load shall be applied and recorded continuously until test piece failure.
7.6 Notch depth measurement
The accurate determination of the depth of the razor blade notch on the unloaded specimens before testing is difficult, therefore, the initial crack length, aini, shall be measured after completion of the
cyclic test by analyzing the created fracture surface. Different surface textures usually allow a clear
distinction between the razor-sharpened notch and the fatigue crack initiated from the notch (see Figure 3). For this purpose, a microscope according to 5.2 or an equivalent device shall be used.
8 Data treatment
To evaluate the results, only specimens with predominantly brittle fractures shall be taken into account. Figure 3 shows typical microscope images of fracture surfaces of CRB specimens after testing. In both images, the relatively smooth ring-like surface from the initial notch, aini, is recognizable, which is a result of the specimen notching with a razor blade. The rough surface structure of the ductile failure area [see Figure 3 a)] is significantly different from the brittle failure area [see Figure 3 b)] . In the second case, a relatively smooth surface typical of brittle failure was created by slow crack growth which changes to ductile at small ligament diameter. The specimen with ductile failure only [see Figure 3 a)] was tested at too high-stress levels and shall be rejected for data evaluation.
To determine the stress range, Δσ0, a calculation to correct the target stress range, Δσ0*, with aini
measured at the fracture surface shall be carried out using Formula (4).
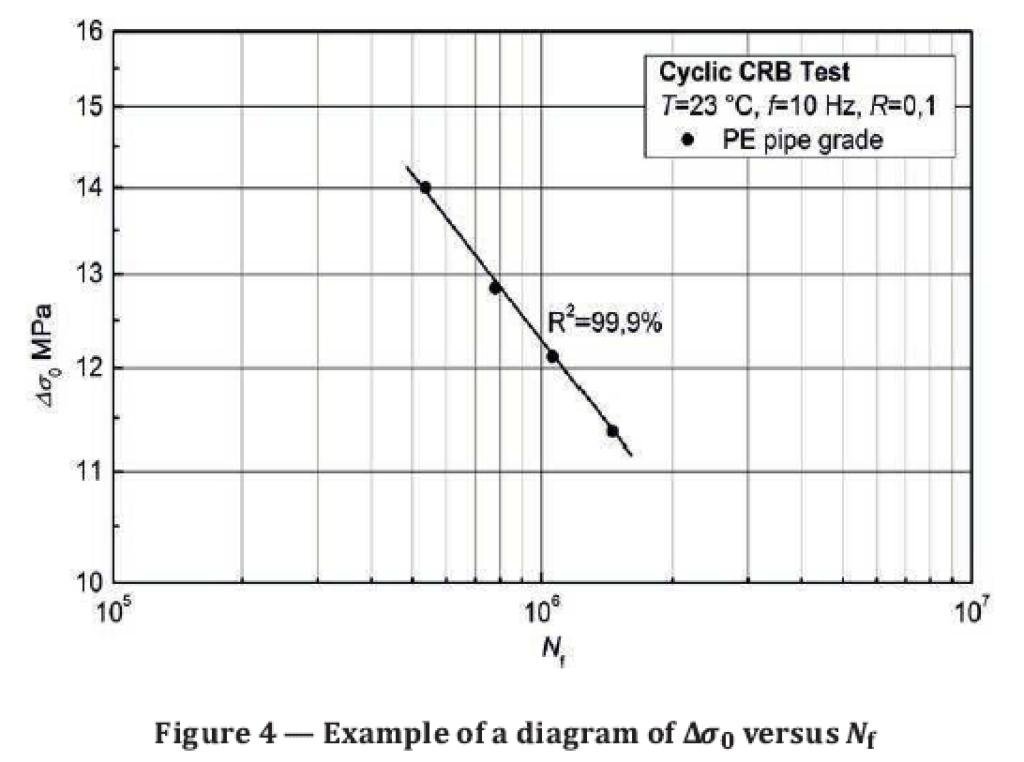
The failure cycle numbers, Nf, as a function of the applied stress range, Δσ0, shall be displayed in a double logarithmic (log-log) diagram. In this diagram, the failure curve shall result in a linear correlation with an accuracy within at least 98 % confidence interval. If no clear linear correlation is recognizable, additional tests with suitable Δσ0 shall be executed. The diagram shall also include information about the specimen configuration, test temperature, load-cycle frequency, and ,R, ratio. An example of a diagram of Δσ0 versus Nf is given in Figure 4.
9 Test report
The test report shall include the following information:
a) a reference to this International Standard, i.e ISO 18489:2015;
b) name of the test laboratory and operating person(s);
c) relevant details for complete identification of the test material or product (e.g. PE base polymer or
compound, type of product, manufacturer, production date) and each test specimen;
d) details of specimen preparation (e.g. cutting, dimensions);
e) details of the notching procedure and specimen conditioning;
f) details of the test equipment;
g) the test atmosphere;
h) the specimen loading variables including Δσ0, σmax, R, Nf, f, cycle waveform;
i) the notch depth, aini, measured at the fracture surface;
j) a photograph of fracture surfaces of the CRB specimen after testing;
k) a diagram of Δσ0 versus Nf;
l) details of any deviations from the method specified in this test protocol which might affect the results such as incidents or any operations not specified;
m) dates of start and end of the test.
Lets see sample calculation according to above standard:


Dynamic Tensile Tester for ISO 18489
- Using a Pneumatic actuator
- Static force [6 bar]: 2500 N
- Dynamic force[5 bar]: 2000N
- Max travel of actuator 50 mm
- Control procedures: Force control
- Cross strut movement: Manual
- Screw-type sample grip (for the sample with thread M14*1 mm)
- Sample length 100 mm
- Sample diameter 14 mm
- Force capacity 250 Kgf
- USB connection to computer
- Loading frequency up to 10 Hz
- Software to monitor data for force, cycle number, time
- Software is included (Windows-Based)
- Report in MS Excel
- Approximate dimension (mm): 640 x 415 x 1100
- Work area [WW – WH] (mm): 480 x 795
- Computer is up to the customer (will be quoted on request of customer)


