4 Description of the test apparatus
4.1 Glow-wire
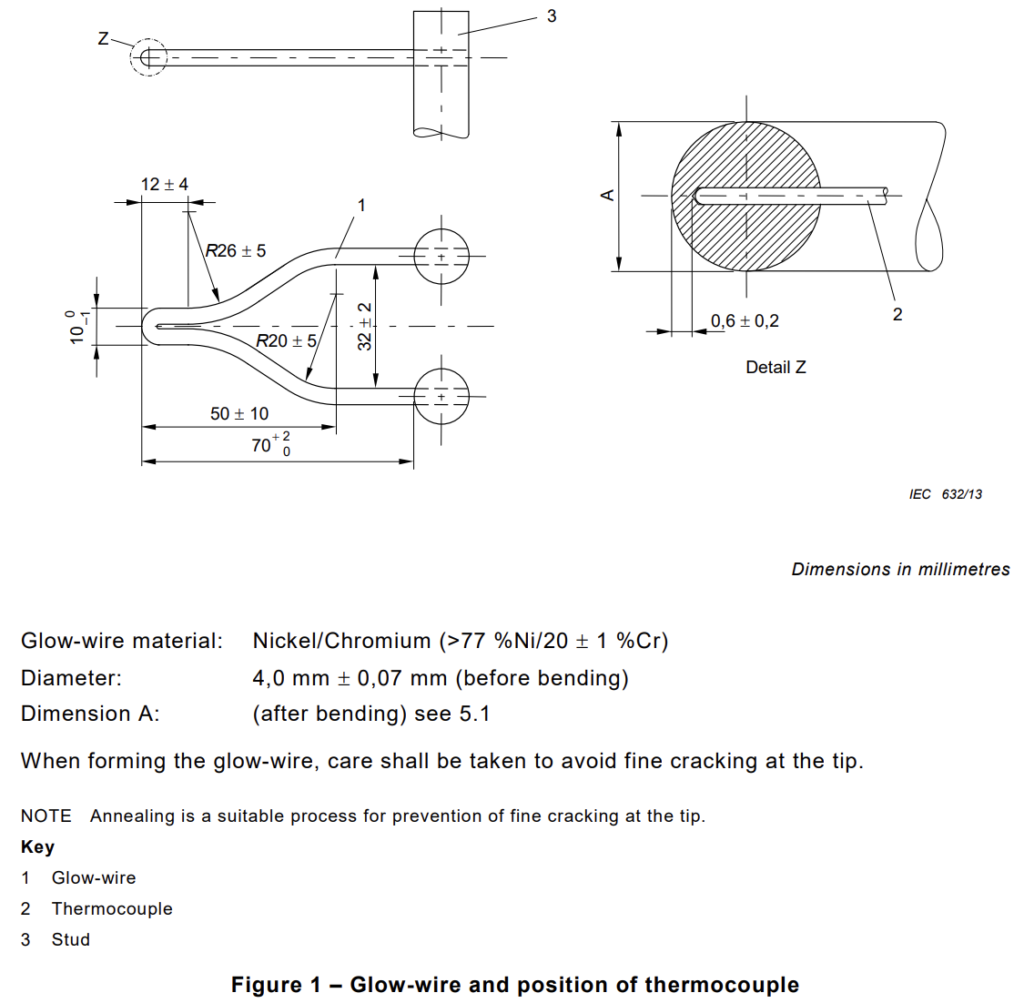
The glow-wire is formed from nickel/chromium (> 77 % Ni/20 ± 1 % Cr) wire, having an overall diameter of 4,00 mm ± 0,07 mm (before bending). The dimensions of the glow wire loop are as detailed in Figure 1.
A new glow-wire shall be annealed for a total of at least 10 h by being subjected to a current of at least 120 A before being used for a test run. The total annealing time may be achieved cumulatively. To avoid damage, the thermocouple shall not be installed during annealing. At the end of annealing, the depth of the thermocouple pocket hole shall be verified.
NOTE 1 The temperature of a new glow-wire which has not been annealed gradually lowers during the first few hours when subjected to a flow of current. After a period of time the temperature then reaches equilibrium.
The test apparatus shall be designed so that the glow-wire is kept in a horizontal plane and applies a force of 0,95 N ± 0,10 N to the test specimen during the application of the glow-wire.
The force shall be maintained at this value when the glow-wire or the test specimen is moved horizontally one towards the other. The penetration of the tip of the glow-wire into and through the test specimen shall be limited to 7 mm ± 0,5 mm.
The test apparatus shall be so designed that burning or glowing particles falling from the test specimen are able to fall without obstruction onto the layer as specified in 4.4.
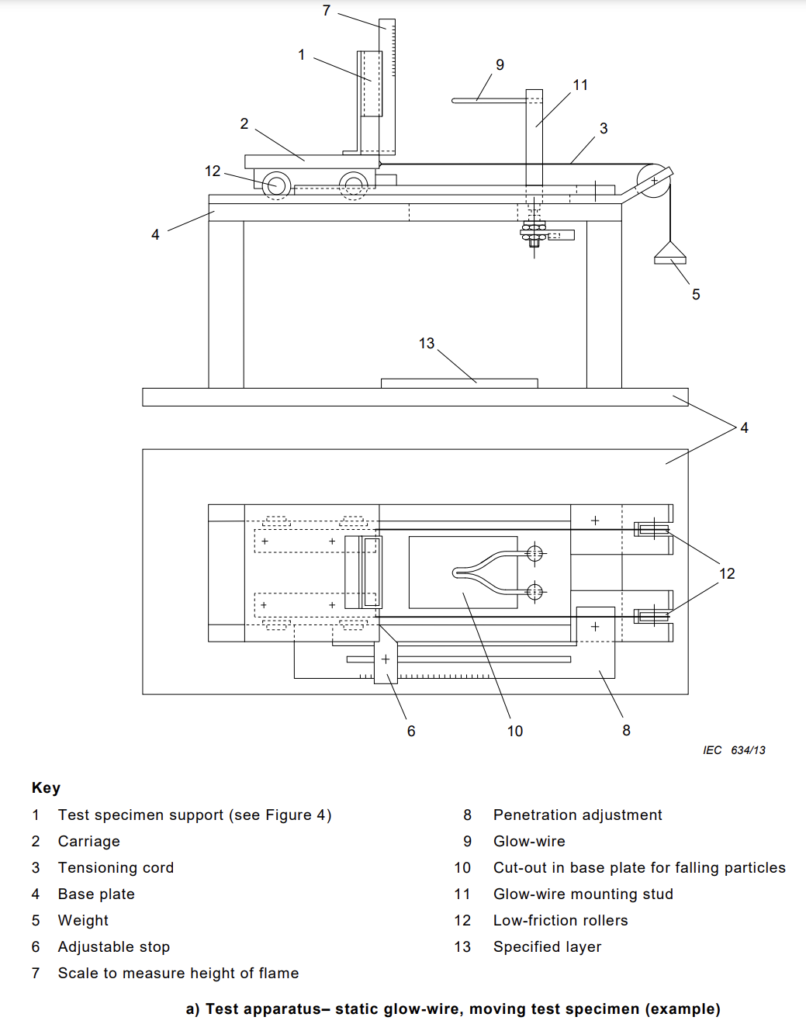
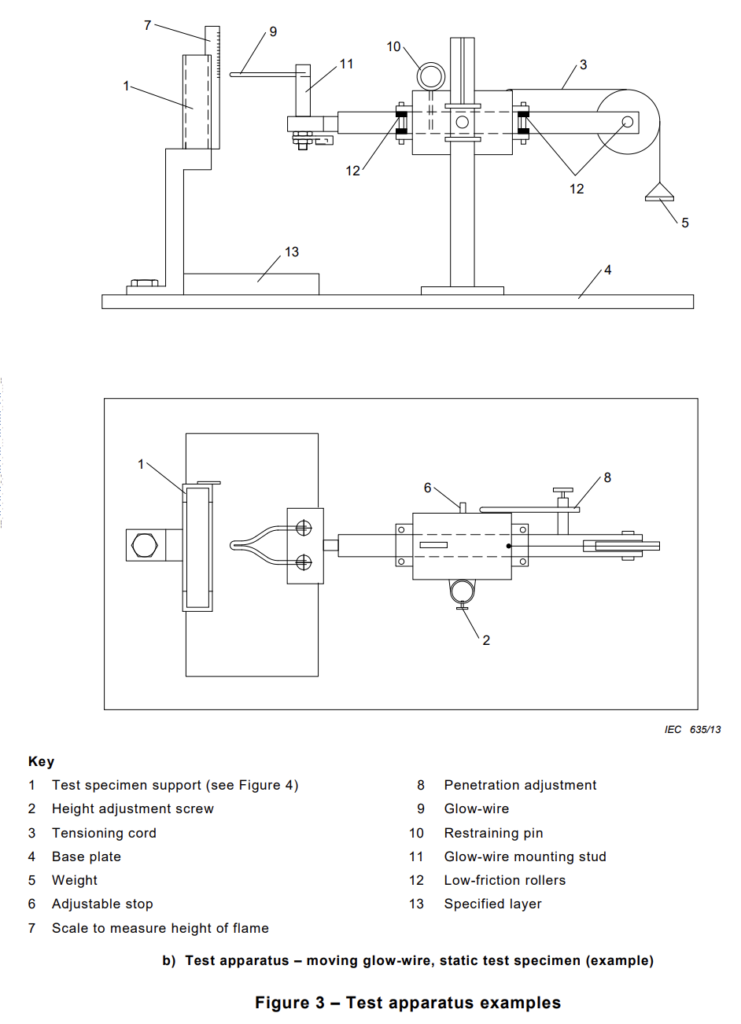
Two typical examples of the test apparatus are shown in Figures 3a and 3b.
NOTE 2 The apparatus shown in Figure 3b has been found useful when testing heavy and/or awkwardly shaped test specimens.
4.2 Test circuit and connections
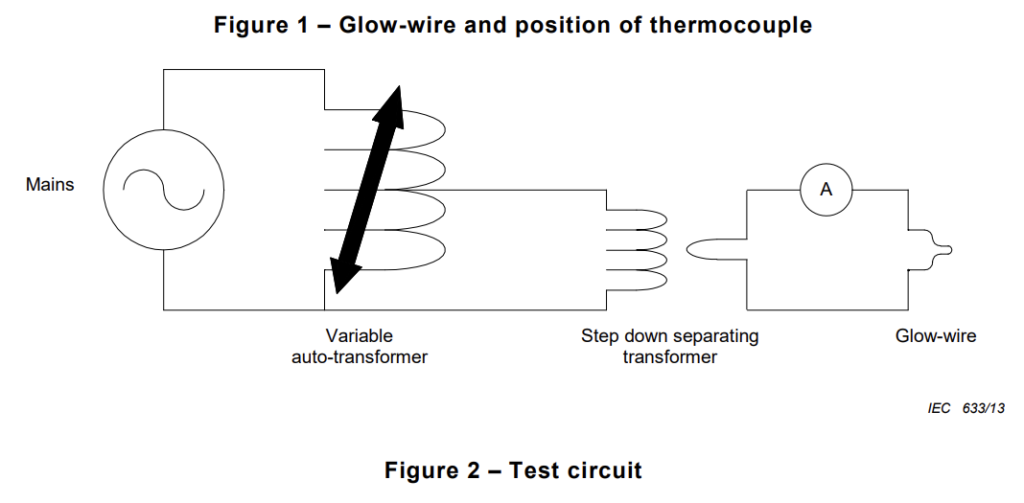
The glow-wire is heated by a simple electric circuit as shown in Figure 2. There shall be no feedback mechanism or circuit to maintain the temperature. The power supply for the glowwire test apparatus shall be a stabilized voltage source (± 2 % rms). The test circuit shall contain a current measuring device which indicates a true rms value with a maximum error of 1,0 %.
Due to the high currents involved, it is essential that all electrical connections for the glowwire are capable of carrying the current without affecting the performance or long-term stability of the circuit. For the glow-wire to stud connection, a sufficient contact area (typically at least 60 mm2 at each end) is necessary for the stable and loss-less current necessary for the test. The glow-wire to stud connection shall be tightly screwed, soldered, or brazed between the glow-wire and studs.
NOTE The typical current necessary for heating the tip to a temperature of 960 °C is between 120 A and 150 A.
4.3 Temperature measuring system
The temperature of the tip of the glow-wire shall be measured by a class 1 (see IEC 60584-2) mineral-insulated metal-sheathed fine-wire thermocouple with an insulated junction. It shall have an overall nominal diameter of 1,0 mm. The thermocouple wires shall be suitable for continuous operation at temperatures up to 960 °C (e.g. chromel/alumel (Type K) – see IEC 60584-1). The welded point shall be located inside the sheath as close to the tip as practicable. The sheath shall consist of a metal resistant to continuous operation at a temperature of at least 1050 °C.
NOTE A sheath made from a nickel-based heat-resistant alloy satisfies the above requirements.
The glow-wire, with the thermocouple inserted, is shown in Figure 1, Detail Z.
The thermocouple is arranged in a pocket hole, drilled in behind the tip of the glow-wire, and maintained as a close fit as shown in detail Z of Figure 1. The pocket hole shall be the smallest diameter that can accommodate the inserted thermocouple in order to reduce the occurrence of contamination during testing. The thermal contact between the tip of the thermocouple and the end of the drilled hole shall be maintained. Care shall be taken to ensure that the thermocouple is able to follow the dimensional changes of the tip of the glowwire caused by heating.
The instrument for measuring the thermocouple voltages may consist of any commercial digital thermometer with a built-in reference junction.
Other temperature measuring instrumentation may be used, but, in case of dispute, the thermocouple method must be used.
4.4 Specified layer
To evaluate the possible spread of fire, for example by burning or glowing particles falling from the test specimen, a specified layer is placed underneath the test specimen.
Unless otherwise specified, a single layer of wrapping tissue resting on, and in close contact with the upper surface of a piece of wooden board (flat and smooth and having a minimum thickness of 10 mm) is positioned at a distance of 200 mm ± 5 mm below the place where the glow-wire is applied to the test specimen. See Figures 3a and 3b.
Wrapping tissue (as specified in ISO 4046-4:2002 Clause 4.215) is a soft and strong lightweight wrapping tissue with a mass per unit area of between 12 g/m2 and 30 g/m2.
4.5 Test chamber
The apparatus shall be operated in a draught-free environment having sufficient volume such
that
– oxygen depletion during the test does not significantly affect the result; and
– the test specimen can be mounted at least 100 mm from any surface.
NOTE 1: A chamber having a volume of at least 0,5 m3 is considered to have sufficient volume for the test.
Within the test location, the ambient light falling on the test specimen, not counting that from the glow-wire, shall not exceed 20 lx. This is measured with a lux meter positioned in place of the test specimen facing towards the rear part of the location.
NOTE 2: Use of a dark background material will usually help in achieving the 20 lx limit.
After each test, the test location shall be vented to replace any depleted oxygen.
4.6 Timing device
The timing device shall have a resolution of 0,2 s or less.
5 Verification of the apparatus
5.1 Verification of the glow-wire tip
Before each series of tests, it is necessary to inspect the glow-wire tip by measuring and recording dimension “A” as shown in detail Z of Figure 1. The glow-wire shall be replaced once this measurement is reduced to 97,5 % or less of the measurement taken before its initial use.
On completion of each test, clean the tip, if necessary, to remove any residue of previously
tested material, for example by means of a wire brush, and then inspect the tip of the glowwire for any cracks. If it is not possible to clean the tip without damaging it (for example when there is molten glass fibre residue), then the glow-wire shall be replaced.
5.2 Verification of the temperature measuring system
The temperature measuring system described in 4.3 shall be verified periodically using the procedure described below.
A one-point verification of the temperature of the glow-wire can be performed using a foil of silver with a purity of at least 99,8 %, approximately 2 mm2 in area and approximately 0,06 mm thick, placed upon the upper surface of the tip of the glow-wire. The glow-wire shall be initially set at a temperature slightly lower than the melting point of the foil and allowed to stabilize. The glow-wire temperature is then increased at a slow heating rate so that the melting point may be accurately observed. When the silver starts to melt the thermometer shall indicate 960 °C ± 10 °C. The glow-wire, while still hot, shall be cleared of all traces of silver immediately after this verification process to reduce the probability of alloying. In case of dispute, this verification method using a silver foil shall be used.
7 Common test procedure
7.1 Test specimen support
The test specimen shall be mounted or clamped so that
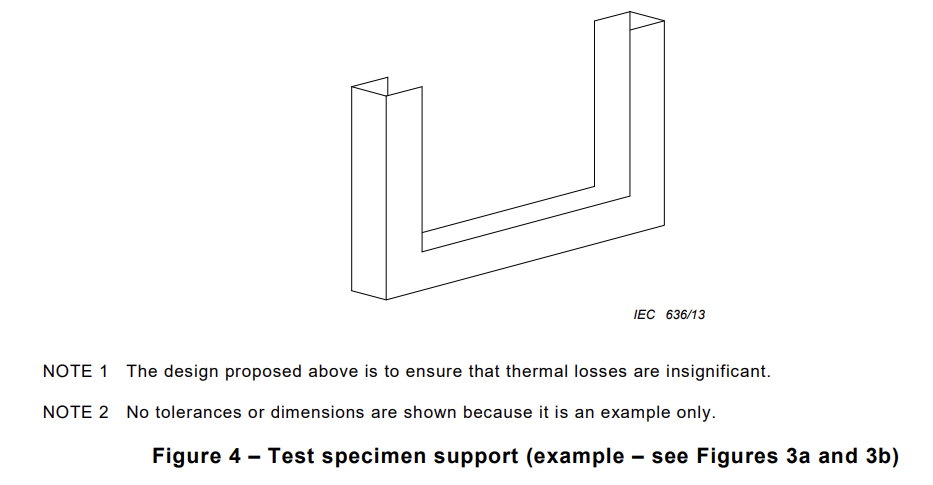
a) the heat losses due to the supporting or fixing means are insignificant (see Figure 4);
b) the planar area of the surface is vertical;
c) the tip of the glow-wire is applied to the center of the planar area of the surface.
Before each set of tests, the glow wire application force shall be checked with a suitable
device. In addition, the free movement of the carriage along the full path shall be checked.
7.2 Glow-wire temperature
Caution:
Precautions shall be taken to safeguard the health of personnel conducting tests against
– the risks of explosion, burning or fire;
– the risk of burns and electric shock;
– the inhalation of smoke and/or toxic products; and
– the risks of toxic residues.
The glow-wire is heated to the specified temperature which is measured by means of the calibrated temperature measurement system. Before bringing the tip of the glow-wire into contact with the test specimen, care shall be taken to ensure that
a) this temperature is constant within 5 K for a period of at least 60 s;
b) there is no contamination in the thermocouple hole drilled in the glow-wire and there is appropriate thermocouple to glow-wire contact. Appropriate contact shall be accomplished by gently pushing the thermocouple into the full depth of the drilled hole;
c) heat radiation does not influence the test specimen during this period by providing an adequate distance between the specimen and glow-wire i.e. 5,0 cm minimum, or by using an appropriate screen; and
d) no further adjustment to the heating current is to be made until after the test is completed.
7.3 Application of the glow-wire
The tip of the glow-wire is then brought smoothly into contact with the test specimen for a duration of 30 s ± 1 s. An approximate rate of approach and withdrawal of 10 mm/s to 25 mm/s has been found to be satisfactory. However, the rate of approach shall be reduced to near zero upon contact to avoid impact forces exceeding 1,05 N. In those cases where the material melts away from the glow-wire, the glow-wire shall not be kept in contact with the test specimen. Following the application time, the glow-wire and the test specimen are slowly separated, avoiding any further heating of the test specimen and any movement of air that might affect the result of the test. The penetration of the tip of the glow-wire into and through the test specimen shall be limited to 7 mm ± 0,5 mm.
Guidance on “ignition” and “flaming” observations
B.1 General
During the tests conducted in accordance with IEC 60695-2-11, IEC 60695-2-12 and IEC 60695-2-13, the following determination shall apply for “ignition” and flaming” observations;
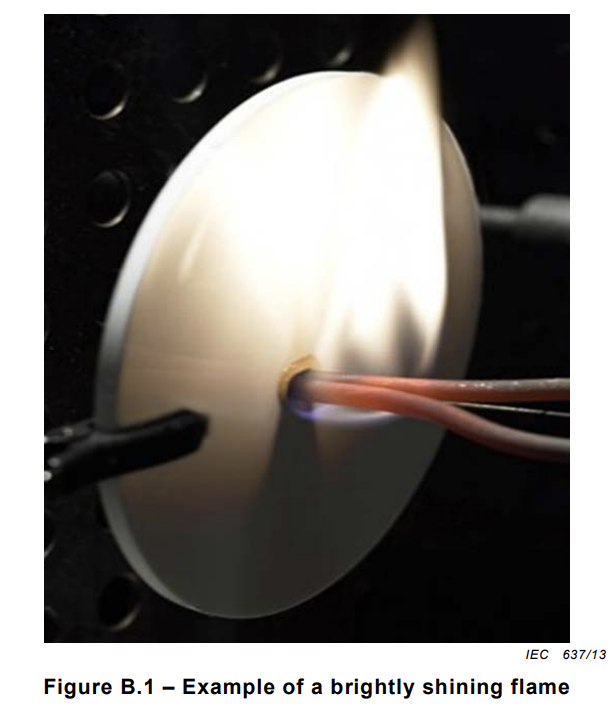
a) A flame observed directly at the test specimen (see Figure B.1) shall be judged a clear indication of ignition. Some materials show a pale flame instead of bright shiny flame.
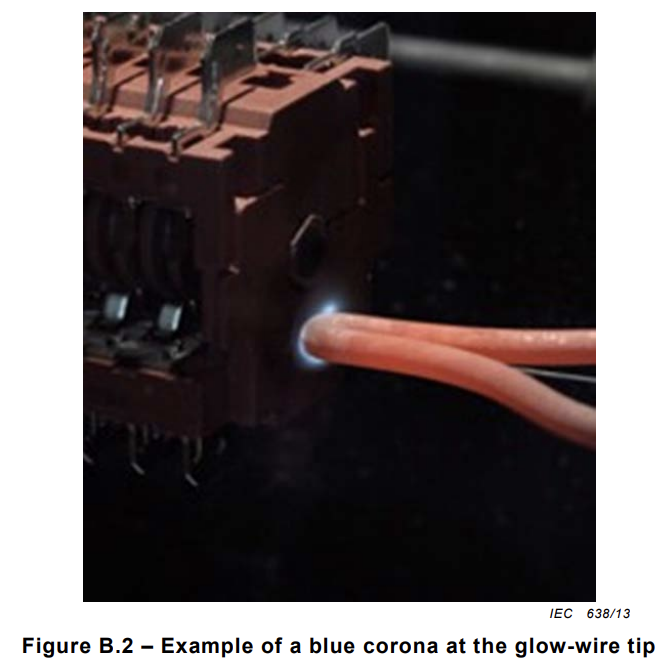
b) Sometimes a circular corona can be observed around the tip of the glow wire (see Figure B.2). This corona consists of ionized gas, predominantly blue in colour and is located in the immediate vicinity of the glow wire. This phenomenon shall not be judged to be ignition of the test specimen, as long as it does not lead to an ignition of the test specimen according to a).
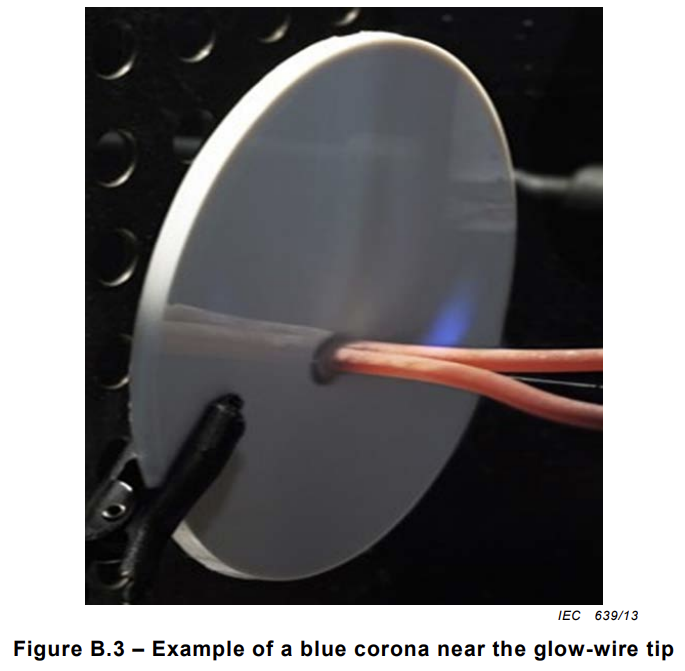
c) Ionized gases can sometimes be noticed along the glow wire (see Figure B.3). This phenomenon shall not be judged to be ignition of the test specimen, as long as it does not lead to an ignition of the test specimen according to a).
B.2 Examples of ignition and non-ignition
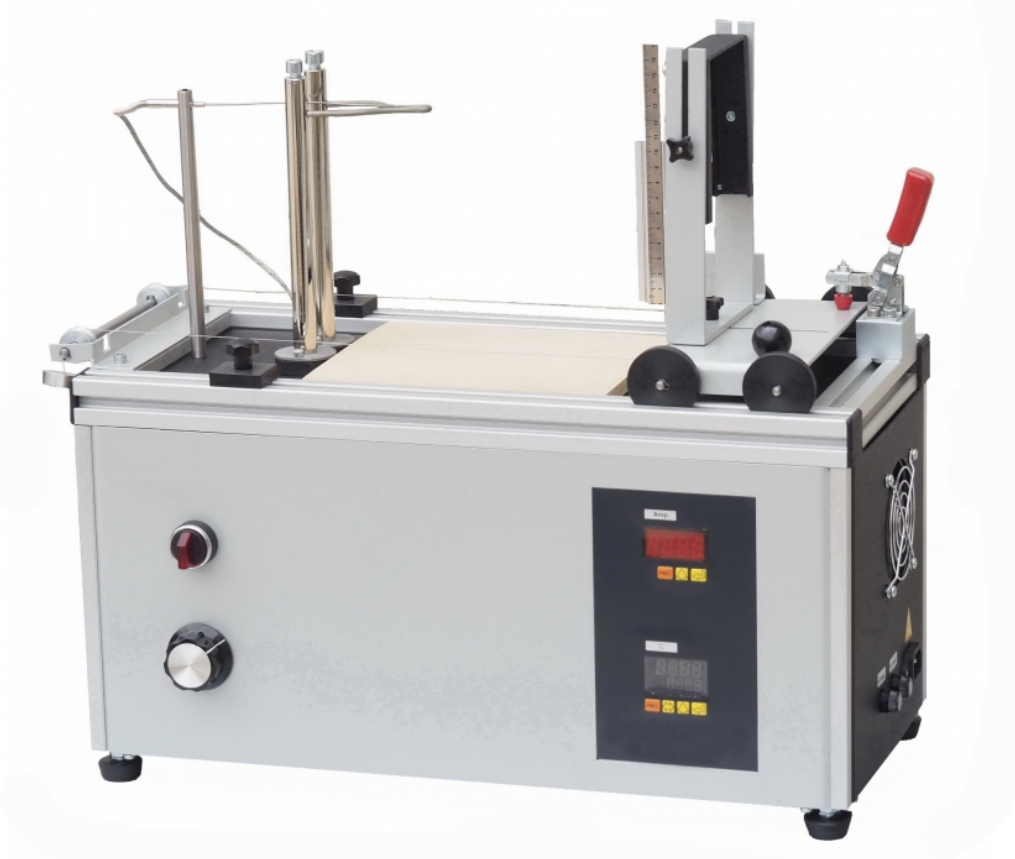
Glow Wire Tester
According to:
It is constructed in compliance with IEC 60695-2-10:2013, IEC 60950-1, IEC 60335-1, IEC 60884-1, IEC 60238, IEC 60695-2-11, IEC 60695-2-12, IEC 60745-1, IEC 60400, IEC 60730- 1, IEC 60598-1, IEC 61050, IEC 60320-1, IEC 61058-1, IEC 60742, IEC 60669-1, UL 746A, BS EN 60695-2-1, BS 6458, NF C20-921-1.
Main Features
- Fully automatic, motorized forward & reverse motion of carriage with test specimen
- Dual speed – both speeds adjustable – rate of approach is reduced before contact (adjustable position of speed reduction)
- Microprocessor controlled regulator – power supply stabilizer
- A-meter which indicates a true rms value with a maximum error of 1,0 %
- Wire loop (> 77 % Ni/20 ± 1 % Cr), 4,00 mm ± 0,07 mm (before bending), shaped as specified in standard, mirror polished tip to enable easier cleaning, hole dia. 1,1 mm. Wire loop is hard soldered to connection discs and easy user replaceable. Each loop is engraved with its serial number to enable its traceability/calibration.
- Each glow wire loop is pre-annealed in protective atmosphere for more than 10 h.
- Timer that automatically starts when the sample contacts the wire loop and triggers the reverse motion of carriage after set time (30 seconds)
- Precise temperature adjustment in two ranges – 10 turn numeric potentiometer (0-999)
- Thermocouple type K, class 1 (see IEC 60584-2), mineral-insulated, metal-sheathed, fine-wire with an insulated junction, outside diameter 1 mm, Metal sheath resistant to 1000 deg. C.
- Mirror polished stainless surface, on which wooden board with wrapping tissue is positioned, enables easy cleaning of burned plastic and other burning residues
- Micro-controller based thermometer with ambient temperature compensation, short circuit protection, thermocouple breakage protection and overheating protection.
- Adjustable penetration limiter
- Penetration scale with slider, for reading penetration depth
- Carriage with 4 wheels with precise stainless steel ball bearings, moving on 2 tracks, preloaded with force of 0,95 N when sample is in contact with wire loop.
- On the carriage is mounted perforated stainless steel specimen support that enables precise sample positioning (4 adjustments)
- Precision scale for measuring flame height
- 200 pcs. paper – wrapping tissue, as specified in 6.86 of ISO 4046
Mechanical Unit
Mechanism with wire loop, thermocouple and motor drive is located on the cover of electric unit. Heating transformer and current transformer are mounted on the bottom side of the cover, so that complete cover is easy removable. Carriage with sample mounting support is so designed that it can be easily removed from the guiding tracks. All regulating elements of the mechanism are equipped with handle-screws to enable easy operation. Wire loop and thermocouple are easily exchangeable. Apparatus also has scales for depth of penetration and flame height reading with zero point adjustments.
Protection
The apparatus is protected against overheating, short circuits, and break-off in the circuit. The thermometer is built with three limit comparators, the first of which is used to protect against temperatures that are too high, which could shorten the lifetime of the thermocouple. It switches off the heating of the glow wire at a temperature of 1000C, which is 40C over max. the temperature that is requested by standard (960C).
In case of a short circuit, the processor detects irregular conditions and turns the heating off.
Technical Specification
Power supply 230(120)V ±10%, 50(60)Hz ±2Hz (Other optional)
Temperature adjustment 370C-1000C in two ranges
PID Temperature control system
Thermocouple Ni-Cr-Ni Type K, dia. 1 mm; -200⎯1150C
Thermometer digital programmable, accuracy ±0.2%, -200⎯1000C
A-meter digital A-meter 150 A RMS
Dimensions W x D x H: 550 x 380 x 490 mm, Weight: 20 kg
Accessories (Included in price)
1 pcs. wire loop for glow wire test apparatus for thermocouple Dia. 1 mm – mirror polished tip for easier cleaning – annealed for 10 hours
1 pcs. thermocouple Dia. 1 mm for glow wire test apparatus
1 pcs. Timing device with a resolution better than 0,2 s
1 pcs. Mirror polished stainless steel plate that enables easy cleaning of possible burned plastic remains
1 pcs. Flat smooth wooden board, having a minimum thickness of 10 mm
200 pcs. Paper-wrapping tissue, as specified in 6.86 of ISO 4046

