
1.Important hints
Before the operation please read this consumers’ handbook carefully in order to use the apparatus correctly and avoid the injury of the person and the damage of the apparatus. The apparatus can only be operated by the professional men according to the consumers’ handbook. The apparatus can only, be repaired by the professional maintenance workers. The apparatus must not be allowed to use for the other purposes. In order to develop and improve our products continuously, we may alter the technical parameters of the products without further notice.
2 Operating procedure of apparatus
2.1 transportation and placement
- The microtome must be erectly transported.
- It is not allowed to clutch the handwheel, tool carrier, specimen clamp or adjusting knob of the slice thickness when miving the apparatus!
- 2.2 operation
- When you use the microtome knife it must be very careful, for its cutting edge is very sharp, if you misoperate it, it will lead to the serious injury and therdfore you may not catch the falling microtome knife with your hand(s) in any case.
- Don’t put the microtome knife any where carelessly, especially make the cutting edge of the microtome knife be upward put, the microtome knife which is not in use should always be preserved in the knife case.
- You should clamp the specimen tightly first, and then fix the knife!
- You must lock the handwheel first in operating the microtome knife and the specimen or in the work internal every time.
- 2.3 cleaning
- Before cleaning the apparatus lock the handwheel first!
- You must not use the solvent that contains acetone and benzene for cleaning the apparatus.
- In using the cleanser you must observe the safe regulations of its manufacturer and the relevant rules and regulations of the laboratory!
- 2.4maintenance
- Only the professional maintenance workers are allowed to overhaul the apparatus!
3.Summary
The microtom is mainly used for the tissue slice and the pathological section of the animal and plant in the research institutes, universities and colleges, hospitals and laboratories. Provided with the semiconductor-refrigerating mains it can quickly refrigerate the slices. It has the advantages of the rational structures, high precision, long service life and being easy to operate etc.
4.Technical parameters
- environmental temperature of using apparatus +5 to +40℃
- slice thickness 1 to 25μm
- adjustment of slice thickness 1μm
- horizontal feeding 35mm
- vertical feeding 46mm
- maximal area of slicing 25×35mm
- sizes 350(L) ×350(W) ×270(H)mm
- weight 26kg
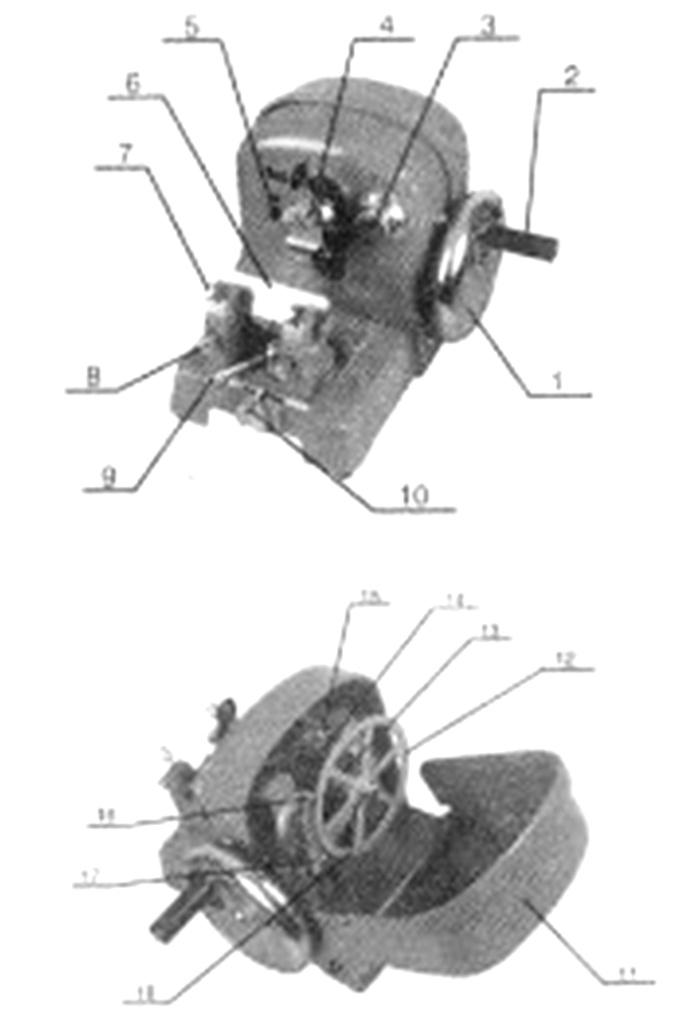
5.Illustrations of apparatus
1.handwheel 2. handle of handwheel 3. adjuster of thickness 4. wax-lump forceps 5. screw of adjusting was-lump angle 6. microtome knife 7. screw to tighten 8. rear angle bolt to tighten 9.handle of fixing tool carrier 10. spacing bolt 11. rear casing 12.handle of advance and retreat of ratchet slicing 16.bracing tooth 17.clutch of bracing tooth 18.ratchet
6.Usual operating of apparatus
6.1 installation
Warning: It is not allowed to clutch the handwheel, tool carrier, wax-lump forceps or adjusting knob of the slice thickness when moving the apparatus!
The place which will be used for placing the apparatus must satisfy the following conditions:
- The experiment table is firm and there is no vibrance.
- There is no vibrance of the guound.
- There should be a capacious and comfortable space for operating the apparatus.
- You should keep the room temperature between 5~40℃
6.2 fixing of specimen
Warning: You should clamp the specimen tightly first, then fix the knife!
You must lock the handwheel first in operating the microtome knife and the specimen or in the work interval every time!
- turn over backward and open the rear cover(11).
- Turn the handwheel till the big pulling plate(14) is hoisted to the highest position, then screw the gripper of stopping slicing(15) to lock the handwheel and the wax-lump forceps(4) in order to prevent its falling.
- Turn the gripping handle on the wax-lump forceps(4) to Adjust the mouth size of the wax-lump forceps(4)
- Place the specimen at the expected position.
- Turn the gripping handle on the wax-lump forceps(4)grip the specimen.
- Loose the locking bolt of the wax-lump forceps, adjust the surface of the griped specimen.
- Tight the locking bolt of the wax-lump forceps to lock the specimon clamp.
6.3 installation of microtome knife
Warning: When you use the microtome knife it is must be very careful, for its cutting edge is very sharp, if you misoperate it, it will lead to the serious injury!
- Turn the two left and right tightening screws(7)of the microtome knife counter-clockwise to withdraw it from.
- Turn and loose the two locking bolts(8)of the left and right of the rear angle.
- Hold the back of the microtome knife, making the cutting edge up, carefully inserting it into the tool carrier from the side direetion.
- Turn the tightening screw(7) of the microtome knife clockwise, evenly support the microtome knife and be not tight-ened first.
- Forwards and backwards move and turn the tightening scrw(7) of the microtome knife, and adjust the rear angle of the microtome till the expected position(between 0-10 degrees of the tool carrier angles).
- Clockwise turn the tightening screw(7) of the microtome knife and evenly tighten the microtome knife.
- Clockwise turn the locking bolt(8) to tighten to the rear angle.
6.4 rough slicing pieces
- Screw the gripper of stopping slicing(15) and loose the wax-lump forceps(4), turn the handwheel to fall the specimen till the corresponding position with the microtome knife.
- Loose the handle of fixing the tool carrier(9), move the tool carrier and make the cutting edge close to the specimen, and then lock the handle of fixing the tool carrier(9).
- Turn the clutch of bracing tooth(17) and make the bracing tooth(16) be out the ratchet(18).
- Turn the ratchet round to move the specimen, carfully adjust the specimen till it meets with the microtome knife exactly. At the same time turn the handwheel to make the specimen move up and down, and watch the distance of the specimen to the cutting edge, simultaneously trim the specimen wax-lump levelly.
- Turn the handwheel to make the specimen move to the highest position, turn the clutch of bracing tooth(17) to make the bracing tooth(16)coincide with the ratchet(18).
- Turn the adjuster of thickness(3) till the thicker degree(such as 20μm ), turn the handwheel round to try slicing the specimen till the expected specimen surface.
Promptings: After loosing the handle of fixing the tool
The forward and backward movings can move the tool carrier to the right slicing position, and the movings towards the left and right can make the whole length of the cutting edge of the blade be fully utilized and unnecessary to adjust the other positions of the blade.
6.5 slicing
- Through turning the adjuster of thickness(3), adjust the slice thickness to the expected value.
- Evenly turn the handwheel to slice.
- Take the slices to lproduce the specimens.
Attention; You should turn the handwheel evenly, and the velocity of the turning must fit in with the hardness of the specimen, when you slice the harder specimen, it should be slower.
6.6 ending of daily works
- Turn the handwheel till the wax-lump forceps(4) is hoisted to the highest position, screw the gripper of stopping slicing(15) to lock the handwheel and the wax-lump forceps(4).
- Take the microtome knife from the tool carrier and place it into the knife case.
- Take the specimen from the wax-lump forceps(4).
- Clear ulp the scraps of the slices.
- Clean the apparatus (see the 7th chapter”Cleaning”.
- Cover the rear cover(11).
Warning: When you use the mivrotome knife it must be very careful, for its cutting edge is very sharp, if you misoperate it, it will lead to the serious injury and therefore you may not catch the falling microtome knife with your hand(s) in any case.
Don’t put the microtome knife anywhere carelessly, especially make the cutting edge of the microtome knife be upward put, the microtome knife which is not in use should always be preserved in the knife case! You must lock the handwheel first in operating the microtome knife and the specimen or in the work interval every time.
7.Cleaning
Warning; Before the cleaning of the apparatus lock the handwheel first!
You must not use the solvent that contains acetone and benzene to clean the apparatus!
- Lock the handwheel.
- Brush off the scraps of the slices with a dry brush.
- Clean the apparatus with a damp rag (slightly moist with cleanser).
8.Discernments and removing of troubles
Phenomena that may arise with the microatome, causes and removing
| phenomena | causes | removing |
| The thicknesses of the slices are not even. The slices are sometimes thin, when serious even the slices can not be produced at all. | The inclination angle of the microtome knife is not right, namely the rear angle is too small.The firmness of the locking of the waxlump forceps and tool carrier is not enough. The knife is blunt. | Make the rear angle bigger. Try slicing enlarging the rear angle step by step. Check up on all of the screws of the system of gripping the specimen and the tool carrier whether or not they screw home. Use another section of the cutting edge or change the microtome knife. |
| The slices are compressed. The slices are seriously compressed, crumpled or pressed each other. | The knife is blunt. The specimen is too hot. The rear angle is too big. The velocity of slicing is too big. | Use another section of the cutting edge or change the microtome knife. Cool the slpecimen on the cold table. Try slicing reducing the rear angle step by step till the right rear angle is found. Slowerly turn the handwheel. |
| When slicing the hard specimen the microtome knife squeaks. There are the scars or vibration marks on the slices. | The velocity of slicing is too big. The rear angle is too big. The firmness of locking of the waxlumlp forcepls or tool carrier is not enough. | Slowerly turn the handwheel. Try slicing reducing the rear angle stelp by step till the right rear angle is found. Check up on all of the screws of the system of grilpping the specimen and the tool carrier whether or not they screw home. |
| The specimen can not ve fed, naturally there are no slices to be produced | The specimen has got to the limit lposition at the front end. | Turn the ratchet to make the specimen draw back. |
9.Maintenances
- Before the first operation of this microtome you must wipe down the rust-proof oil ooutside on the microtome.
- Any parts of the microtome must not be disassembled at will. When the microtome is not in use, you should keep the microtome in the wooden case.
- Clean the microtome one time everyday.
- Lubricate the various mobile parts with the lubricating oil appropriate for the precision instrument every month:
–screw rod and its nut
–ratchet, bracing tooth and clutch of bracing tooth
–various mibile slides
various adjusting parts on the tool carrier
Warning : only the peofessional maintenance workers are allowed to overhaul the apparatus!
10.Sharpening of the cutting edge of the microtome knife
The quality of the slices is closely linked with the sharpness of the microtome knife. If the microtome knife is blunt or with the notches on it, it will lead to slices broken, incomplete, wrinkled or unevenness .
10.1 ways of the sharpening
Generally there are two sharpening, that is to sharpen it on a sharpener. The other is hand sharpening – to make it keen on a sharpening stone by hands. There are some sorts of sharpening stones – natural oil stone, artificial oil stone, fine blue stone, inkstone fineness, adequate hardness, with no grain of sand, or any other solid grain.
10.2 Steps to sharpen the blade:
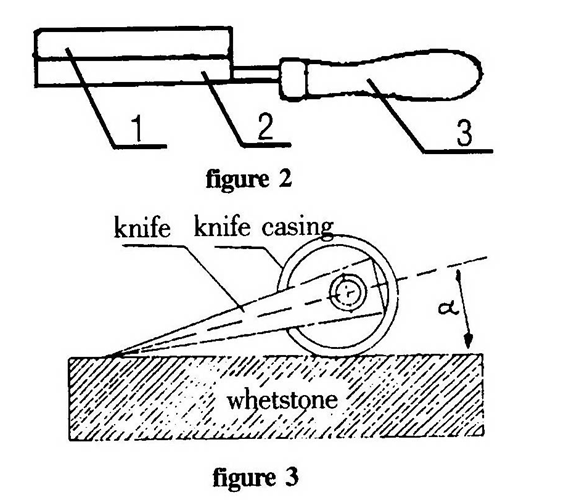
- As showed in illustration 2: Fasten the screw on one end of handle(3) into a screw hole of the blade, it is for the worker to choose the hole he prefers.
- Insert the back lpart of the slicing blade(1) into the blade shell(2).
- Clean dust, dirt and otheer stuffs off the blade.
- Coat over the sharpening stone with spindle oil or pararfin oil, then put the blade on the sharpening stone with an angle a (fig,3) between the blade edge and the stone. To guarantee that the angle a for the first sharpening equals to any angle a for its later sharpening, a definite blade shell should be used for a definite blade only.
- With your right hand holding the handle, your left hand holds the blade shell and moves the blade edge to and fro on the stone. Make it a point that all parts on the edge are sharpened. When your push the blade on one of the two sides, you should pull it back on its other side so that both sides of the blade get fair chances for sharpening. Go on working this way until the edge is well adapted to cut. To test its sharpness, you may touch the edge with your finger. When you feel that your finger is on a line of very small needle points, it hints that the edge is keen enough for slicing.
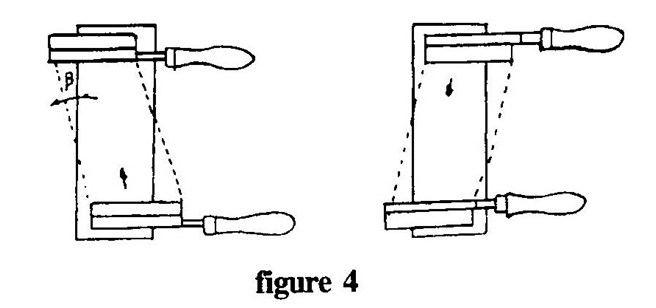
- In the course of sharpening, rough sharpening as well as fine sharpening may be done on two different stones. If the stone is not big enough, you may put the blade against the stone to form an angle β, as on fig, 4, and sharpening can be done along angleβ. When you push the blade forward then pull it back ward, not only you should turn the blade over, but should move the blade crosswise, so that the edge as a whole is sharpened.
- Examine the edge of sharpened blade under a one hunderd-fold microscope, it is in good quantity if is bright and smooth along the edge without any notch or rough spot.
- When the slicing blade is not very keen after some cutting, you may sharpen it on a piece of fine leather. However, there is no other way to sharpen a dull blaed except on a sharpening stone.
- Take off the blade shell(2) and handle(3) and make them cleam for further use.
- After sharpening, coat over the slicing blade with antirust greaes, then lput it into the blade box for further use.
11.Appendices
11.1 changes of products
- In order to develop and improve our products continuously, we may alter the technical parameters of the products without further notice.
11.2 guarantee
- Within a year after the date of production and without the factors created by men if the unusable cases arise, our factory will be responsible for the vepair or free exchange. In addition, we repair our products long- termly.
11.3 accessories of the microtome
| Name | Unit | Quantity |
| 1.microtome knife | piece | 1 |
| 2.knife case | piece | 1 |
| 3.knife handle | piece | 1 |
| 4.lubricationg oil | bottle | 1 |
| 5.consumers’book | Copy | 1 |
| 6.certificate of quality | Copy | 1 |