

Q1- Pressure is fluctuating in two of the lines. The set pressure was 6.4 bar, and the pressure on the graph was between 6 and 7 bar.
A- Actually, when a line pressure is reached to the set pressure and the pressure is in the range of [Set+-0.2] or [Set+-0.4], depending on the model of the machine, the pump needs to be stopped. When the pump is working continuously in one line, there are 4 main reasons that need to be checked:
1- Sample assembly has leakage. Leaks on the sample itself, or leaks on the end caps of the sample.
2- There is leaks in the downstream , including fittings, hoses, ….
3- Pressure inside the accumulator is higher than the working pressure defined for that line. The working pressure you decide for a specific line of the machine needs to be higher than the air pressure inside the accumulator. When the air pressure is set higher than the minimum working pressure of the line, you may have fluctuations in the pressure adjustment.
In this case, the sample assembly has leakage.
Q2- Pressure in one line dropped from the set pressure, and some of the lines were stopped automatically.
A- When a line stops automatically, there are 2 main reasons. First, pressure dropped in the sample for any reason, and the pump is not capable of raising the pressure to the set value, and it stops the line for the safety of the pump. This situation happens in case of the main water line being cut off from the pump, or leakage of the sample in such a way that the pump can not compensate for the leak value within the maximum definite time in the settings page.
After we studied the case, there was less water in the supply water tank of the machine. IT causes the pump to soak air inside it, and the operator needs to deair the pump again for it to work properly.
Q3- Set pressure on the line was 6.4 while the pressure has over shoot around 3 or 4 bars.
A- We checked the line and understood that the accumulator air pressure was zero. It means that it does not function in the line. Meaning, when the pump is working to raise the pressure inside samples, especially when they are small, you will have pressure shocks inside the sample.
You need to set the air pressure inside the accumulator to a level below the minimum working pressure of that line. For the emergency we had and no time for air charging to accumulator, we solved the issue as instructed below:
1- Reduced the pump rpm to a lower value, like 10 or even less. This makes the pump work with low speed to have charging low flow of water to sample for fine adjustment of the pressure.
2- Reduced the steel manual needle valve of the charging line to have less flow of water to the sample pieces to be able to adjust the pressure finely.
3- The Operator needs to have a pressure charging kit for the accumulator to set the proper pressure level inside the accumulator.
Problems for the above 3 main questions were solved with the above recommendations.
Q4- How we can charge accumulator air or N2 pressure for our range of pressure application
For this specific case, where the minimum working pressure of the machine is 6.4 bar, the accumulator’s pressure needs to be less than this value. maybe 5 or 6 bar is OK. When the machine is shipping to the customer, air pressure inside the accumulators is around 20 or 30 bar. The operator can easily open the end Allen bolt slowly and reduce the pressure to about 6 or 5 bar. When adjusting this air pressure inside the accumulator, the line needs to be free of sample pieces. When you do this pressure adjustment without removing sample piece from the line, you may release all pressure inside the accumulator and it will be free of pressure, and you need to charge it again.
For charging the accumulator, you can use N2 balloon gas, or if the pressure is low, in this case, maybe 6 bar, you can use the compressed air line of the factory. The connection fitting to the accumulator is a 28*1.5mm male thread. The standard accumulator charging kits have always had this connection. When you are buying this kit, be careful to have this connection on the pack.
Important note: When you don’t have proper pressure inside the accumulator, you need to reduce the charging side manual steel needle valve to a tiny opening, like 1 or 2 degrees, to reduce the water flow inside the sample piece. This will guarantee the precise adjustment of pressure without any overshoot.
For small-sized of pipes and fittings, you also need to reduce the pump speed to about 5 or 6 on the display of the frequency inverter.
Video for how to charge accumulator is below link:
For the second day of machine checking, we recognized a leak from a fitting for one of the lines. Also recognized leak from sample assembly for the other line and stopped that specific line.
Other lines are going on stable.
Also, the tank needs to be connected to a tapped water line with a filter to always have water inside the tank. The operator may forget to fill it manually.
3rd Day Check Out With Samples
For 3rd day we did sample checking on all lines in the morning. all lines were working fine.
Also front panel of the software is updated as per customer request to 2 decimal point of pressure display and setting of pressure.
5 Samples prepared for the evening online meeting. all 5 samples mounted on lines 1, 2,3,4,7.
Pressure adjustments of all lines were perfect. samples on lines 1,2,7 were free of any leakage. The pressure graph and pressure adjustment were perfect. Pressure goes up to 6.4 bar, and they were going very stable without any fluctuations.
On samples of lines 3,4, there was tiny leakage (recognized from the pressure graph) on the sample assembly or downstream. need to check the leakage in the morning and start them again.
4th Day Check Out With Samples
The team prepared 8 samples for testing. We started all lines.
The IT man was with the computer. Unfortunately, he reset the laptop to factory settings. We installed the software again.
The samples had been put inside the tank.
lines 1,2,3,4,6,7,8 work perfectly without any fluctuation. pressure lines are going stable.
Line 5 seems to have a small leak somewhere (it is clear from the pressure graph). We swapped the sample assembly with another pressure line, and it went well. This means the leak is not related to the sample assembly. We need to check the piping and hoses of the inside machine, the tank, and the connecting hoses between the pressure unit and the water tank.
Also need to consider that, accumulators of lines 4 and 5 are free of pressure and need to be charged.
Proposals:
As I understood, for the night, there is no one in the laboratory. At least you need to have remote internet connection to PC using Supremo (you can have an account for the Supremo connection), someone can connect and check if everything is going well or not. Supremo also provides service of mobile app for such applications (even no need for a PC on the remote side).
For the first weeks of the machine running, we can provide this service online, checking free of charge.
Be sure the electricity will never shut down during running of the machine.
When the electricity shuts down, and logging of the laptop is stopped. The machine solenoid valves for each line are in closed mode, and pressure will still remain inside the samples. When you come to the machine and start it again, you can start logging. the logging will continue, and no need to start the sample from the beginning. Pressure data with time stamps will be saved in files in the root of “C:\\HYDRO TEST”. You can easily have access to them using MS EXCEL.
27-28/5/2025 solid dirt on solenoid valve of line 4
Solid dirt cause space between solenoid valve piston and the seat. there is polymer piece on solenoid valve piston that touches the seat of the valve and cause shut off of the valve. When solid dirt coming into the valve cause it to be opened all the time and there is leak on it even the command is close command. It cause pressure fluctuations on the line all the time. Meaning pressure raising by the pump and valve is cliosed from the PLC, while it is not close and there is leak from the solenoid valve. the pressure graph will be flucturating all the time. The graph will be line below:

The operator needs to open the piston of solenoid valve on both sides of the charge and discharge and clean it. It is an easy process.
6/5/2025 Lines Running stable
Reports on Stations 1-8


The main important parameters for stable running as a brief:
- Filtered, clean, soft water
- The computer needs to be on all the time. Electricity need not be cut off.
- All firewall and security software that causes Windows to stop working, including those that block hardware and ports, as well as SQL, needs to be shut down. It seems the software is a virus and stops it from working.
- Samples need to be free of any leakage. Even tiny bleeding on sample assembly causes the fluctuation of pressure, and the pump works all the time. Operator need to check few hours after assembly to be sure there is not any leakage.
Last day 7/8/2025 Samples Passed 1000 hours of Test and We stopped the Lines (Total of 7 Lines Were Running from 5/22/2025)
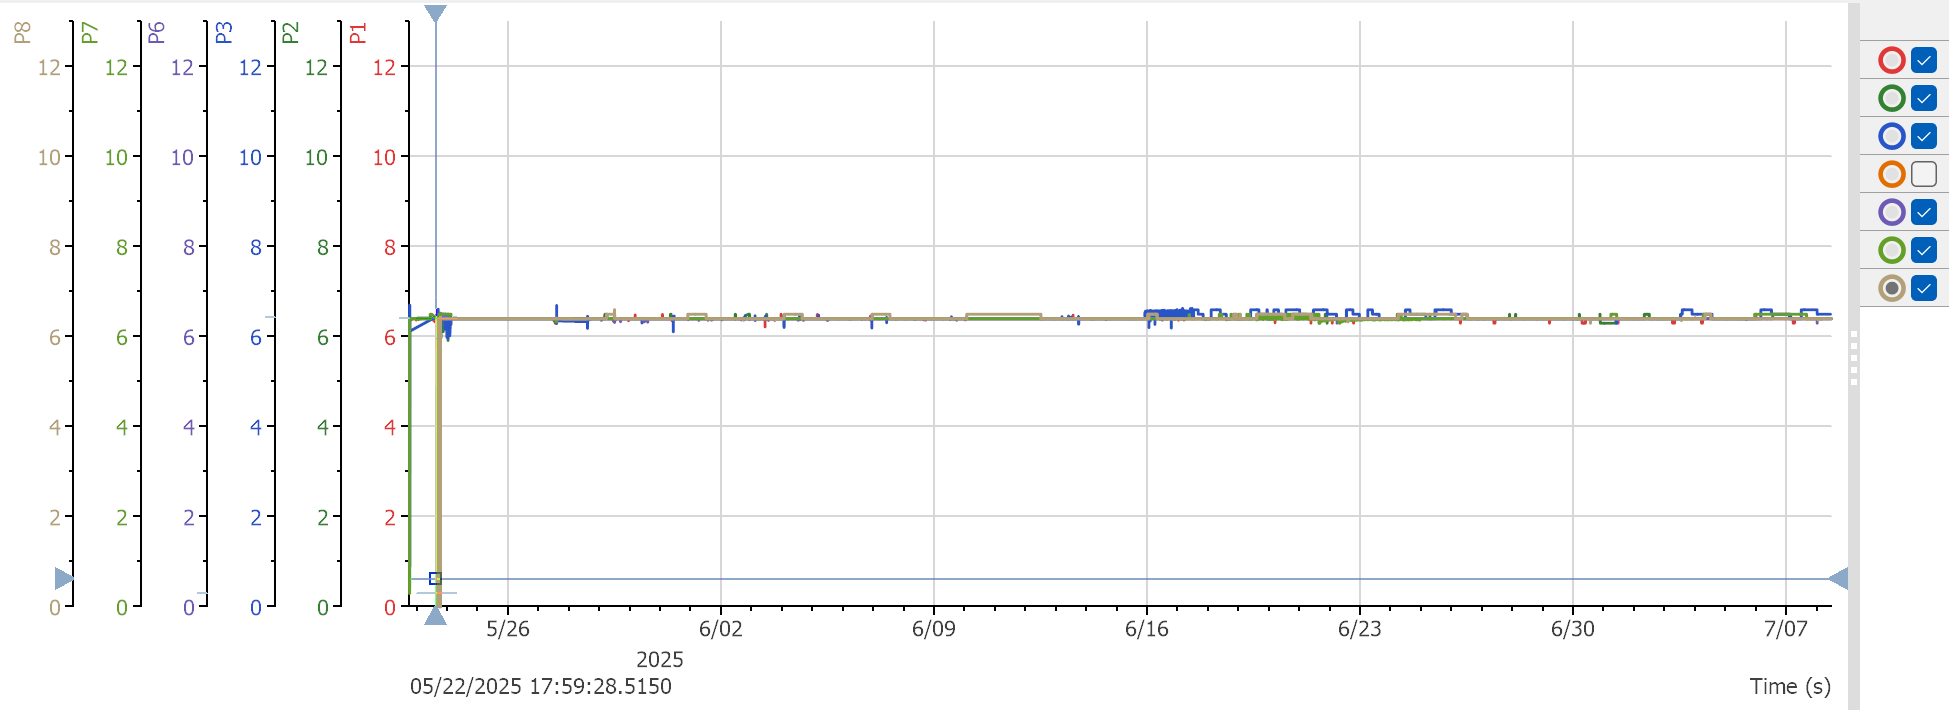
Lines 1, 2, 3, 6, 7, 8 were perfect in the pressure graph as above
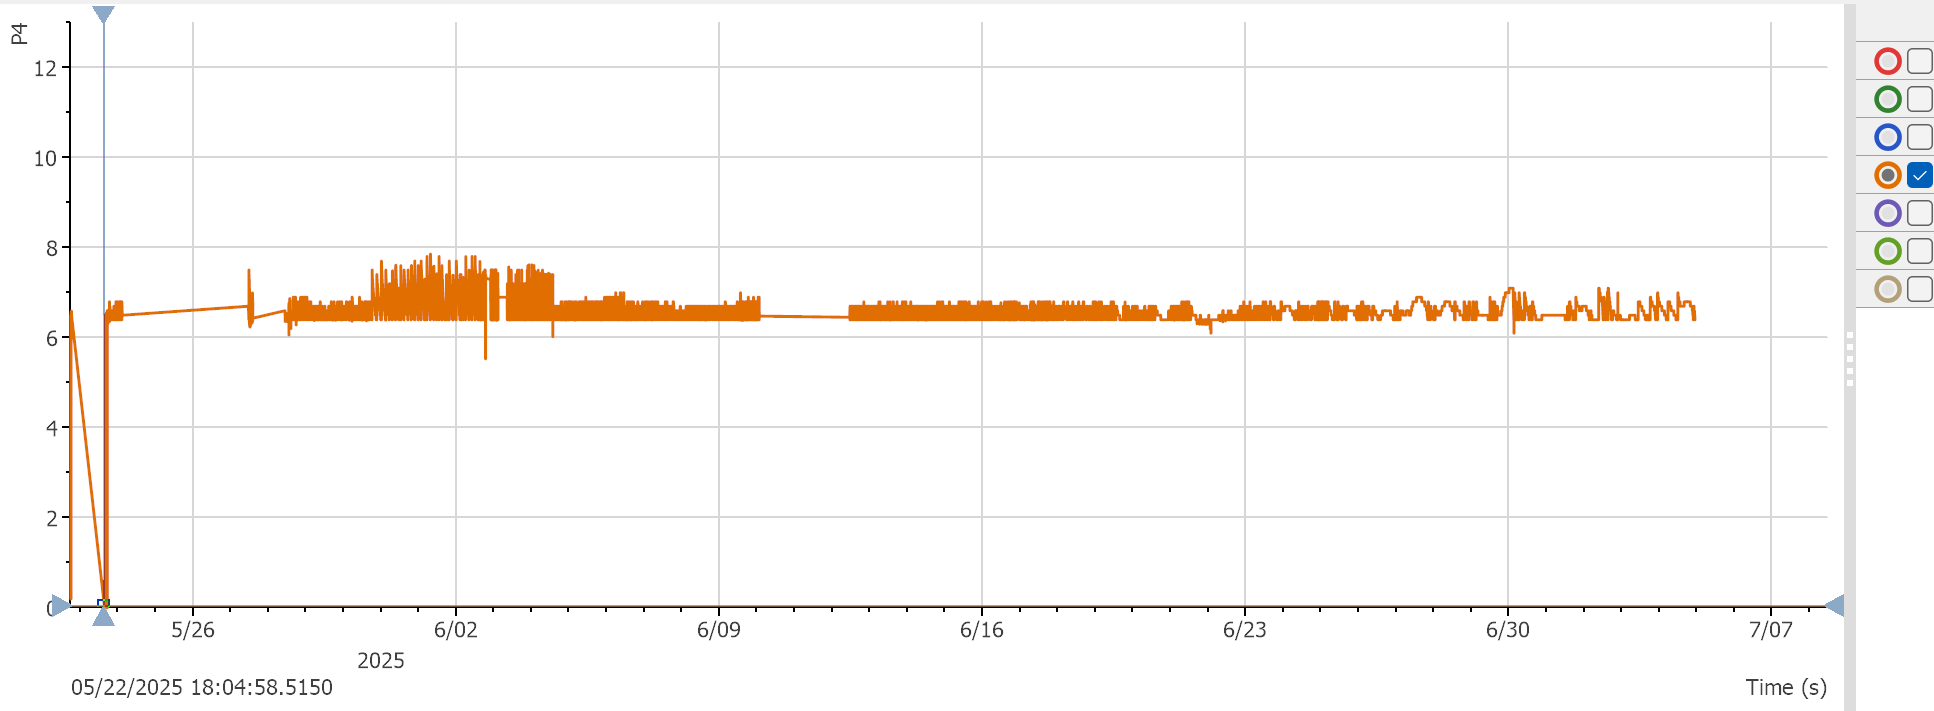
Line No.4 had some out-of-range pressure in some time periods. When a line pressure shows fluctuation during a test, it means that there is absolutely tiny leakage somewhere on the sample piece, in the pressure lines of the machine, or inside the water tank. The operator needs to be concerned about such circumstances and check all leaks, even tiny ones.
This was all done successfully on a trial run of the machine for a period of 1000 hours testing for the first set of sample pieces. ,
For any assistance, please call on WhatsApp hotline: +905469180483