General Methods
5.1 Except as otherwise specified in these test methods for rubber O-rings, the following ASTM test methods applicable in general to vulcanized rubber, shall be complied with as required and are hereby made a part of these test methods:
5.1.1 Tension Test—Test Methods D 412.
5.1.2 Compression Set—Test Methods D 395.
5.1.3 Low Temperature—Test Method D 1329.
5.1.4 Density—Test Methods D 297.
5.1.5 Fluid Aging—Test Method D 471.
5.1.6 Heat Aging—Test Methods D 865 and D 573.
5.1.7 Hardness—Test Methods D 2240 and D 1415.
5.2 In case of conflict between the provisions of these test methods and those of detailed procedures herein, the latter shall take precedence.
7 Dimensional Measurements
7.1 Thickness:
7.1.1 The thickness or cross section may be measured by one of the following methods: (a) a hand micrometer equipped with 6-mm (0.25-in.) diameter hemispherical tips (ballpoint or tubing micrometers), (b) dial indicators that have a maximum contact force of 0.29 N (29 gf), or (c) an electronic micrometer with a spring force of 0.1 N (10 gf) maximum. Better accuracy can be obtained with a 0.05-N (5-gf) spring or with no spring. In case of referee tests, both laboratories shall use the same spring force.
7.1.2 The O-ring specimen shall be measured at four points equally distributed around the circumference in both the radial and axial direction. An average reading shall be used for calculation.
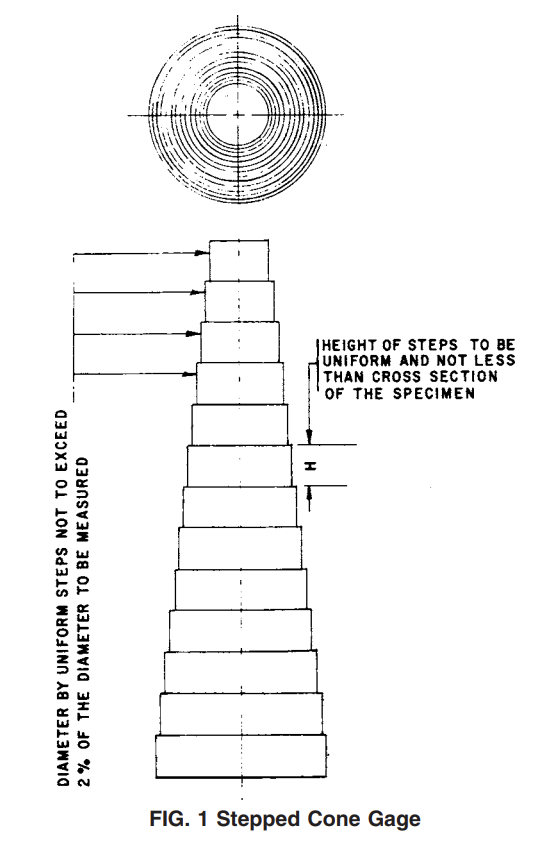
7.2 Diameter—A stepped cone or optical comparator may be used for measuring the inside diameter of small rings. The diametric intervals of the stepped cone shall not exceed 2 % of the diameter to be measured (see Fig. 1).
8 Tension Testing
8.1 Testing Machine— The testing machine shall conform to the requirements specified in Section 3 of Test Methods D 412, with the exception of the grips. Grips for testing rings shall consist of ball-bearing spools at least 9 mm (0.35 in.) in diameter, and be capable of being brought within 19 mm (0.75 in.) center-to-center distance at closest approach. Stresses within the specimen shall be minimized by (1) rotating one spool one full revolution for each 150 mm (6.0 in.) of travel of the power-driven grips or (2) lubricating the contact surface of the spools with castor oil. Grips for testing straight specimens may be of any type provided breaks do not occur in a portion of the specimen that has been at any time in contact with the grips. For specimens smaller than 25 mm (1 in.) in inside diameter, spools of smaller diameter and closer approach may be employed.
8.2 Test Specimen:
8.2.1 The test specimen shall consist of an entire O-ring except in the following cases: (1) when the diameter is too large to permit a break within the limits of travel of the testing machine, (2) when the specimen has been previously cut open to permit an aging test, and (3) when the specimen is unaged but is to be compared with an aged specimen as described in (2). For these cases a specimen cut from a ring shall be employed.
8.2.2 Specimens that exhibit obvious flaws at any point on the surface, such as might result from imperfect molding or flash removal, shall not be tested.
8.3 Procedure for Determination of Tensile Strength, Ultimate Elongation, and Tensile Stress:
8.3.1 Bring the grips close enough together so the specimen can be installed without stretching. Set the machine for a speed of 500 +- 50 mm (20 +- 2 in.)/min, set the chart recorder, and engage the clutch. (If a recorder is not used, note the spool center-to-center distance continually by means of a suitable scale). The stressed inside circumference, L, is equal to twice the distance between spools plus the circumference of one spool. Record the breaking force value, F, at the elongation specified for tensile stress and at the time of rupture. Measure the center-to-center distance between the spools at rupture to the nearest 2.5 mm (0.1 in.) and record as the value for D. 8.3.2 For the application of bench marks to segmented specimens as described in 8.2, hold the piece as straight as possible being careful not to apply excessive stress. Follow the procedure described in 8.3.1. Discard results for any specimen that breaks at a point that has at any time contacted the grip, and test an additional specimen. A suitable extensiometer may be employed for elongation determination.
8.4 Calculations:
8.4.1 Tensile Strength— Calculate the tensile strength as follows:
8.4.1.1 For O-rings on spool grips:
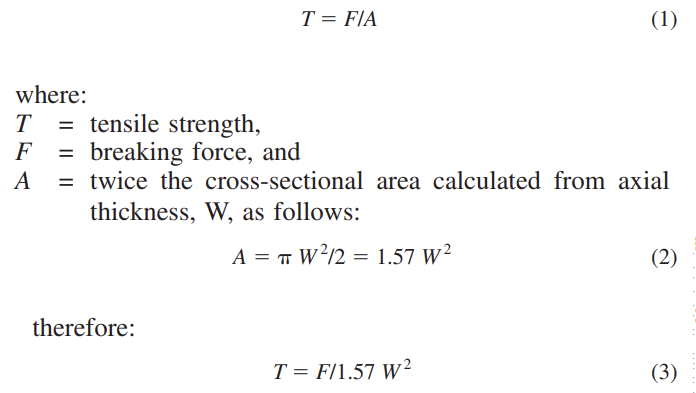
8.4.1.2 For straight or single-strand specimens:

8.4.2 Ultimate Elongation—Calculate the ultimate elongation as follows:
8.4.2.1 For rings:

where:
L = observed distance between bench marks of stressed
specimen, and
Lo = original distance between bench marks.
8.4.3 Tensile Stress— Calculate the tensile stress as in the case of tensile strength except the stress is reported at a predetermined elongation below the ultimate elongation. Calculate the center-to-center distance of the spool grips, D, where the prescribed elongation, E, occurs, as follows:

NOTE 1—This value of tensile stress at a predetermined elongation is based upon inside circumference and differs from that determined by Test Methods D 412, which is based on the mean circumference.
8.5 Characteristics of Sample Tested—The median of the values for three specimens shall be taken as the characteristics of the sample tested, except that under the following conditions the median of the values for five specimens (two additional) shall be used:
8.5.1 If one or more values do not meet the specified requirements when testing for compliance with specifications.
8.5.2 If referee tests are being made.
8.6 Report:
8.6.1 The report shall include the following:
8.6.1.1 Results calculated as in 8.4,
8.6.1.2 Date of test,
8.6.1.3 Temperature of test room if other than provided for in Section 6,
8.6.1.4 Type of testing machine used, including diameter of spool grip if other than standard, and speed, if other than 8.3+- 0.8 mm (20.0 +- 2 in.)/min, and
8.6.1.5 Type of specimen (ring or straight).
9 Tension Set Test
9.1 Procedure:
9.1.1 Stretch the O-ring specimens to 100 % elongation and hold at this strain for 10 min. At the end of this period release the specimen and allow it to recover for 10 min. At the end of this recovery period, measure the inside diameter with a step gage reference in 7.2 and shown in Fig. 1.
9.1.2 Apply the strain by (1) stretching the specimen over a tapered cone which has a step at the required 100 % elongation, or (2) by means of a tension test machine stopping the machine at 100 % elongation, or ( 3) by the use of any special fixture capable of holding the O-ring over two spools at constant distance between spool centers.
9.2 Calculation— Calculate tension set as follows:

where:
L 1 = diameter after testing, and
Lo = original diameter.
9.3 Straight specimens cut from large O-rings may be tested and calculated in accordance with Test Methods D 412.
10 Compression Set Test
10.1 Nature of Test— The compression set of O-ring specimens shall follow the general procedures of Method B of Test Methods D 395, with the following exceptions:
10.2 Apparatus:
10.2.1 Spacers—The spacers shall be adjusted to within
0.025 mm (0.01 in.). This can be done by employing shim stock of various thickness.
10.2.2 Measurement— The cross section before and after test shall be measured in the same marked location with a ball-point (tubing) micrometer or other method as described in 7.1.
10.3 Test Specimen— The specimen shall be a suitable section cut from the sample O-ring. A52-mm (2-in.) section has been found to be satisfactory on sample O-rings of 17-mm (0.67-in.) or larger inside diameter. On smaller O-rings, a section of approximately 3 mm (1⁄8 in.) shall be cut from the sample and discarded.
NOTE 2—Testing a whole O-ring for compression set is always avoided because air trapped inside the O-ring results in a different set of conditions on the inside and outside surface of the specimen.
10.4 Procedure—Measure the actual specimen to within 0.025 mm (0.001 in.) and calculate the spacer to be 75 % of this thickness, to within 0.025 mm (0.001 in.). Close the plates, employing a sufficient number of bolts to prevent deflection upon heating. At the end of the heating period, release the plates as soon as possible and allow the specimens to cool to room temperature under the conditions described in Test Methods D 395.
11 Compression Set in Liquids
11.1 Compression set may be conducted immersed in any liquid provided a suitable container is available. The container needs to be large enough to hold the plates and withstand the vapor pressure of the liquid at test temperature.
11.2 The specimen is prepared in accordance with 10.3, and at the termination of the heating period the plates are released immediately and the specimens are allowed to cool to room temperature for 30 min in a fresh cool portion of the test liquid. Measurement and reporting are the same except the type of
liquid is listed in the report.
12 Low-Temperature Test
12.1 Nature of Test— The TR-10 or Temperature Retraction Test shall be in accordance with Test Method D 1329 with the exceptions given in 12.2 to 12.4.
12.2 Test Specimen— The test specimen shall be an O-ring of 1.5 to 3.8-mm (0.06 to 0.15-in.) cross-sectional diameter and of sufficient length to reach from clamp to clamp when the ring is cut and held in straight position.
12.3 Procedure—Stretch the mounted specimen 50 % as standard. If a greater or lesser stretch is used, report the actual stretch.
12.4 Report—The report shall include the following:
12.4.1 Testing elongation, in percent, and
12.4.2 Temperature at which the specimen retracts 10 %, designated as TR-10 and at other points, such as 30, 50, or 70 %, or all, if required.
13 Relative Density Test
13.1 Test Specimen— Any O-ring, O-rings, or segment of an O-ring may be considered as the specimen. The minimum mass of the specimen shall be 0.005 N (0.5 gf). In the case of very small O-rings, two or more pieces may be used as the specimen to accomplish this total minimum mass.
13.2 Procedure—Employ the procedure outlined in Test Methods D 297, density hydrostatic method.
NOTE 3—Extreme accuracy is required in making relative density determinations on small O-rings 0.001 N (1 g or less). The surface tension on the suspending wire is critical; this wire should be of the smallest diameter corrosion-resistant wire that will support the specimen weight. This surface tension on the wire and the elimination of small air bubbles on the surface of the specimen can be reduced by the addition of a few drops of wetting agent to the water in the weighing beaker.
14 Immersion Test
14.1 Nature of Test— For determination of the changes in physical properties after liquid immersion, the definitions, standard test liquid descriptions, and general technique shall be in accordance with Test Method D 471. The detailed procedure for O-rings, outlined in this section however, shall take precedence in case of conflict.
14.2 Apparatus:
14.2.1 The apparatus specified in Test Method D 471 for volatile liquids shall be used.
14.2.2 Standard Heating Device shall be an aluminum block heater or oil bath heater. The temperature shall be maintained within +- 1°C (1.8°F).
14.3 Test Specimens— The test specimen shall consist of an entire O-ring when the outside diameter is small enough to permit installation in a test tube with the fluid level adjusted in accordance with 14.2.2. For sizes too large in circumference to insert as described, the O-ring shall be cut into segments. The specimen shall be a segment 90 +- 2 mm (3.5 +- 0.08 in.) in length. All tests for hardness, tension, elongation, and volume change shall be made in triplicate. The same three specimens may be used for all tests with hardness and volume determinations made prior to stress-strain tests. In the case of liquids
that are volatile at room temperature, the specimen must be quickly placed back into the test liquid after hardness and volume test and prior to tension testing.
14.4 Procedure:
14.4.1 Suspend three specimens at one level in the test tube by the use of corrosion-resistant wire; separate the specimens by bending small loops in the wire or by the use of corrosionresistant washers. For whole O-rings 6 mm (0.25 in.) in cross section and larger, place one specimen in each test tube. For cross-section sizes less than 4 mm (0.16 in.) place three specimens in each test tube.
14.4.2 Suspend the specimens vertically so that 25 mm (1.0 in.) of liquid is between the lower extremity of the specimen and the bottom of the tube. Add enough liquid to cover the specimens to a depth of 25 mm (1.0 in.) over the upper extremity of the specimens.
NOTE 4—For liquid mixtures, where the volume percent of the most minor constituent is known, the liquid volume of that constituent shall be 15 times the volume of the test piece.
For liquid mixtures where the volume percent of the most minor constituent is not known, then that volume is assumed to be 1 %, and the volume of the test liquid will be 1500 times the volume of the test pieces. If the above procedure is used, operators should be aware that the test tube specified in Test Method D 471 may not be adequate and alternative containers and heating system may be required.
NOTE 5—A problem that can occur with large whole specimens is cracking at the point of maximum bend at the upper or lower portion, or both, of the specimen. When cracking is observed upon removal from the oil, or when breaks occur at these points during tension tests, a retest shall be made on segments cut from an O-ring.
14.4.3 Make volume change determinations on a minimum specimen weight of 0.005 N (0.5 gf). This may be accomplished by using two or more pieces for the specimen in the case of very small O-rings (see Note 2).
15 Heat Aging Test
15.1 Procedure—The general procedures for heat aging O-rings shall be in accordance with Test Method D 573, with the following exception: When required by the material specification, or when agreed upon by the purchaser and the seller, the procedure shall be in accordance with Test Method D 865. The report shall state which method was employed.
16 Hardness Test
16.1 Nature of Test— It is difficult to obtain reliability in testing hardness of O-rings due to the curved surface and relatively small cross section thickness. With certain precautions and proper technique the following test methods may be employed. It is recommended that for O-rings of crosssectional thickness less than 6 mm (0.25 in.) the microtester specified in Test Method D 1415 be employed.
16.2 Procedure:
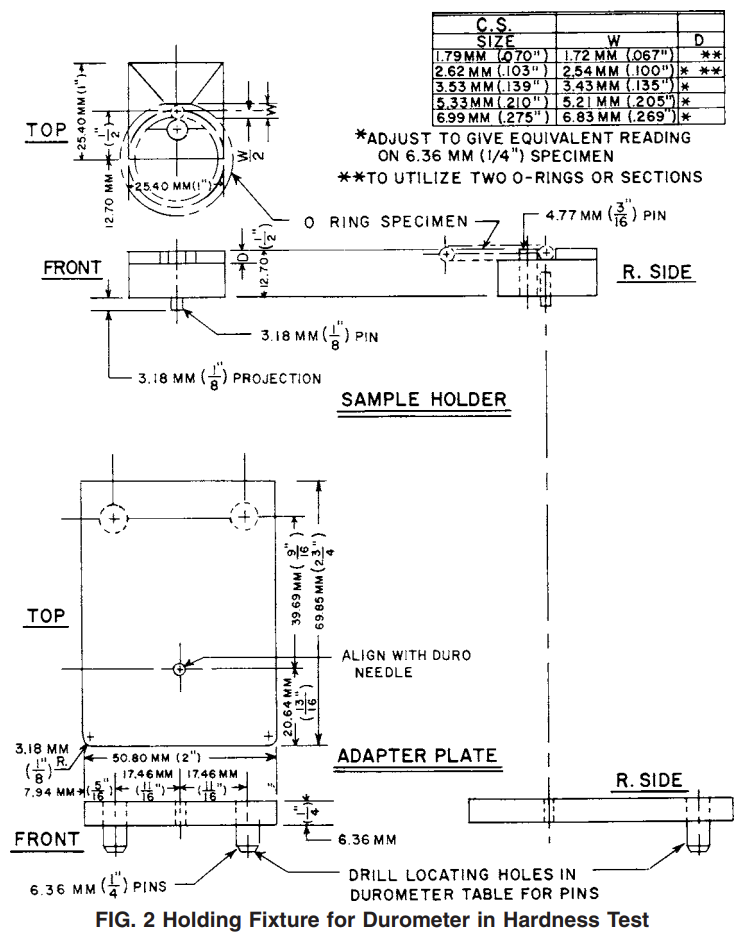
16.2.1 Test Method D 2240—This procedure was developed to test rubber articles of 6-mm (0.25-in.) thickness minimum and employs an indentor point 2.5 mm (0.1 in.) in length. Use caution (1) to center the specimen so the point of the indentor reads on the center or thickest portion, and (2) to apply just enough pressure to bring the base of the instrument in close contact with the specimen without compressing the specimen.
A holding fixture may be employed which will provide (1) limitation of travel of the durometer head and (2) a selfcentering feature to eliminate alignment difficulties. A fixture that accomplishes these requirements is shown in Fig. 2. Any fixture or design principle that will accomplish the stipulations of (1) and (2) above may be employed. Do not make hardness determinations on the parting or “flash” line.
NOTE 6—The durometer as described in Test Method D 2240 is not recommended for testing O-rings with cross section of less than 6 mm (0.25 in.). If hardness measurements are made with this instrument on O-rings of smaller cross section, the values obtained may be different from those obtained on a standard specimen. Fixtures as shown in 16.2.2 should be employed for such determinations. For O-rings of less than 3-mm (0.12-in.) cross section, the fixture should be designed, double depth, to hold vertically two cross-section thicknesses of the specimen. This is to increase the total thickness to greater than the length of the indentor point. The total depth of the groove must be adjusted to a depth that will reduce within 62 the hardness of a standard specimen of the same material.
16.2.2 Test Method D 1415—This test method, using a micro tester (see 3.3 of Test Method D 1415) permits the testing of very small specimens to 1-mm (0.04-in.) minimum thickness. This test method is recommended for determining the hardness of O-rings with a cross-sectional thickness of 6 mm (0.25 in.) and smaller.
NOTE 7—Values obtained with the micro hardness tester may differ from durometer values due to the difference in methods. The surface effect from aging or curing is more pronounced with the micro tester.
17 O-Ring Mold Shrinkage Test
17.1 Nature of Test— This test method involves the molding of various rubber materials in cavities of standard dimensions representative of typical O-ring configurations. The specimens are then measured for inside diameter and cross-sectional thickness within 0.025 mm (0.001 in.) to determine actual mold shrinkage as a means of process control.
17.2 Apparatus:
17.2.1 Shrinkage Mold— Most critical is the shrinkage mold. Great care must be taken in both the manufacture and maintenance of this mold. Care must be taken not to dent, scratch, or otherwise damage the cavity. The mold cavities must be kept clean. Harsh mechanical or chemical methods that would dull the “cut off” or increase the cavity size must be avoided. The surface finish must be the best commercial practice.
17.2.2 Calipers and Micrometers—Cavity measurement shall be made by the use of vernier calipers and depth micrometers as follows:
17.2.2.1 Align the edges of the vernier with the inside diameter of the cavity “with magnification.” Take a reading that is the outside diameter of the cavity.
17.2.2.2 Open the calipers to align the outside diameter of the cavity. This gives the width of the cross section.
17.2.2.3 Use depth micrometers to check the depth of the cavity. Check each half for depth. The total of the two halves gives the total depth of the cavity.
17.2.2.4 Dimensions for the cavity of a recommended test size are 3.6-mm (0.142-in.) cross section by 25-mm (1.0-in.) inside diameter.
NOTE 8—Other test sizes varying the cross section and inside diameter may be preferred and are permitted. This size is recommended merely as the median standard cross section in a diameter easily molded and measured. Some laboratories may prefer a larger size, the important consideration being that the seller and the manufacturer use the same or comparable size for control work. It has been found important to use a test mold cross-section size as close as possible to the cross-section size of the production mold being considered.
17.3 Test Specimen:
17.3.1 Preparation of preforms is by the die-cut method unless otherwise specified. Sample stock shall be prepared by sheeting on a standard laboratory mill to a thickness of approximately 20 to 25 % greater than the cavity depth. Milling time should be the minimum required to obtain a smooth sheet. The sheet shall be allowed to rest for 30 to 60 min after which preforms shall be cut out with a suitable die. Other types of preforming, such as a spliced extrusion or slice from a tube may give slightly different results. If an alternative method is used it must be noted in the report.
17.3.2 The preforms shall be placed in the shrinkage test mold which is maintained at curing temperature +-2°C (+_3.6°F) in a suitable press. The mold shall be closed quickly and brought to a pressure equal to a minimum of 3.4 MPa (500 psi) across the mold for the optimum curing time of the material being tested. This curing time and temperature shall be noted in the report. Curing time and especially temperature are very critical in shrinkage consideration.
17.3.3 After curing is complete the specimens shall be allowed to rest for a minimum of 16 h at a temperature of 23 +- 2°C (73.4 +- 3.6°F). Flash removal shall be done individually and carefully so as not to disturb the basic dimensions of the specimen. An abrasive paper or sand-stick of fine grade is usually employed for the operation. Excess flash on the inside diameter must be avoided since this will alter the inside diameter measurement.
17.3.4 Specimen rings obtained must be free of all major defects, such as nonfills, backrind, etc., as these factors may affect true shrinkage determination. Care must be exercised to ensure proper closing of the mold to prevent erroneous cross-section shrinkage results.
17.4 Procedure:
17.4.1 Measure the cross section by the use of tubing
micrometers or other method as described in 7.1. Determine actual shrinking by subtracting the average or mean cross section of the specimen from the actual mold cavity size. Measurement of the cross section in inside diameter, outside diameter, and side-to-side axes is desirable. This provides a check on the accuracy of the mold cavity radius and true roundness of cross section. Some materials, such as silicones, may create an imbalance on the two cross-section axes due to inherent shrinkage characteristics, thus producing an out-ofround cross section.
17.4.2 Measure inside diameter by the use of a suitable step gage as shown in Fig. 1, or a suitable taper gage (see 7.2). One or more gages may be necessary to cover a wide range of shrinkage. Take care not to force the specimen on the step gage. Use only enough pressure to be certain the inside diameter is in intimate contact with the gage. Determine actual linear shrinkage of the inside diameter by subtracting the average or mean inside diameter value of the specimens from the actual mold cavity inside diameter. The resultant value divided by the mold inside diameter and multiplied by 100 is the percent shrinkage. An alternative method of expression is in units such as millimetres per millimetre or inches per inch.
17.4.3 An alternative method of measuring the inside diameter and cross section is the shadowgraph or comparator. This instrument is very accurate, but if the O-ring is unsupported the diameter must be taken in two directions and averaged. To prevent any out-of-roundness, a special cone can be used in conjunction with the comparator. The comparator is also used to determine roundness of cross section by measuring thin slices of the cross-sectional area.
17.5 Report—The report shall include the following:
17.5.1 Method of preforming.
17.5.2 Number of specimens measured, and
17.5.3 Average shrinkage, expressed as a percentage.
18 Corrosion Test
18.1 This test is intended to give a fast and relatively reproducible rating of the corrosion potential for an O-ring.
18.2 Apparatus:
18.2.1 The apparatus shall consist of any chamber that is corrosion-proof, can be sealed, and is of convenient size for the work load.
NOTE 9—A laboratory desiccator jar is commonly used.
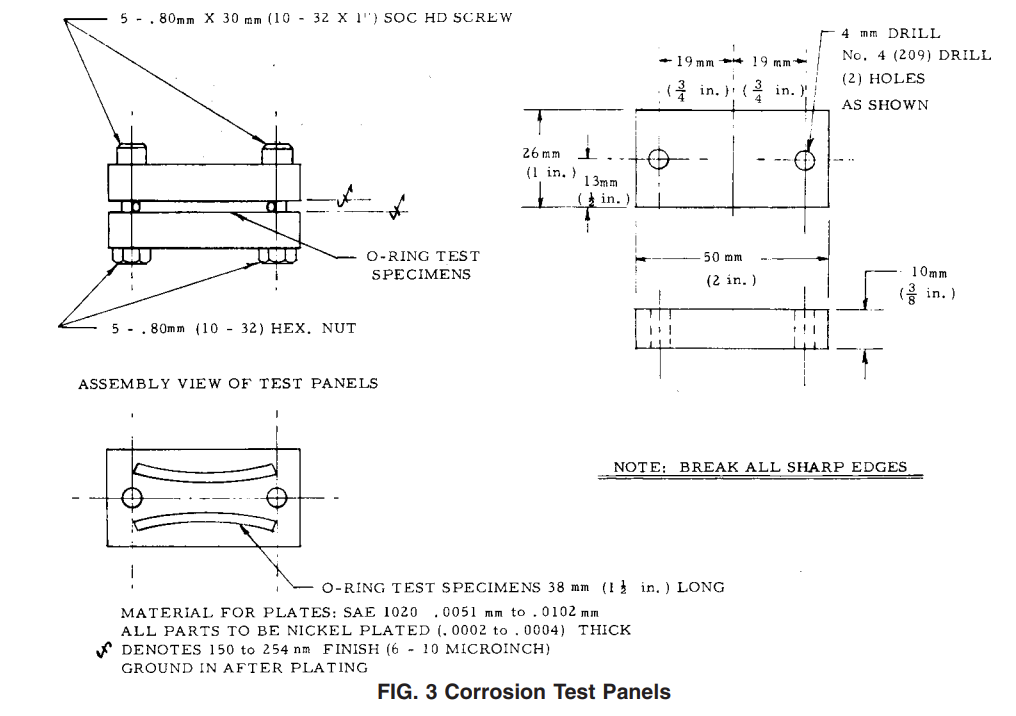
18.2.2 The test panels unless otherwise specified shall be made of SAE-1020 steel. The panels shall be made in accordance with the drawings in Fig. 3. 18.2.3 Relative humidity of 100 % is maintained by the use of a solution of 85 % distilled water and 15 % USP glycerin. This solution should be added to a depth equal to at least 20 % of the depth of the chamber.
18.2.4 A corrosion-proof shelf shall be employed to hold the fixtures close above but not touching the solution. 18.3 Test Specimen— The test specimens shall consist of two segments 38 mm (1.5 in.) in length, cut from the sample O-ring. If the sample O-ring is smaller than 38 mm in circumference, two whole O-rings may be used.
18.4 Procedure:
18.4.1 Clean the panels with toluene or other solvent system that will produce a clean dry surface free from film.
18.4.2 Remove the cover and place the individual specimens and test panels into the open chamber for 1 h of preconditioning.
18.4.3 After this 1 h preconditioning, assemble the specimens with panels as shown in Fig. 3. Apply sufficient pressure to cause a deflection of 15 % of the original cross-sectional diameter of the specimens. 18.4.4 Place the assembled fixture on a watchglass and insert it into the test chamber.
18.4.5 Cover the chamber and allow it to stand for 96 h at 23 +- 2°C (73.4 +- 3.6°F).
18.4.6 Remove the specimens, wash the panels with toluene or other suitable solvent system, and wipe with a lint-free cloth. If superficial rust or adhering particles from the specimen are still present, a light buffing with crocus cloth, steel, or brass wool is permitted.
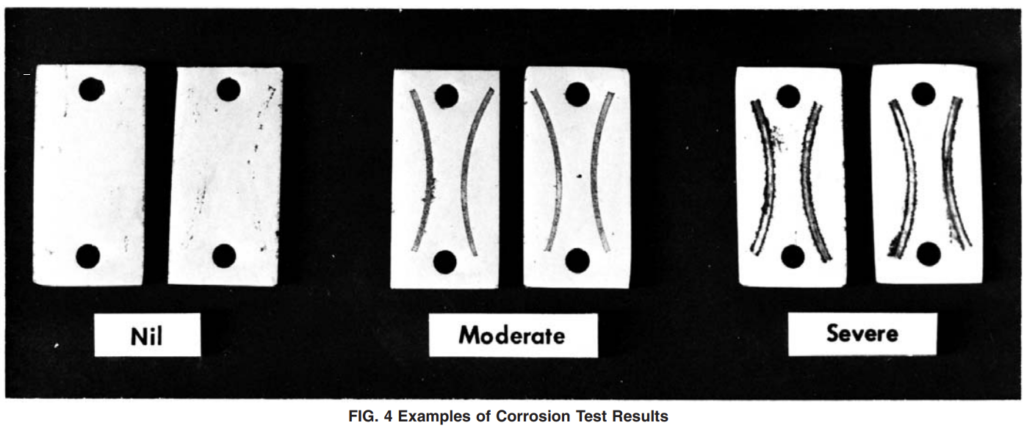
18.5 Compare the results to the examples shown in Fig. 4. The rating shall be nil, moderate, or severe.
-
 Single Column Tensile Compression Tester (UTM)-50 Kg-1000mm
 -
 Single Column Tensile Compression Tester (UTM)-100 Kg-1000mm
 -
 Single Column Tensile Compression Tester (UTM)-100 Kg-500mm
 -
 Precise Balance-0.1mg-220gr
 -
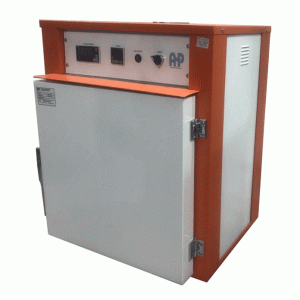 Hot Air Oven-55 Lit internal Capacity
 -
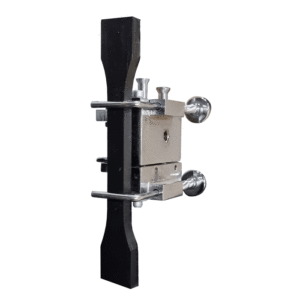 Micro Extensometer
 -
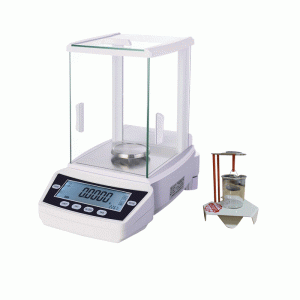 Precise Balance and Density Kit
 -
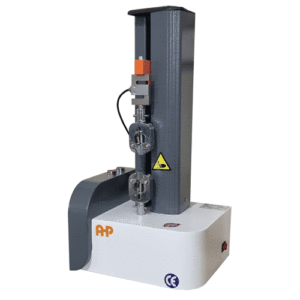 Single Column Tensile Compression Tester (UTM)
 -
 Hot Air Oven
