5 Apparatus
5.1 Loading device
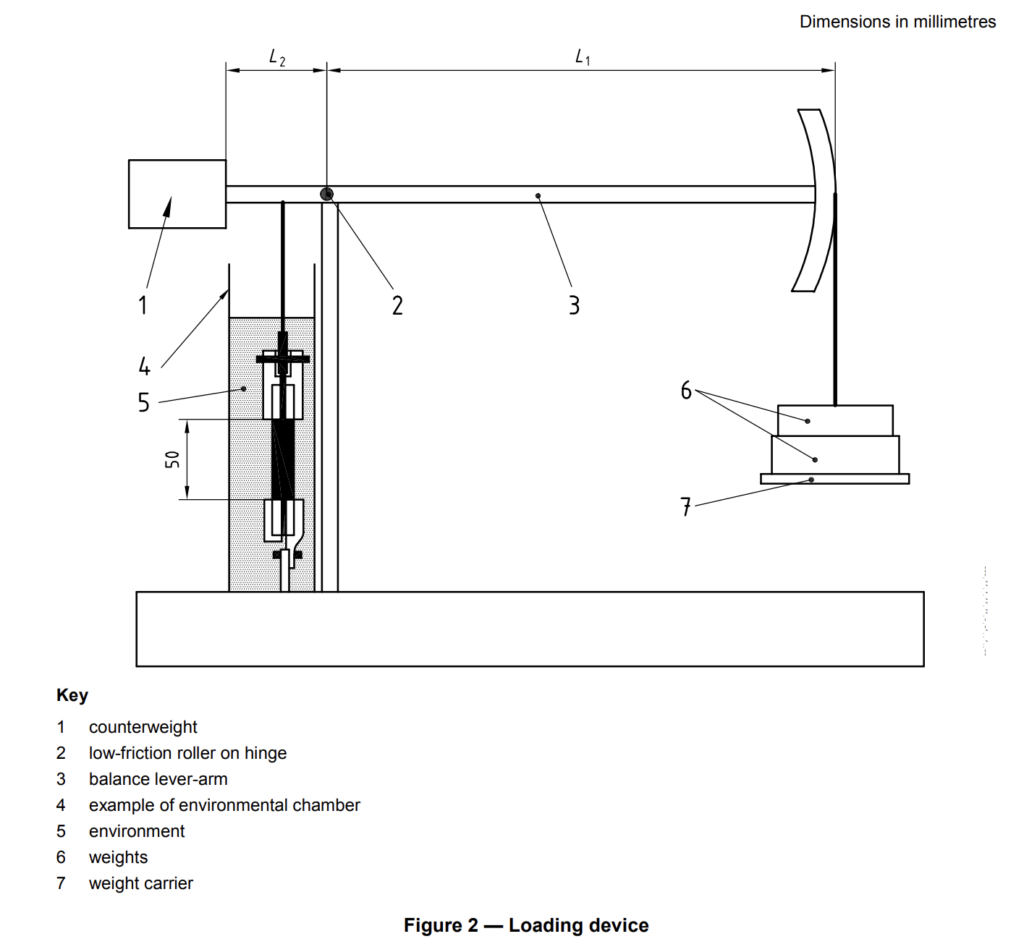
A suitable device for applying the load is a lever-arm loading machine with an arm ratio between 4:1 and 10:1. A typical example of such a device is shown in Figure 2. The lever-arm ratio R is equal to L1/L2. When the lever-arm is fitted with the top specimen grip and the weight carrier, it shall be horizontal, i.e. balanced.
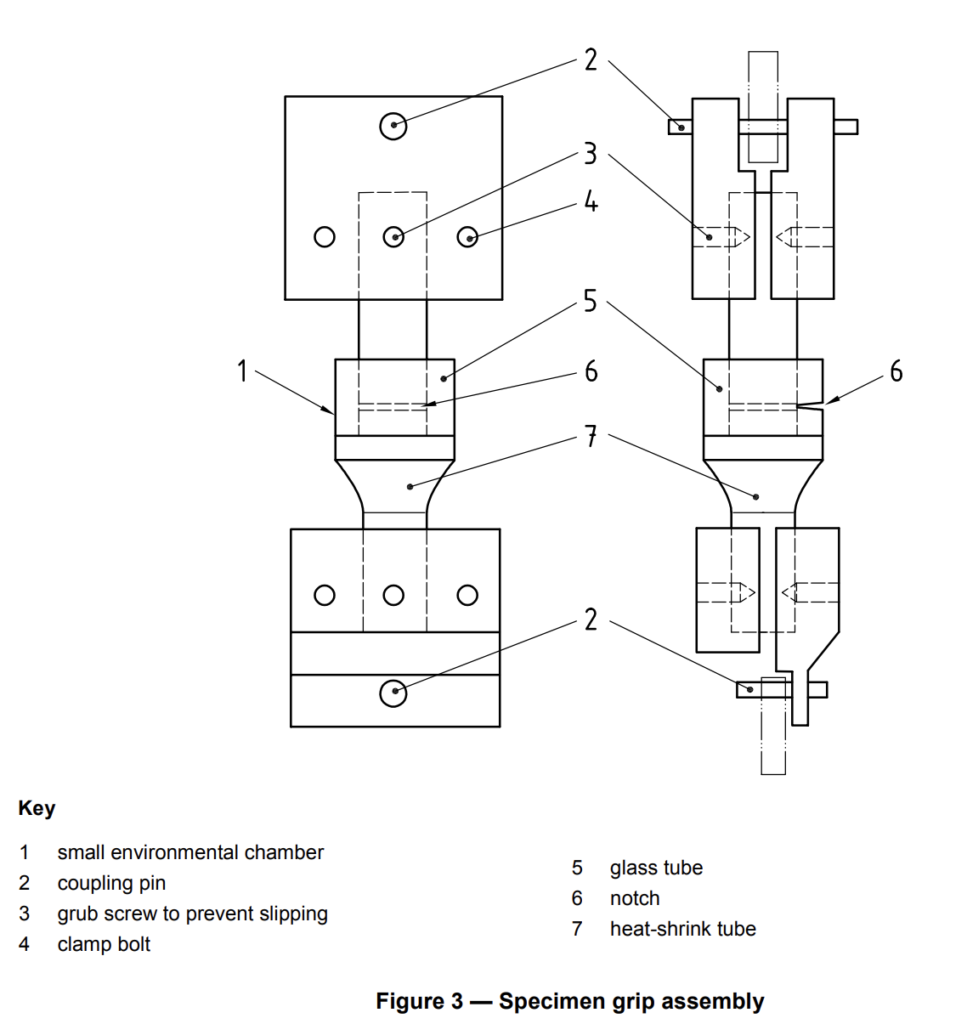
The specimen grips shall be designed to prevent slippage of the test specimen and to ensure that the load is transmitted axially through the test piece, e.g. via a low-friction coupling, to prevent bending and torsion of the test specimen during the test. A typical test specimen grip assembly is shown in Figure 3.
In addition to the above example, the tensile load may be applied directly using deadweights, pneumatically actuated loading or any other means of producing a constant load. The loading device shall be capable of applying the load to an accuracy of ± 1 %. The balanced loading apparatus as described in ISO 6252 has also been used satisfactorily.
The functioning and calibration of the equipment shall be checked on a regular basis because the applied load is a critical parameter. The calibration of a lever-arm machine can be checked by hanging a series of known weights on the specimen side of the lever-arm and counterbalancing these in turn with weights on the weight hanger. The ratio of the former to the latter provides a direct measure of the arm ratio and hence a check on the operation of the equipment.
In the case of multiple-specimen testing, care shall be taken to avoid undue disturbance of the remaining test specimens when one or more specimens fail.
NOTE Measurement of the extension of the test specimen or movement of the lever-arm can provide useful information. The rate of extension of the test specimen will increase when the initiation of the crack from the notch has occurred and will increase rapidly when failure is imminent.
5.2 Thermostatically controlled chamber
This chamber shall be designed to contain the environment and ensure immersion of at least the notched area of the specimen(s). The chamber shall be constructed of material(s) which do not affect the environment and which are not affected by it. The temperature of the environment shall be controlled to maintain the test specimens within ± 1,0 °C of the specified test temperature. Where the environment is aggressive, the chamber can be very small as shown in Figure 3.
If the cloud point of the environment solution is lower than the test temperature, phase separation will occur and so moderate laminar flow is required in the environment to ensure uniform dispersal. It shall also be ensured that the results achieved at each location in the immersion bath are the same.
5.3 Temperature-measuring device
A calibrated thermometer, thermocouple or thermistor with an accuracy of ± 0,1 °C is suitable.
5.4 Timing device
This shall automatically indicate or record the point when the test specimen fails by excessive displacement of the grips. The accuracy of the timing equipment shall be ± 1 min.
5.5 Notching apparatus
This machine shall be designed so that the notches are coplanar and the plane of notching is perpendicular to the tensile axis of the test specimen. The machine shall have a device to ensure that the notches are placed in the centre of the test specimen. The notch tip radius shall be less than 10 µm. Razor blades are preferred. However, a cutting machine with a tool like a broaching device is acceptable as an alternative provided the notch tip radius is less than 10 µm.
NOTE A device, appropriately dimensioned, such as illustrated in ISO 11542-2:1998, Figure B.1, would be
satisfactory.
5.6 Microscope
A microscope is required to allow accurate measurement of the actual ligament size (distance between the tips of the notches) after failure. It shall read to an accuracy of ± 100 µm.
6 Preparation of test specimens
6.1 Test specimen geometry
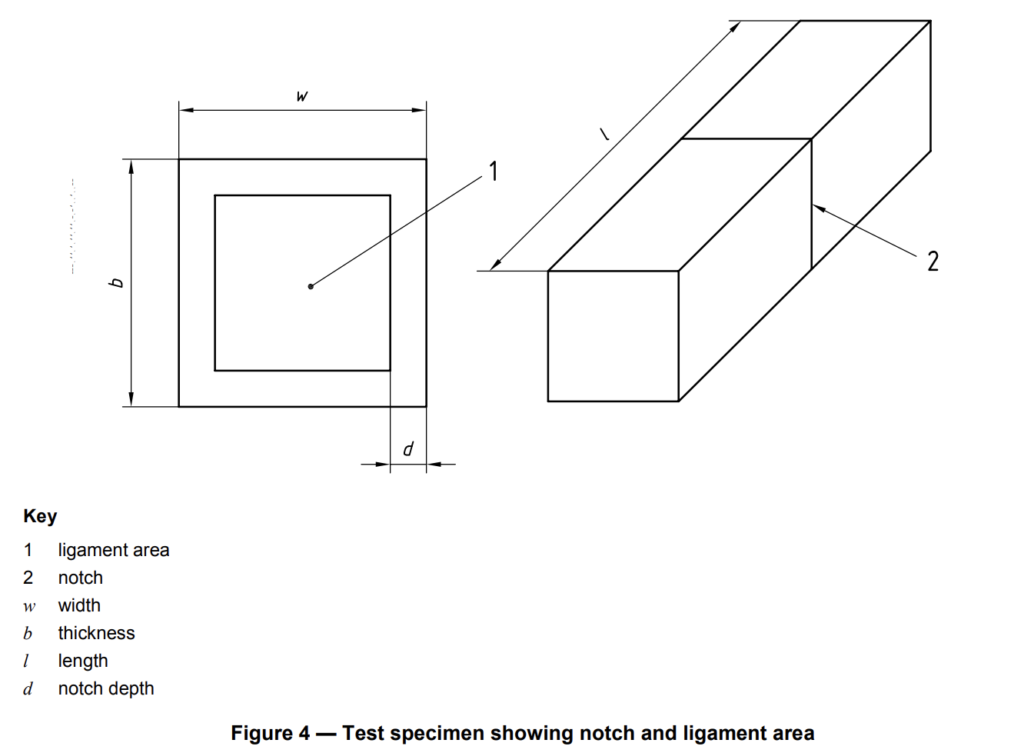
Typical test specimen geometries are given in Annex A. If other specimens are used, these shall be made
such that the ligament area is approximately 50 % of the total cross-sectional area of the specimen (see
Figure 4). This is to make sure that specimen failure will occur under the prescribed conditions. A “dog-bone” shaped specimen is easier to clamp, but a parallel-sided section of at least 15 mm on either side of the notch is required. The use of different test specimen geometries will give different results with the same polyethylene.
Comparisons between materials are only valid if the same specimen geometry and specimen preparation
technique are used.
A neutral-type nonylphenoxy-(ethyleneoxy)-ethanol detergent of the general formula shown below is required:

The value of n can be 10 or 11. Such detergents are suitable for use in testing at elevated temperatures and are sufficiently aggressive to produce failure in a reasonable timescale. A detergent with a value of n of 11 gives shorter failure times than one for which n = 10.
Using deionized water, prepare a sufficient quantity of a solution, of a concentration equivalent to 2 % by
mass of the detergent, to ensure complete immersion of the test specimens. Other surface-active agents may be used if specified in the relevant product standard or by agreement between the interested parties. If, for example, Igepal CO630 is used, its concentration and designation shall be clearly specified in the test report because the result may depend on the surfactant used.
NOTE The effect of a detergent on polyethylene varies with the density of the material. For lower-density PE, this can be more severe than if water or air alone is used.
Tests carried out using freshly made-up solutions of some detergents can give variable results, so the solution shall be “aged” for 14 days at the test temperature to ensure that the alcohol groups are converted to acid groups. This is said to improve the reproducibility of the results. The solution may continue to age, and it is suggested that a check be made after 2 500 h of use. Specimens of a control material can be tested in the solution to verify that there is no difference in activity.
6.2 Other environments
The FNCT is suitable for comparative testing of polyethylene test specimens with other chemicals, including distilled water. The test report shall contain full details of the identity, concentration and producer of the chemical used, as well as the designation of the polyethylene. Environments at higher temperatures, especially above 80 °C, can give different results due to absorption, chemical attack or crystalline changes in the polyethylene itself, and this shall be taken into consideration when carrying out the test.
7 Preparation of test specimens
7.1 Test specimen geometry
Typical test specimen geometries are given in Annex A. If other specimens are used, these shall be made
such that the ligament area is approximately 50 % of the total cross-sectional area of the specimen (see
Figure 4). This is to make sure that specimen failure will occur under the prescribed conditions. A “dog-bone” shaped specimen is easier to clamp, but a parallel-sided section of at least 15 mm on either side of the notch is required. The use of different test specimen geometries will give different results with the same polyethylene. Comparisons between materials are only valid if the same specimen geometry and specimen preparation technique are used.
7.2 Test specimen preparation
Except when testing finished products, prepare test specimens from compression-moulded sheet.
ISO 1872-2:1993 (Subclause 3.3), ISO 11542-2:1998 (Table 1) and ISO 293 all give general guidelines for
moulding and cooling conditions. However, thick sheets require the use of the conditions specified in Table 1 below. The use of different moulding conditions will affect the results. Machine the test specimens to size from the moulded sheet in accordance with ISO 2818 at least 24 h after moulding. Trim the specimen edges of any remaining swarf left from machining. When comparing finished products, cut the test specimens from extruded or moulded goods in accordance with ISO 2818. Always check the relevant product standard for any further details.

If the material is a powder, it may be deemed necessary to calendar or compound the material prior to the compression-moulding step. It is essential to make sure that the powder is heat-stabilized when this is done.
7.3 Test specimen notching
Specimens shall be notched at room temperature. Due care shall be taken to avoid blunting the notch during this operation, e.g. avoid the use of excessive speed/force, as this will invalidate the results. If a razor blade is used, it shall be used for producing no more than a hundred notches. Whatever device is used for notching, the tolerance on the required notch depth is ± 0,1 mm.
NOTE Notch integrity may be checked microscopically.
7.4 Conditioning of test specimens
Normally, notched test specimens shall be stored at (23 ± 2) °C, although (27 ± 2) °C may be used in tropical countries. When they are required for use at other temperatures, they shall be conditioned in the environment at the test temperature for (10 ± 2) h after clamping in the loading apparatus and prior to loading.
8 Test procedure
8.1 Choice of stress and temperature
For a known material or category of material, select from Annex A a stress and temperature that will cause
brittle failure of the test specimens. Test at least four specimens, at nominal stresses above and below the
selected value; this is to compensate for variation in the ligament area introduced during the notching
operation. For example, having selected a stress of 9 MPa, a series of nominal stress values, such as
8,25 MPa, 8,75 MPa, 9,25 MPa and 9,75 MPa, could be used to give a spread above and below 9 MPa.
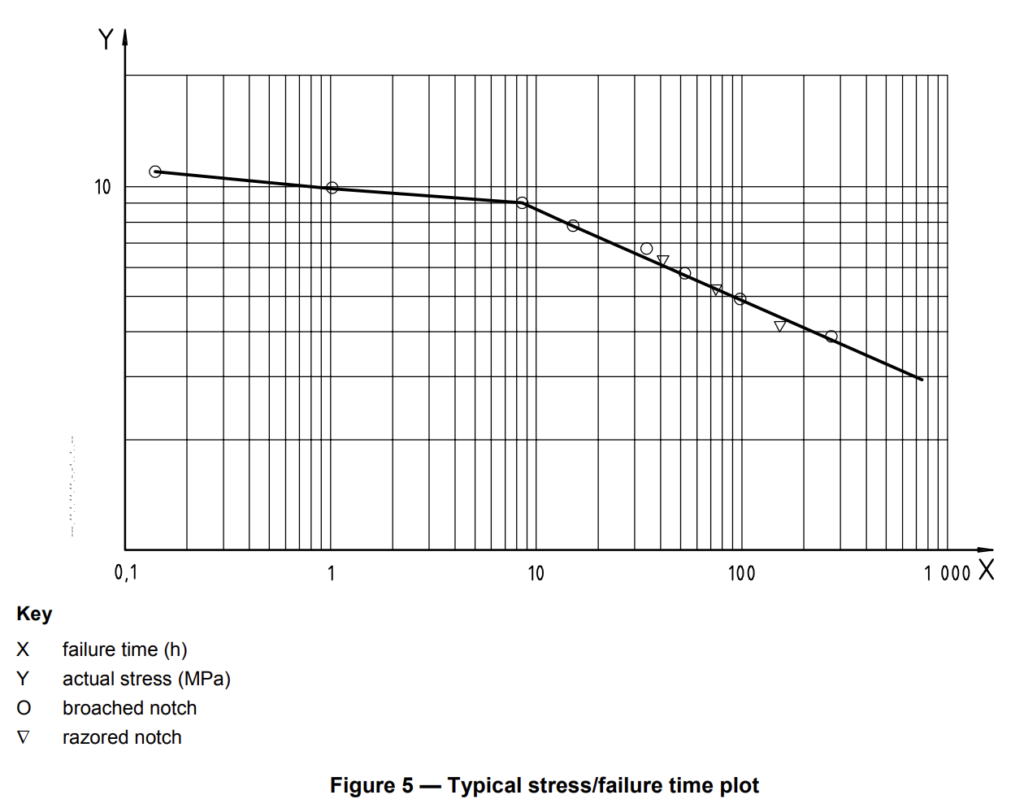
If an unknown polyethylene material is being tested, then it is useful to map out its behaviour over a broad range of stresses at an appropriate temperature. A typical example of this approach is shown in Figure 5.
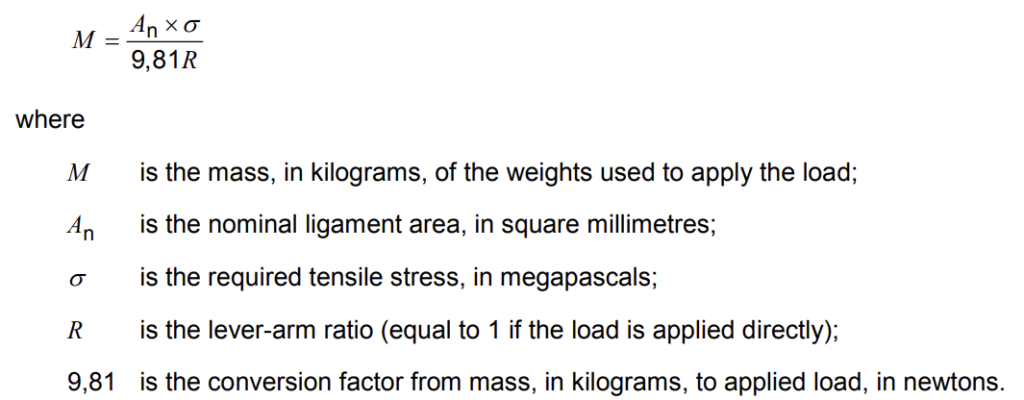
8.2 Calculation of test load
Calculate the test load from the equation:
8.3 Application of the load to the test specimen
Place a notched test specimen in the grips of the lever-arm loading machine (see Figures 2 and 3), taking
care to avoid bending or twisting the specimen. Position the specimen with half its length exposed between the grips and with the notch plane located at the centre. Immerse the specimen, held in the grips, in the environment, ensuring that the notched area is in contact with the environment, and condition it in accordance with 7.4. After conditioning, gradually apply the calculated load to the lever-arm, avoiding shock loading of the specimen. At the same time, start the timing device.
If the specimen has been cut from a finished product, it may contain internal stresses and be a little bent.
Refer to the particular product standard for further guidance.
NOTE 1 It has been found convenient to lower the weight carrier using a suitable jack or other means.
NOTE 2 Lower temperatures will increase the time to failure of the test specimen. Higher temperatures will decrease the time to failure, but if too high a temperature is used changes in crystallinity and possibly also oxidative ageing may occur. The same will apply when different environments are used.
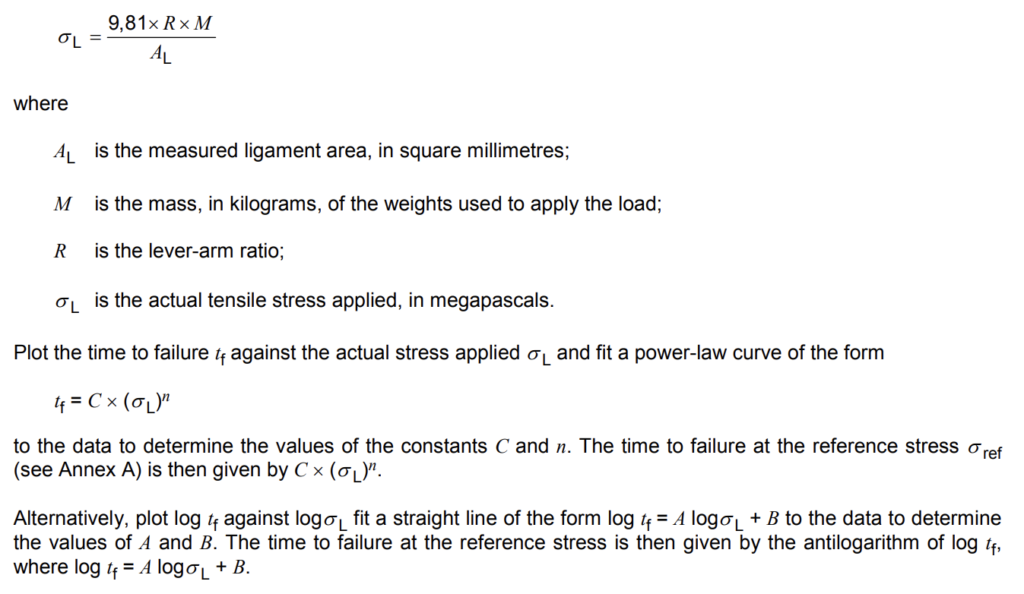
8.4 Calculation of results
Examine the fracture surface of each test specimen to ensure that the fracture is of the brittle type (see
Figure 1). Measure the dimensions of the ligament using a travelling microscope and calculate the ligament area. Calculate the actual stress applied, σ L, from the equation:
Annex A
(informative)
Specimen dimensions and environment
A.1 Surface-active agent
Any suitable product that meets the requirements of 6.1, e.g. Arkopal N110 (n = 11), may be used.
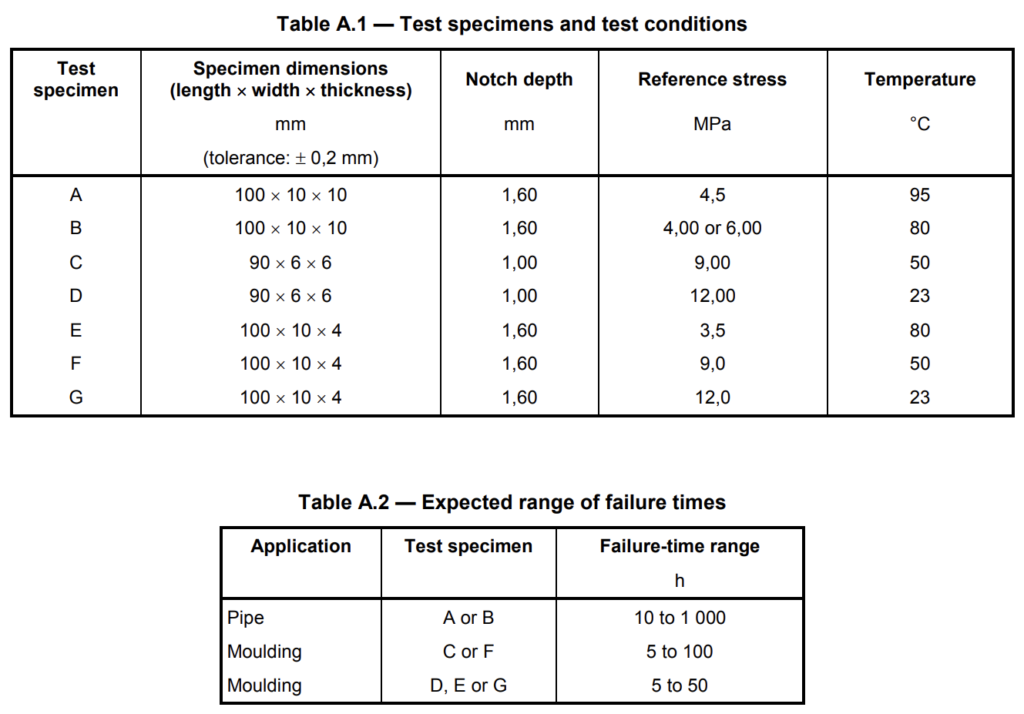
A.2 Test specimen dimensions and test conditions
Specimens A and B (see Table A.1), have been found suitable for very high stress crack resistant
polyethylenes used, for instance, for pressure pipes and fittings. Completely brittle failures do not always
occur at 95 °C, and caution must be exercised in the interpretation of the results. Table A.2 gives some
indication of the expected range of failure times. Experience has shown that specimens with a cross-section below 6 mm × 6 mm are too small to achieve plane-strain conditions and thus obtain brittle failure with lower-ESC materials.
Annex C
(informative)
Additional information related to the installation of PE100-RC systems for conventional and non-conventional installations.
C.1 Pipe material
Polyethylene materials have been used for the manufacture of piping systems for water supply since then 1950S, offering a corrosion resistant system. Since this time, the materials used for these systems have been developed and improved in terms of performance, potential pressure rating and above all durability and resistance to fracture.
Whilst initial improvements increased the materials pressure resistance (PE 63, PE 80 and PE 100), considerable progress has been made in recent years in increasing the resistance to SCG [19].
The main technical advantage of PE 100-RC is that it is even more resistant to SCG, PE 100-RC materials for piping systems require a separate number of tests to assess SCG performance, Piping systems made of such a material can be used for alternative trenchless installation methods when more surface damage can be encountered or for installations where excavated soil is used as the embedding material, respecting local regulations, As a result the durability of the system is potentially increased by using these materials.
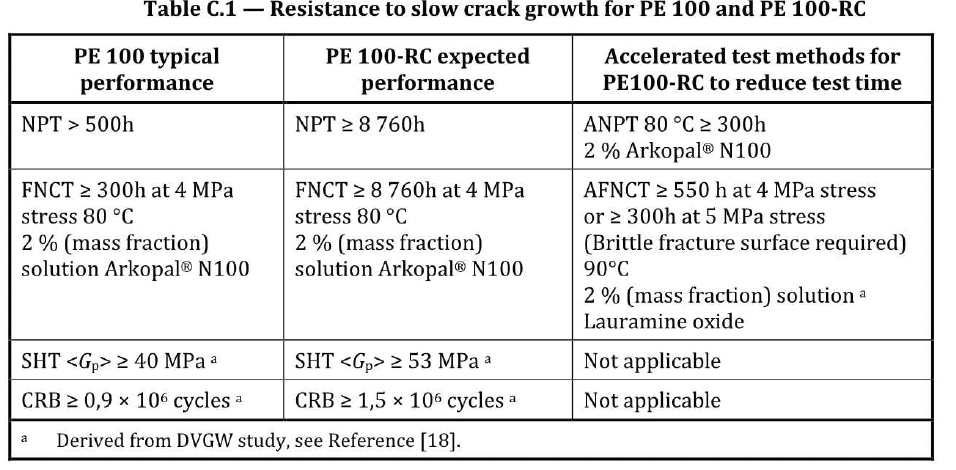
The material and product requirements of PE 100-RC compared to the well-known and established PE 100 are identical in each part of the EN 12201 series, with the exception of the requirements specified for the resistance to SCG behavior for the material and the pipe, the fitting and valve components given in the different parts of the EN 12201 series, as appropriate. Table C.1 gives a comparison between the performance of PE 100 and PE 100-RC materials related to resistance to SCG test methods.

Full Notch Creep Tester-2 NCT- Tensile Creep Tester FNCT is widely used method to classify polyethylene materials in regarding to their slow crack growth behavior under accelerated conditions
- According to standards ISO 16770 and DVS 2203-4
- Number of stations as customer request
- 10 inch touch display (as per customer request)
- Report as MS EXCEL file
- 100 l of tank capacity
- Circulation system for bath
- Sample elevator system
- SS304 bath
- Temperature up to 95 C
- Load ranges as request
- Fine adjust of force by lever mechanism
- Number of loadcells as per customer request (one for all stations or one per each station)
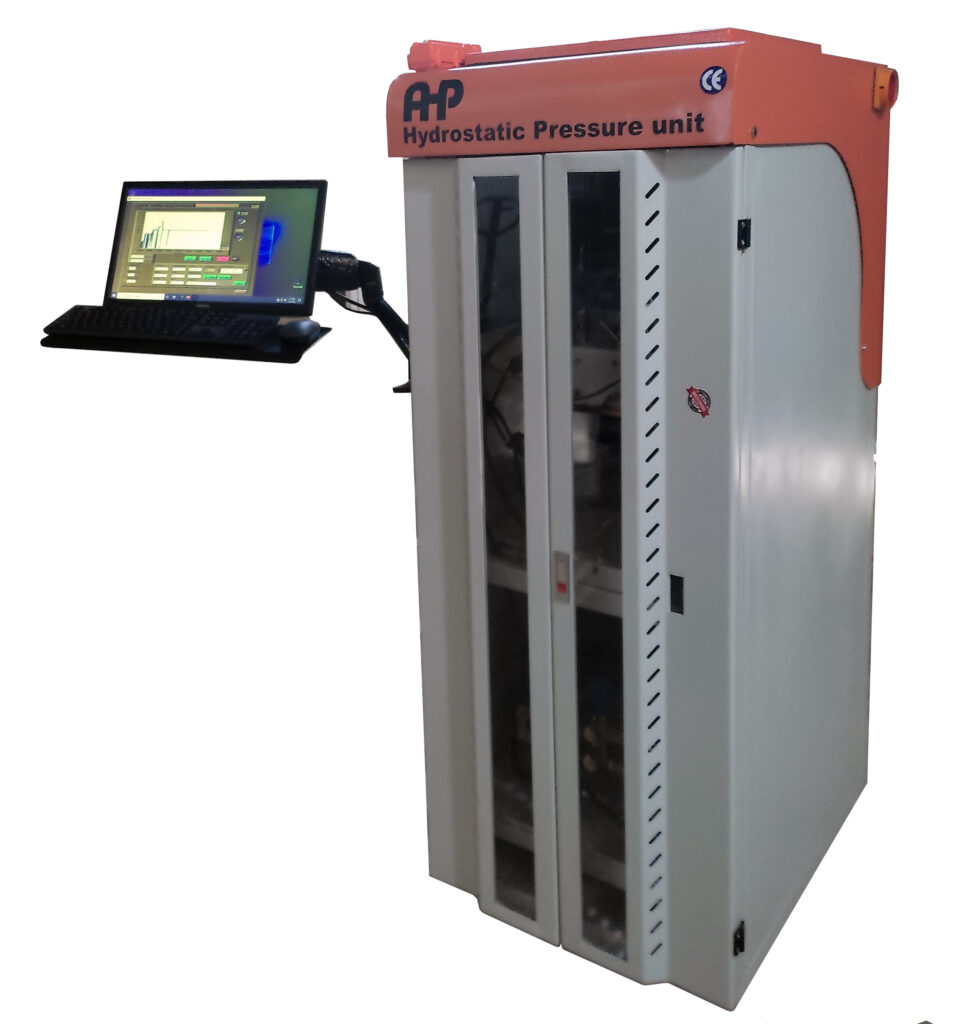
Hydrostatic Pressure Unit 2 station-100bar
- According to ISO 1167 , ASTM D1598 and ASTM D 1599
- Including 2 separate pressure control lines up to 100 bar
- Connection to computer is USB port
- Software is included
- European pump, sensors, and valves
- Main pump is Italian
- Including bypass system for pump safety
- Each line has a separate module controller for easy service purposes
- Data is saved in TDMS database to keep it in case of a power failure
- Report out in MS WORD
- Manual charge and discharge hand key
- Automatic pressure control
- Pressure rate control
- Accumulators with dial pressure gages for double check the accuracy of digital pressure on the computer
- Airless system
- Maximum accuracy, a long service life, and a user-friendly system, combined with flexibility
- High-precision pressure regulation, selectively regulated input pressure in each Line
- Quick system calibration easily by the operator and calibration data saved in the controller modules
- Convenient operation, evaluation of results and clear visualization via LabVIEW and windows based software
- Operator access to all important settings from the front panel
- PLC based control of the pressure channels
- Pressure gauge for checking each line actual pressure on accumulators
- High-quality unit components guarantee long service life
- Along with AHP data logging software quarantine keeping of data in power break cases
- Ramp control capabilities for each line pressure
- European components of valves, sensors and pump
- Including high pressure accumulators
- Training video is included
- online support for the software
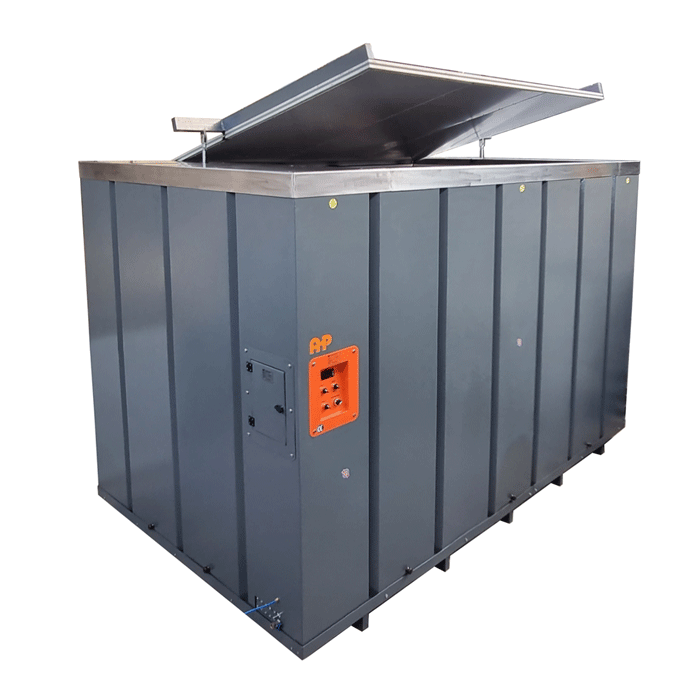
- According to ISO 1167, ASDTM D 1598, ASTM D 1599
- Including 2 connection lines from the pressure unit
- Temperature control from Room Temperature up to 95C
- Pneumatic-operated door
- Water circulation system for temperature homogeneity
- Digital PID temperature controller
- Elastomeric foam insulation for the lid
- SS304 for contact surfaces with water
- Outer body is powder-coated paint
- Have a level control that ensures that the test medium is topped up automatically
- The special circulation system guarantees high accuracy and uniform temperature distribution
- The double insulation of the bath walls
- Steam release out
- Pneumatic-operated doors
- Quick-release couplings connections inside the bath (standard delivery is female G1/4″)
- High-quality stainless steel SS304
- Option to connect a chiller for 20C tests
- Easy connection to pressure test units
- Constant test temperatures thanks to highly-efficient water circulation and precise temperature control in the inner tank
- High-quality stainless steel test tank
- Double insulation of the basic tank and insulated lid for minimum energy loss
- Option to connect a chiller and plate heat exchanger to provide efficient and environmentally-friendly water cooling for low test temperatures (on request of customer-standard delivery has not this heat exchanger)
- Integrated monitoring of tank level and temperature
- Number of suspension rails : 2
- All parts coming into contact with water is SS304
- Maximum temperature is 95C
- Training video included
- Flange type heater allows easy repair
- Direct contact of temperature measurement sensor with water inside the tank
- Including two temperature sensor for controller and for the computer monitoring
- Easy access to internal parts for replacement
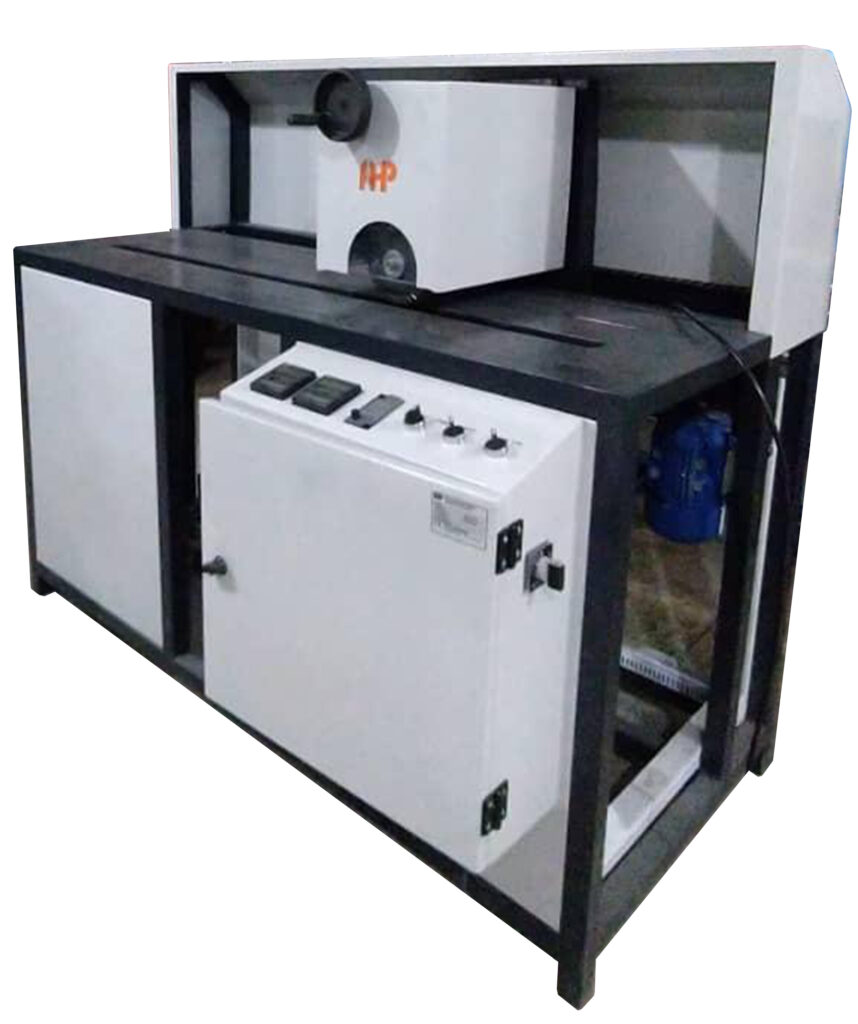
Notch Milling Machine for SCG Tester (Suitable for ANPT, NPT Test of Pipes)
- According to ISO 13479
- Suitable for pipes of diameter up to 250mm (other size ranges on request)
- Digital depth of notch cutter indicator
- Digital indicator of notch length
- Rotation speed adjustment
- Feed rate according to standard
- Manual notch depth adjustment
- Cutter according to standard
- Automatic sample holder
- A training video is included
