5 Pendulum method
5.1 Apparatus
5.1.1 General
The rebound resilience shall be measured by means of an apparatus consisting of a pendulum-like onedegree-of-freedom mechanical oscillatory device and a heavy and secure test piece holder.
The two items shall be suitably fixed together for rebound resilience measurements, and either item can be removed for purposes of adjustment or checking of the oscillatory device.
Means shall be provided for measuring the rebound of the pendulum, either using a calibrated scale or an electrical signal.
Various practical designs of apparatus which conform to these specifications are available (see Annexes B
and C).
NOTE 1 The various types of apparatus designed to operate within the ranges specified for the various parameters (see below) and correctly calibrated give substantially the same values of rebound resilience.
The apparatus and impacted test piece characteristics shall be such as to fall within the following specified ranges:
⎯ indentor diameter (D): 12,45 mm to 15,05 mm;
⎯ test piece thickness (d): (12,5 ± 0,5) mm;
⎯ impacting mass (m): 0,34 kg to 0,35 kg;
⎯ impact velocity (v): 1,4 m/s to 2,0 m/s;
⎯ apparent strain energy density (mv2/Dd2): 324 kJ/m3 to 463 kJ/m3.
NOTE 2 The conditions and apparatus specified in this International Standard involve the selection of a spherical indentor and of a flat test piece and are assumed to be essentially dependent on the fundamental parameters D, d, m and v listed above. In addition, the ratio of impact energy to an equivalent volume, or “apparent strain energy density” (mv2/Dd2), which under simplifying assumptions is related to impact strain, has to be maintained within the narrow range
specified.
NOTE 3 The ranges are such that they embrace the requirements for the Lüpke pendulum method (12,5 mm, 12,5 mm, 0,35 kg, 1,4 m/s, 351 kJ/m3) and the modified Schob pendulum method (15,0 mm, 12,5 mm, 0,25 kg, 2 m/s, 427 kJ/m3).

5.1.2 Oscillatory device
The oscillatory device shall consist of a rigid body or hammer terminating in an indenting spherical surface, supported so as to oscillate linearly or circularly under the action of a restoring force which can be due to gravity or produced by the elastic reaction of springs or by a wire in torsion. The velocity of the indenting spherical surface at the point of impact shall be in the horizontal direction and perpendicular to the surface of the test piece.
5.1.3 System for following the motion of the hammer
The motion of the hammer shall be followed either by means of a system comprising a pointer and a fixed scale or by a system which measures the position or velocity of the hammer to furnish electrical signals.
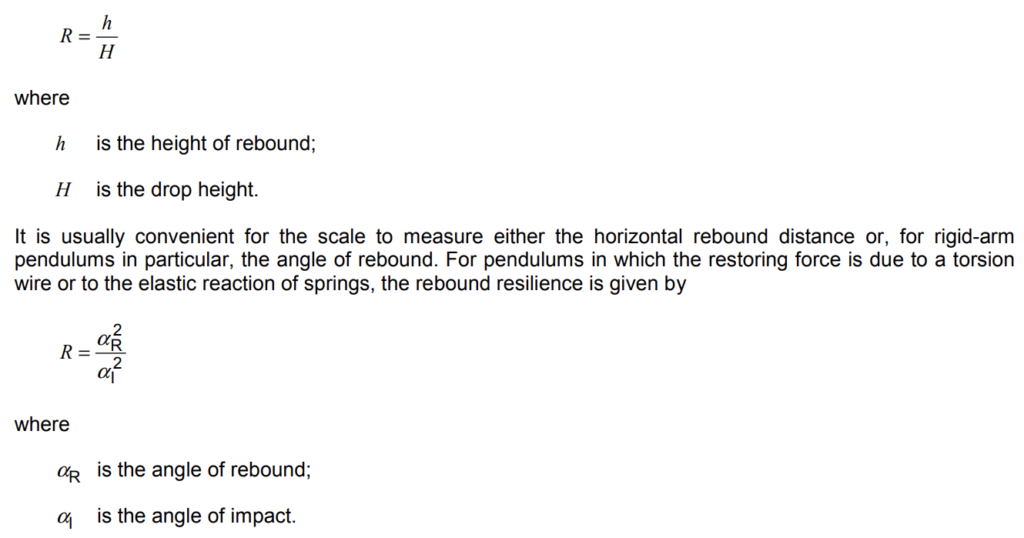
For pendulums in which the restoring force is due to gravity, the rebound resilience R is given by

For this form of apparatus, it is convenient for the scale to be used to measure the angle of rebound.
The scale can be graduated uniformly or be calibrated directly in units of resilience. For uniformly graduated scales, conversion equations, charts or tables to allow the determination of the resilience are also necessary.
5.1.4 Test piece holder
The disc-shaped test piece shall be securely held during mechanical conditioning and rebound measurement.
The surface against which the back of the test piece is applied shall be metallic, flat and smoothly finished, vertical and perpendicular to the impact velocity direction.
This backplate is part of an anvil which shall either be free, in which case it shall have a mass of at least
200 times the impacting mass, or shall be rigidly fastened to a very rigid system, such as a masonry structure.
Any type of suitable holding device can be used provided that it gives rebound resilience values that deviate by not more than 0,02 (absolute rebound resilience) from those obtained with test pieces bonded to a rigid backplate. This shall be checked using one compound of high rebound resilience (approximately 0,90) and one of high hardness (approximately 85 IRHD).
No lateral restraint shall be applied to the test piece. A clearance of at least 2 mm shall be left around it in
order to allow it to bulge freely when impacted.
Examples of suitable holding devices include suction holding devices (by vacuum), mechanical clamping
devices and combinations of the two. In any of these cases, the holding device shall not cause excess
deformation of the surface to be impacted and shall not allow shuffling or slipping. A recommended
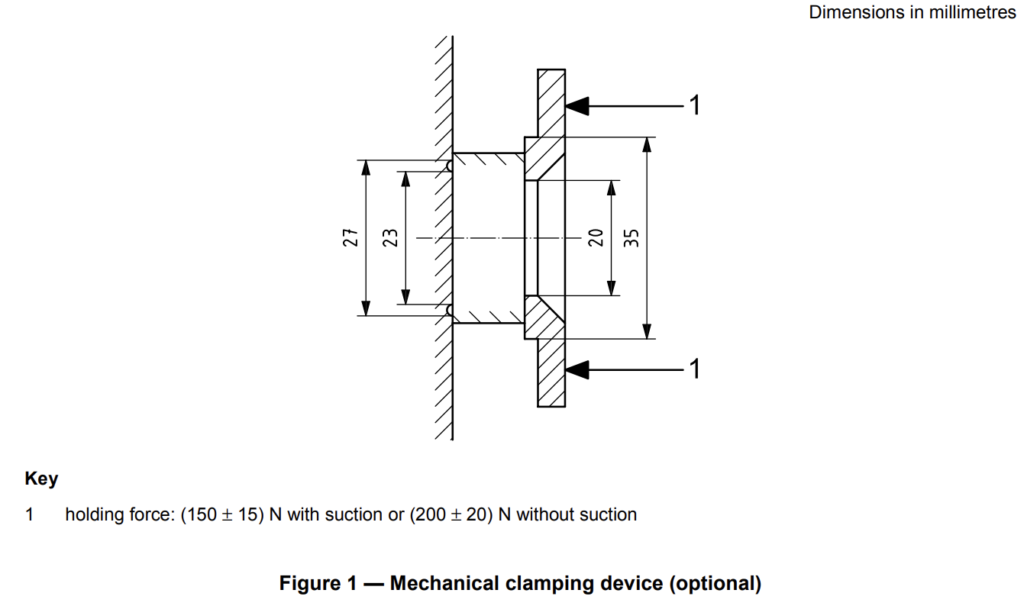
mechanical clamping device consists of a metal ring (see Figure 1) with a 20 mm internal diameter and 35 mm external diameter and able to exert on the front of the test piece a force of (200 ± 20) N given, for example, by springs. In this case, the indenting sphere shall enter, at its rest position, the centre of the retaining ring.
Another recommended method of holding is by suction on the back of the test piece. This can be applied
through a circular groove, 25 mm in diameter and 2 mm in width, evacuated by a pump which maintains an absolute pressure not greater than 10 kPa. In this case, the force exerted by the retaining ring can be reduced to (150 ± 15) N.
5.1.5 Temperature control
If measurements are to be carried out at a series of temperatures different from standard laboratory
temperature, the pendulum can be placed and operated in a suitable oven or cold chamber operating in
accordance with ISO 23529. In this case, the apparatus shall be checked for correct operation (see 5.1.6)
over the range of temperatures used.
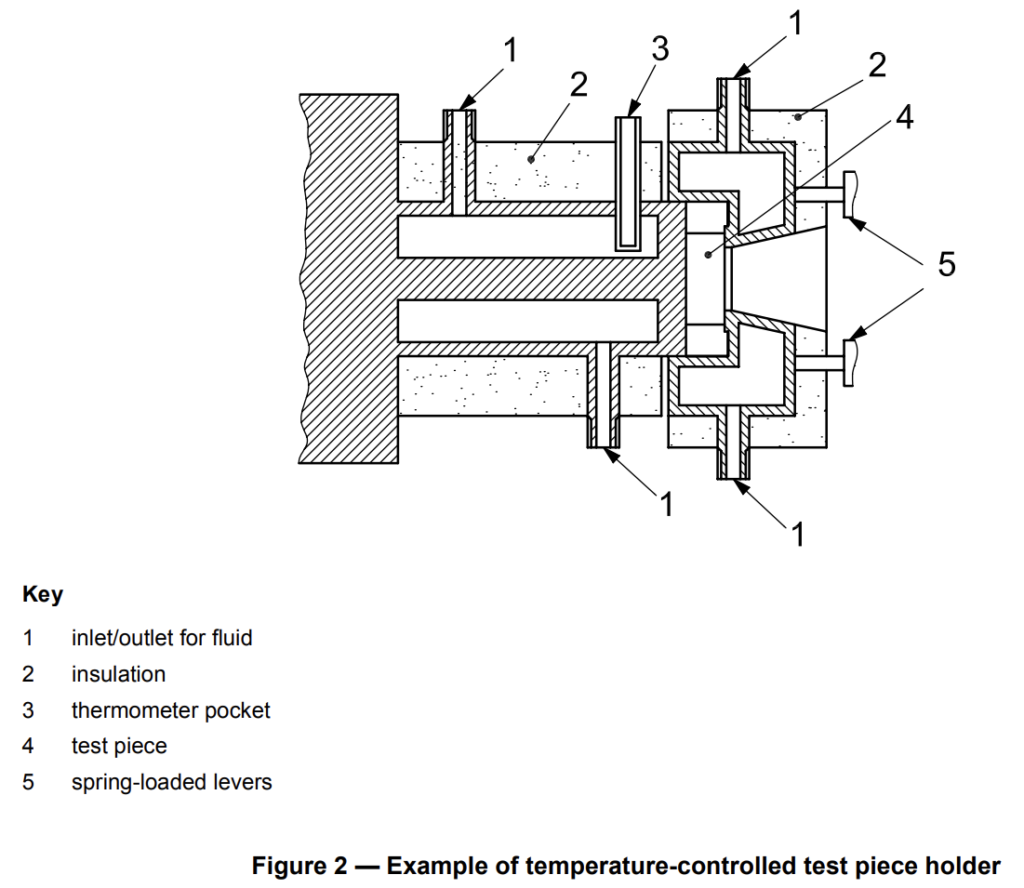
Alternatively, suitable provisions shall be made for heating or cooling the test piece holder by means of
circulating fluids (see Figure 2). A heated or cooled gas curtain over the front opening of the holder is
recommended in order to ensure that the test piece is completely surrounded by a temperature-controlled medium.
Thermocouples or other instruments shall be provided for measuring the temperature of the holder at a
position as close as possible to the test piece.


5.1.6 Adjustment of oscillatory device
The complete apparatus shall be repeatedly operated, impacting test pieces of rubber at the extreme ranges of hardness (30 IRHD and 85 IRHD). Its motion shall be smooth and no form of spurious oscillation mode, such as whip or vibration, shall be caused by the impact because of insufficient stiffness of rigid parts or a defective system of guidance.
For the purpose of initial adjustment or periodic checking, the test piece holder shall be removed from the oscillatory device and the following procedure carried out (measurement of the logarithmic decrement of the Lüpke pendulum may be omitted because it is clear that its logarithmic decrement is less than 0,01).
Weigh and measure the dimensions of the moving hammer and measure its distances from the guiding pivots or suspensions in order to carry out inertial-parameter calculations. From these, verify that the equivalent impacting mass conforms to the specifications in 5.1.1 and that its line of impact is such as not to cause significant reactions on pivots or suspensions.
Ensure that the diameter of the spherical indenting surface conforms to the specification in 5.1.1 and that the area of the spherical surface of the indentor in all cases exceeds the area of the indented surface of the rubber during impact. It is preferable that the impacting surface be a complete half-sphere.
Leave the complete oscillatory device free to attain its rest position. If using a pointer and fixed scale (see
5.1.3), check that this is at the zero point of the scale and that this is the position at which impact takes place.
At this point, the indenting sphere shall be moving horizontally.
The following procedure shall be carried out where necessary to correct for frictional losses. It is not
necessary where a method of observing impact and rebound velocities is used or the logarithmic decrement can be shown to be less than 0,01.
5.2 Test pieces
5.2.1 Preparation
The test pieces shall have flat, smooth and parallel surfaces. They shall be prepared either by moulding or by cutting and buffing. If test pieces are prepared by cutting and buffing, this shall be carried out in accordance with ISO 23529. They shall be free from fabric and any other reinforcing support.
5.2.2 Dimensions
The standard test piece is a disc with a thickness of (12,5 ± 0,5) mm and a diameter of (29 ± 0,5) mm. Other test pieces having non-standard dimensions may be used for comparative measurements with special provisions (see Annex A).
5.2.3 Measurement of dimensions
Check that the test pieces meet the requirements in 5.2.2, using the appropriate method of measurement
described in ISO 23529.
5.2.4 Number of test pieces
For each material, two test pieces shall be tested.
5.2.5 Time-interval between forming and testing
Samples and test pieces shall be protected from light and heat as much as possible during the interval
between forming (vulcanization or moulding) and testing.
For normal test purposes, the minimum time between forming and testing shall be 16 h. In cases of arbitration, the minimum time shall be 72 h.
For non-product tests, the maximum time between forming and testing shall be four weeks and, for
evaluations intended to be comparable, the tests shall, as far as possible, be carried out after the same time interval.
For product tests, whenever possible, the time between forming and testing shall not exceed three months. In other cases, tests shall be made within two months of the date of receipt of the product by the purchaser (see ISO 23529).
If the preparation of the test piece involves buffing, the interval between buffing and testing shall be not less than 3 h and not greater than 72 h.
5.2.6 Conditioning
Prepared test pieces shall be conditioned immediately before testing for a minimum period of 3 h at one of the standard laboratory temperatures specified in ISO 23529. The same temperature shall be used throughout any one test or series of tests intended to be comparable.
5.3 Temperature of test
The temperature or temperature range of the test shall be chosen according to the material being tested and the information required. Preference shall be given to the temperatures listed in ISO 23529. The tolerance limits on the temperature shall be not more than ± 1 °C. When no temperature is specified, a standard laboratory temperature shall be chosen.
Where the resilience changes quickly with temperature, the use of more temperatures at closer intervals is
recommended.

Rebound Resilience Tester | Rubber Tester
Standards
- DIN 53 512
- ISO 4662
- BS 903 Part A8 Method B
- ASTM D7121, Method B
- DIN 13 014
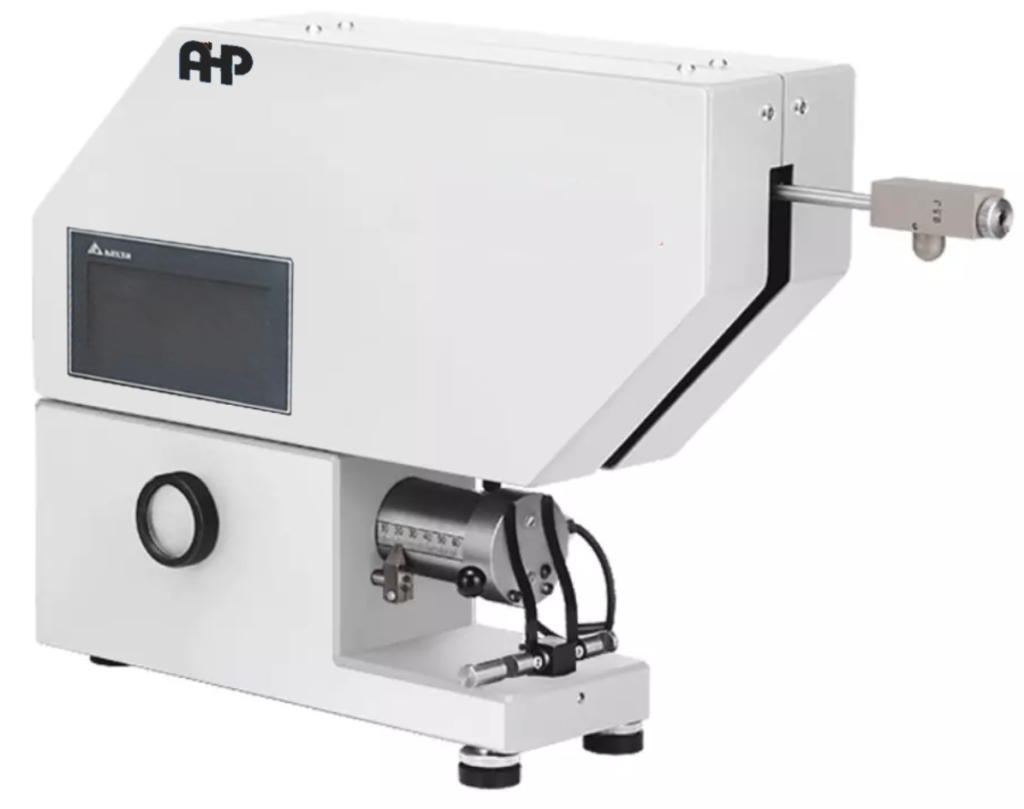
The rebound resilience tester:
- For tests on elastomers and rubber to DIN 53512 (elastomers and rubber); ISO 4662 (rubber); BS 903 Part A8 Method B (rubber); ASTM D7121 Method B (Schob)
- For tests on foam materials to DIN 13014 (polyether foam hospital mattresses).
Function description
The objective of tests on elastomers and foams is the straightforward and fast measurement of material elasticity. One material that is up to 100% elastic stores supplied energy and releases it at the moment the force is no longer applied. In contrast, material that is up to 100% plastic absorbs supplied energy completely. These characteristics are used to measure rebound resilience.
Advantages
Instrument equipment/details:
- Resolution 0.06 degrees.
- Extremely low-maintenance – fully automatic sequence
- Frictionless pendulum encoder.
- Wear-free mechanism – ideal for continuous operation.
- Touch screen
Operation
- Menu-guided operation.
- Pendulum height is easily adjustable via an eccentric
- Export of data to MS Excel
Optional Specimen tempering
The specimen plus interchangeable clamping fixture can be temperature-conditioned externally in a heated chamber.
The specimen clamping fixture is attached to the instrument base by means of a plug fastener, enabling rapid changes. This reduces temperature losses from the temperature-conditioned specimen during insertion into the tester.
A specimen holder with a temperature control unit for a temperature range of up to 100°C that can be electrically heated is available for tests at high temperatures.
| Item No. | 3802 | 3804 | |
| Specimen dimensions | |||
| Diameter of the specimen | Ø 28 … 50 | – | mm |
| Specimen length | 28 … 50 | 80 | mm |
| Specimen width | 28 … 50 | 80 | mm |
| Specimen thickness | 0 … 15 | 50 | mm |
| Distance from specimen holder to the striker | 0 … 60 (can be adjusted steplessly) | 0 … 60 (can be adjusted steplessly) | mm |
| Pendulum energy | 0.5 | 0.2 (pendulum 1), 0.196 (pendulum 2) | J |
| Pendulum striker, dome-shaped | Ø 15 | – (pendulum 1), Ø 30 (pendulum 2) | mm |
| Rounded end | – | RK= 40, Cyl. Ø = 40 (pendulum 1) | |
| Pendulum length | Lred = 200 | Lred = 200 | mm |
| Pendulum mass | 0.252 | – | kg |
| Apparent strain energy density | 426.5 | – | kJ/m3 |
| Angle of fall | 90 | 90 | ° |
| Impact velocity | 1.98 | 1.98 | m/s |
| Display | 3″ Touch screen | 3″ Touch screen | |
| Dimensions | |||
| Height | 380 | 380 | mm |
| Width | 500 | 500 | mm |
| Depth | 280 | 280 | mm |
| Weight, approx. | 60 | 60 | kg |
| Scope of delivery | 1 connecting cable, 1 spherical striking edge , 1 specimen grip | 1 connecting cable, 1 spherical striking edge , 1 specimen grip |
