3 Principle
A test piece consisting of a PVC-U pipe mounted into a PVC-U socket is exposed within a specified temperature range to two specified negative internal pressures for a specified test period, while the pipe is being subjected to an angular deflection in the socket and to deformation. During the test the test piece is monitored for signs of leakage.
4 Apparatus
4.1 Apparatus, comprising at least two fixing devices, one of which is movable, to allow angular deflection to be applied to the test joint, while a negative air pressure (partial vacuum) is being applied.
4.2 Vacuum gauge, having an accuracy of ± 1 % at the measured values.
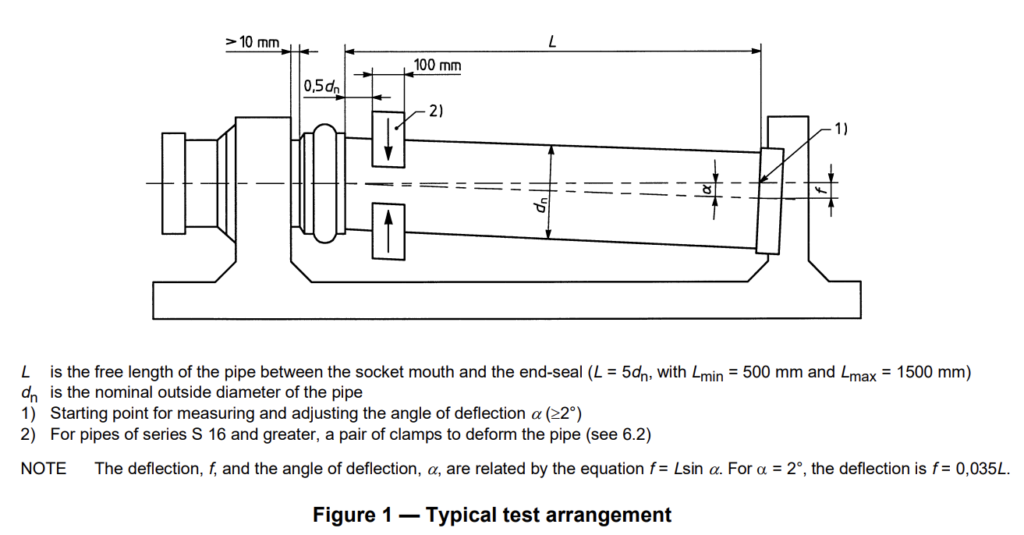
4.3 Equipment, designed to produce a deforming force on the pipe spigot at a specified distance from the mouth of the socket. A typical arrangement is shown in Figure 1.

4.4 Vacuum pump, capable of maintaining the two required levels of negative pressure (see 6.6).
4.5 Isolation valve, between the test piece and the vacuum pump (see 6.6).
5 Test piece
The test piece shall comprise an assembly of a PVC-U pipe section conforming to either EN 1452-2 or ISO 4422-2, as applicable, and mounted into the PVC-U socket to be tested.
NOTE When the test is conducted in accordance with EN ISO 13844, EN 1452-2 is applicable, whereas ISO 4422-2 is applicable when the test is conducted in accordance with ISO 13844.
The assembly shall be carried out in accordance with the socket manufacturer’s instructions.
Pipes of the same nominal pressure (PN) or the same pipe series S as that of the socket shall be used for the test.
For the applicable size, the mean outside diameter of the pipe shall be the smallest available within the tolerance band and the socket dimensions (mean inside diameter and the diameter of the groove for housing the sealing ring) shall be the largest available conforming to the maximum values stated by the manufacturer.
The length of the pipe section shall be such that the free length, L, between the socket mouth and the end-seal is equal to five times the nominal outside diameter of the pipe with a minimum of 500 mm and a maximum of 1500 mm.
6 Procedure
6.1 Secure the socket, without any deformation, to the immovable fixing device of the apparatus so that the socket axis is horizontal and adjust the pipe section in line with the axis of the socket.
6.2 For pipes of series S 16 and greater (i.e. thinner walls), deform the pipe in the vertical plane by 5 % of the dn using a pair of 100 mm wide clamps placed at a distance of 0,5dn from the mouth of the test socket. Measure the deformation at the face of the clamp adjacent to the mouth of the socket.
6.3 For pipes of series less than S 16 (i.e. thicker walls), carry out procedures given in 6.4 to 6.6 without applying the deforming force.
6.4 By inclining the pipe in the test apparatus, determine the free angle of deflection, Alfa , which the joint can tolerate without forcing.
If Alfa >= 2°, firmly anchor the pipe to maintain the deflected pipe in this position for the remainder of the test. If Alfa < 2°, carry out the test at a deflection of 2° measured at the starting point (see Figure 1), by forcing the pipe to that position.
6.5 Carry out the procedure of 6.6 under the following conditions:
a) with the angular deflection applied in the vertical plane while constantly inspecting for and recording any signs of leakage;
b) with the ambient temperature constant to within ± 2 °C and within the range of 15 °C to 25 °C.
6.6 Apply a negative pressure to the test piece until a constant gauge pressure of -(0,1 ± 0,02) bar
[-(0,01 ± 0,002) MPa] is achieved (see Figure 2).
Isolate the vacuum pump from the test piece, monitor the pressure for 15 min and record any change in the negative pressure. If the change in negative pressure exceeds 0,05 bar (0,005 MPa), stop the test.
Unless the change in negative pressure was not more than 0,05 bar [0,005 MPa], apply a further negative pressure to the test piece until a constant gauge pressure of -(0,8 ± 0,02) bar
[-(0,08 ± 0,002) MPa] is achieved.
Again, isolate the vacuum pump from the test piece, monitor the pressure for a further 15 min and record any change in negative pressure.
NOTE The first negative pressure is approximately 0,9 bar absolute. The second negative pressure is approximately 0,2 bar absolute.

