4. Summary of Test Method
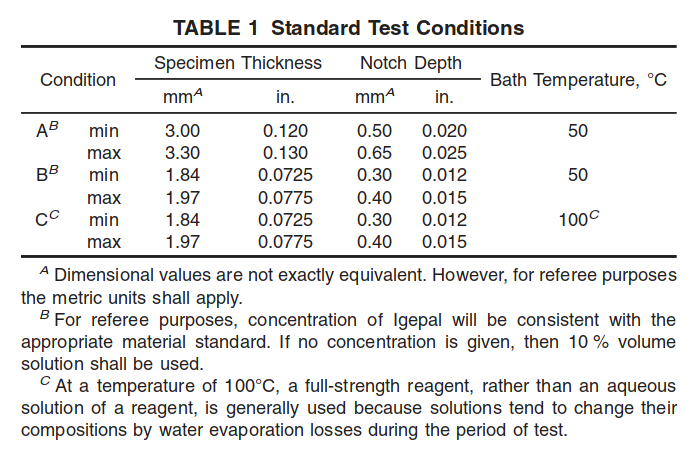
4.1 Bent specimens of the plastic, each having a controlled imperfection on one surface, are exposed to the action of a surface-active agent. The proportion of the total number of specimens that crack in a given time is observed.
6. Apparatus
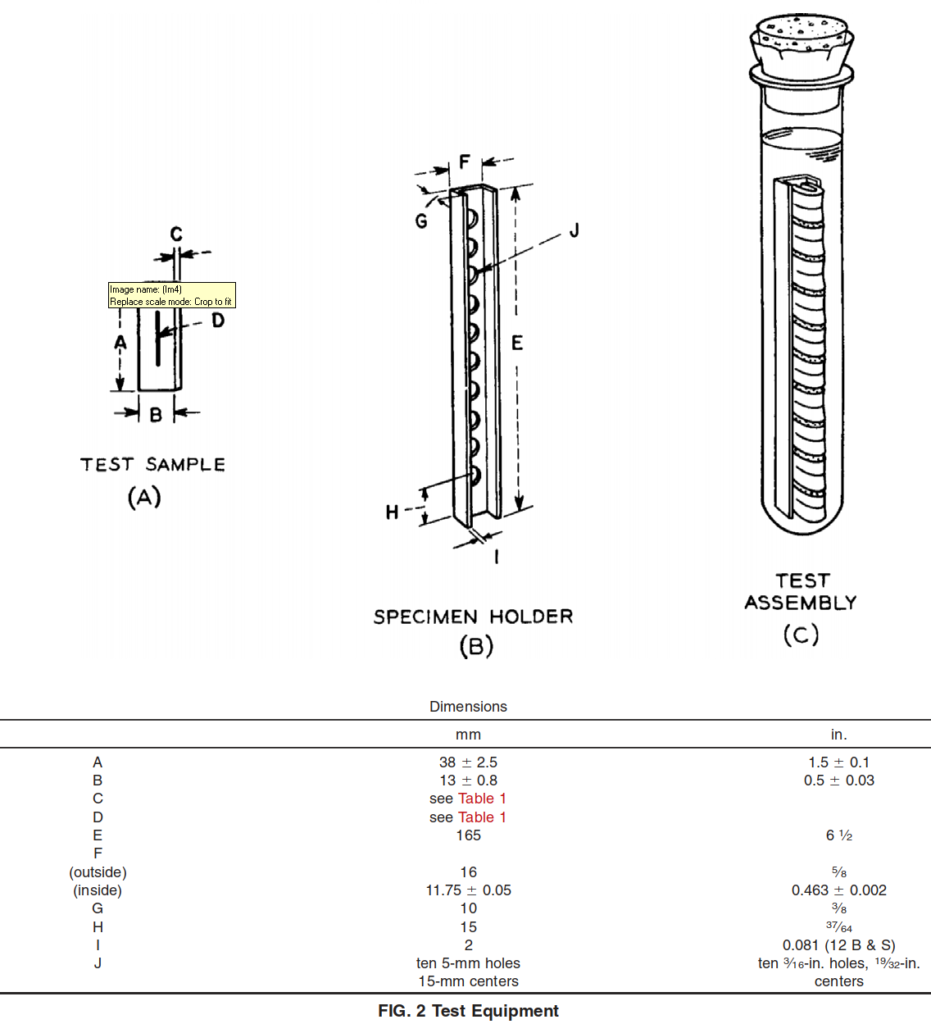
6.1 Blanking Die—A rectangular die or other means suitable for cutting specimens 38 6 2.5 mm by 13 6 0.8 mm
(1.5 6 0.1 in. by 0.50 6 0.03 in.). These specimens must be cut with square edges. Beveled ends in particular are to be avoided.
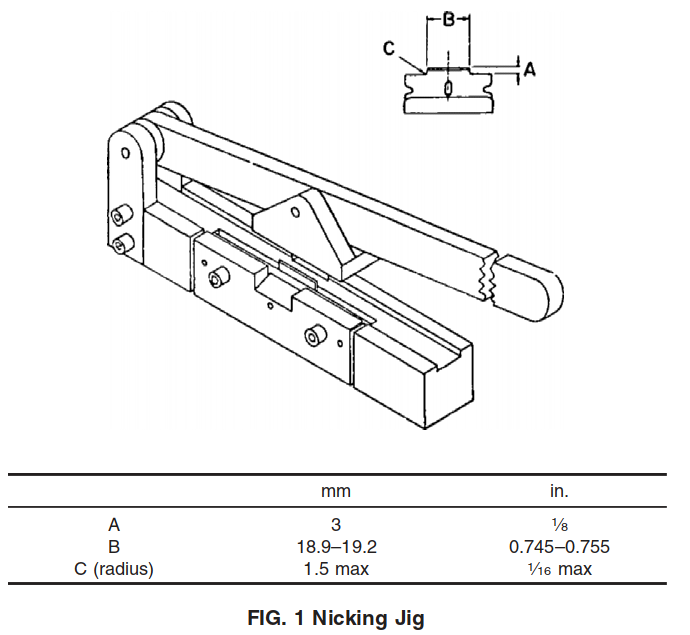
6.2 Jig—A jig for making a controlled imperfection in specimens of the dimensions shown in Table 1, parallel to the
long edges of the specimen and centered on one of the broad faces. The jig shown in Fig. 15shall be used.
NOTE 4—It is recommended that the jig be permanently mounted to ensure notching consistency.
6.3 Specimen Holders—Lengths of hard or half-hard brass channel having the dimensions shown in (B) of Fig. 2 shall be used. The sides of the channel shall be parallel and the inside corners sharp and square. Any burrs present on the inside of the channel shall be removed. The inside width is critical (see Dimension F in Fig. 2).
6.4 Test Tubes and Closures—Hard glass tubes nominally 200 mm long with a preferred minimum inside diameter of
31.5 mm and a cork or rubber stopper. Alternatively, tubes with threaded ends and plastic caps are permissible.
NOTE 5—Some older test tubes have inside diameters of less than 31.5 mm. These are acceptable as long as there is adequate clearance to allow the filled specimen holder to be inserted into the tube without any interference.
NOTE 6—Hard glass (borosilicate) tubes and No. 15 corks have been found satisfactory.
6.5 Aluminum Foil—Approximately 0.08 to 0.13 mm
(0.003 to 0.005 in.) thick, for wrapping.
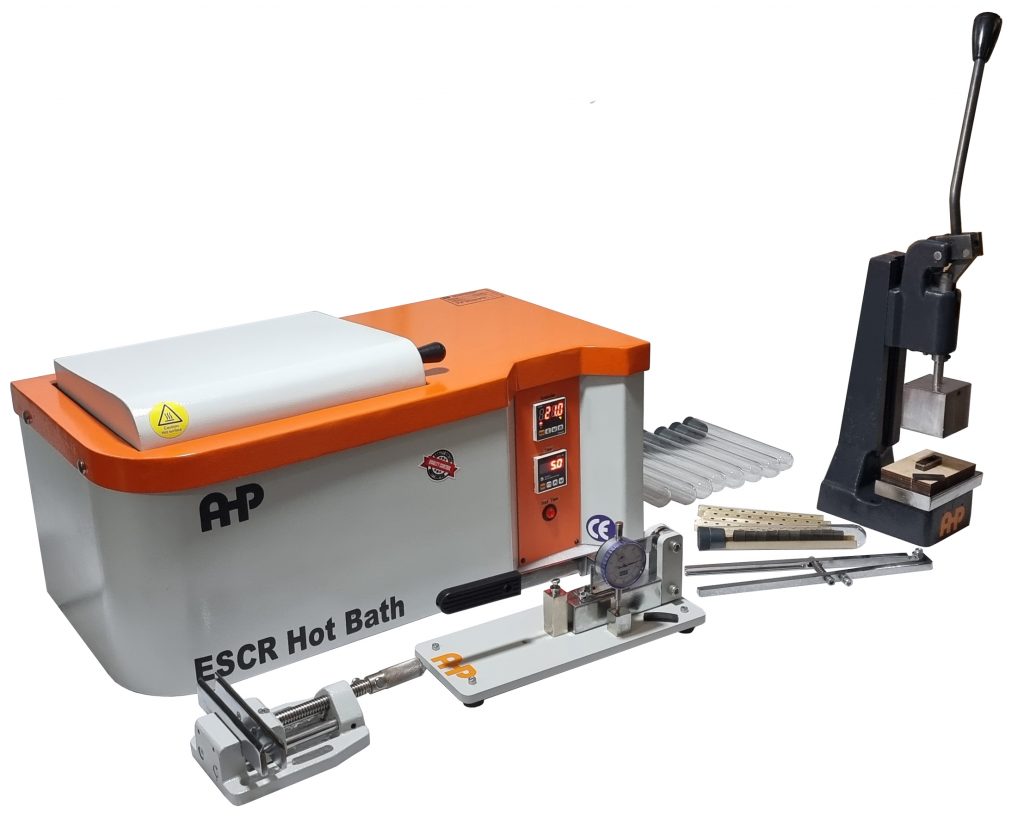
6.6 Constant-Temperature Bath—A constant-temperature liquid bath maintained at 50.0 6 0.5°C for Conditions A and B of Table 1 and 100.0 6 0.5°C for Condition C of Table 1.
6.7 Test Tube Rack—A rack to hold test tubes immersed to reagent level.
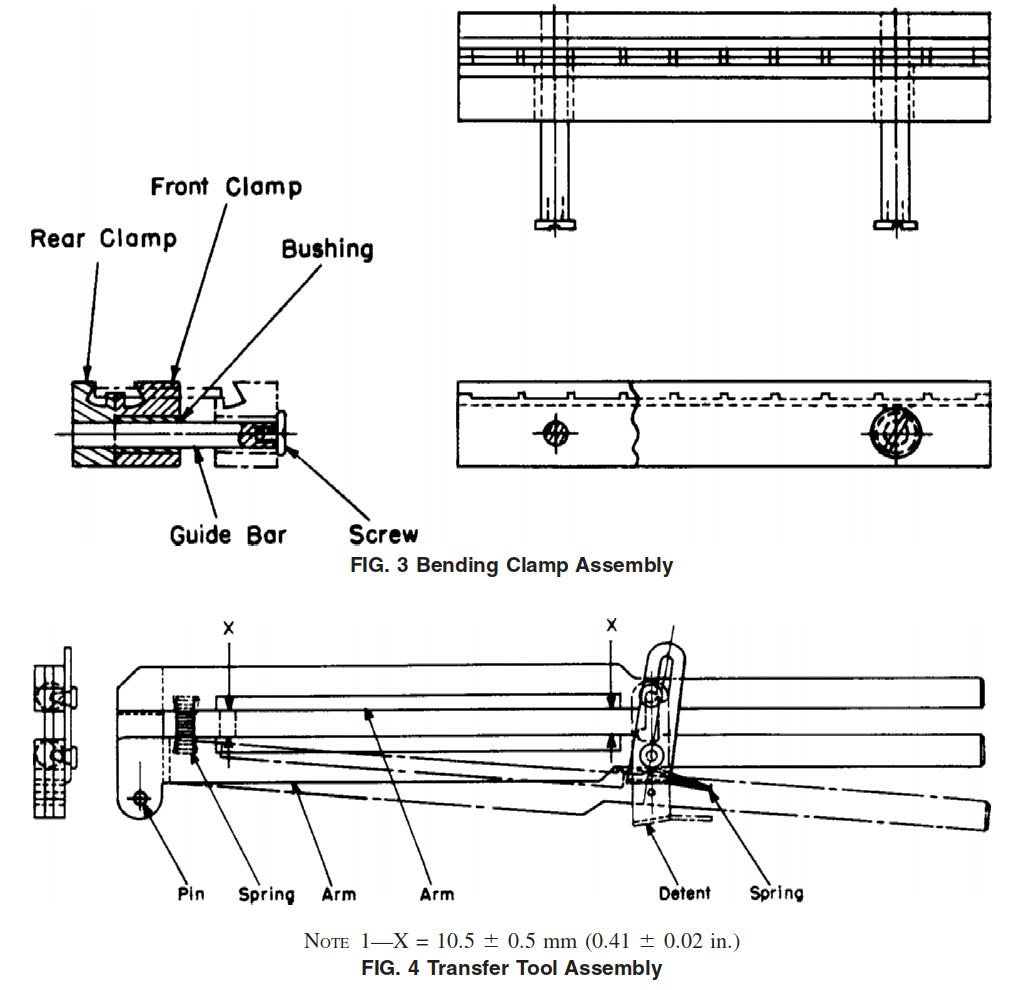
6.8 Bending Clamp—As shown in Fig. 3.
6.9 Transfer Tool—As shown in Fig. 4.
7. Reagent
7.1 The preferred reagent is a nonylphenoxy poly(ethyleneoxy)ethanol.6
NOTE 7—There are environmental concerns regarding the disposal of Nonylphenoxy poly(ethyleneoxy) ethanol (CAS 68412-54-4), for example, Igepal CO-630. Users are advised to consult their supplier or local environmental office and follow the guidelines provided for the proper disposal of this chemical.
NOTE 8—The reagent should be stored in closed metal or glass containers because it is somewhat hygroscopic.
NOTE 9—The manufacturer has stated that this aggressive agent undergoes no known degradation when used as follows: A10 % volume solution in water at 50°C for 1000 h of testing.
NOTE 10—The appearance of carbonyl bands in an Igepal Fourier transform infrared (FT-IR) scan is an indication of degradation.
7.2 Other surface-active agents, soaps, or any liquid organic substance that is not absorbed appreciably by the polymer can also be used.
8. Test Specimen
8.1 Unless otherwise specified, the test specimens shall be molded in accordance with Procedure C of Annex A1 of Practice D4703.
NOTE 11—Use no liquid release agents, waxes, polishes, and so forth, when molding. However, inert materials such as polyester film, unplasticized cellophane, polytetrafluoroethylene, and aluminum foil have been found satisfactory.
8.2 Sheets may be examined for internal stresses by taking specimens from random locations in the sheet and placing them in a Petri dish containing 3 mm (1⁄8 in.) of talc and setting the dish in an air oven at 130°C for Types I and II polyethylene plastic and at 150°C for Types III and IV polyethylene plastic for 30 minutes. If shrinkage of the specimens is less than 10 % in the lengthwise direction, the molded sheet can be considered satisfactory (see also Test Method D1204).
8.3 Cut specimens from smooth sheet pressed from granules or mill-massed material to the dimensions given in Fig. 2 (A). Use a die or other device that produces specimens with clean-cut, square, unbeveled edges. The specimens should be cut within 24 h after the sheets are prepared.
10. Procedure
10.1 Select the condition desired from Table 1.
NOTE 12—Generally, polyethylene plastics with densities between
0.910 and 0.925 are tested under Condition A. Polyethylenes with densities >0.925 are tested under Condition B. Condition C may be used to accelerate testing for materials with extremely high ESCR values. The user of this test method should refer to the material specifications such as D1248, D3350, or D4976 for specific test conditions.
10.2 Give each conditioned specimen a controlled imperfection (notch) on one surface as shown in (A) of Fig. 2. Use a sharp blade, mounted in the jig shown in Fig. 1, for making this imperfection. A depth micrometer may be used for setting the blade in the jig so that the notch depth is controlled as specified in Table 1. The difference between the height at the top of the blade edge and the channel of the jig where the top of the specimen rests when being nicked is measured to ensure the proper setting of the blade.
NOTE 13—Where it is desired to nick specimens to a notch depth required by Conditions B and C in Table 1 and the available jig has been designed for nicking specimens to a notch depth required by Condition A in Table 1, brass shim stock 0.21 mm (0.008 in.) thick may be used to make the more shallow notch. Brass shim stock is cut wide enough so that it fits snugly inside the jig channel where the specimen rests when nicked. The length of the shim should be such that it extends over the blade, around the end of the jig, and under the end so that the jig will rest on
about 1 or 2 in. of the shim stock. The weight of the jig resting on the shim stock prevents deformation of the shim stock during the nicking operation. An oblong hole long enough to fit completely over the protruding blade is cut in the other end of the shim stock. Discard shim stock that becomes wrinkled or deformed in such a way as to prevent the specimen from lying horizontal in the jig.
NOTE 14—In order to maintain notch consistency, it is recommended to keep the force applied to the jig handle constant. This can be done by applying the force at the same location of the jig handle each time using a torque wrench.
NOTE 15—The notch depth correlates with the depth of blade setting, which is measured by a depth micrometer (see 10.2). The notch depth can be verified by microtoming the cross section of the specimen followed by examining the slice under microscope. It also can be done by fracturing a notched specimen after it is cooled with liquid nitrogen then examine the fracture surface under microscope.
NOTE 16—Check notch quality for straight edge, sharp notch and free of stress concentration area by examining the cross section of the specimen under microscope equipped with a polarized light.
10.3 Inspect the edge of the blade for notches and burrs under normal vision prior to the first nicking and at least after each 30 successive nicks have been performed. In no case shall a blade be used for more than 100 specimens. Replace the blade whenever there is any question of its having become dull or damaged.
10.4 Place ten specimens, with the controlled imperfection up, in the slots provided in the bending clamp. Close the clamp by means of a vise, arbor press, or other suitable aid, taking 30 to 35 s for the complete closing operation. Place the transfer tool in position on top of the closed clamp and close it over the specimens. Then lift the specimens from the clamp with the transfer tool and place them in the channel by releasing the transfer tool. The ends of all the specimens should rest against the base of the brass channel. If some specimens are riding too high in the holder they should be forced down by manual pressure.
10.5 Not more than 10 min after the specimens have been bent into the holder, insert the holder in the test tube. Then immediately fill the tube to approximately 13 mm (0.5 in.) above the top specimen with fresh reagent which is at a temperature of 23 6 1°C (73.4 6 1.8°F). Stopper the tube with a foil-wrapped cork and immediately place it in the constant-temperature bath at the preselected test temperature. The controlled imperfections should not be touching the test tube during the test.
NOTE 17—The heat capacity and the heat input capacity of the bath should be high enough so that the temperature does not drop more than 1°C when the samples are added.
10.6 Inspect the test specimen at indicated elapsed times and record the total number of failures at the time.
10.7 Obtain the failure point in one of the following three ways:
10.7.1 Percentage of failure at the end of the intervals specified for the material under test, for example, 50 % failure at 24 h.
10.7.2 Estimated failure time in hours when a percentage of failure occurs by observation. This is designated as fp where p is the percentage of specimen failure. f50will be the time when the fifth specimen fails in a ten-specimen test.
10.7.3 Estimated failure time in hours when a percentage of failure occurs by graphical calculation as described in Annex A1. This is designated as Fp where p is the percentage of specimen failure. F50will be the calculated time at the 50 % line on the probability graph.

