6.6 Preparation of test specimens to determine compliance with the requirements for creep, dimensional change and compressive strength
6.6.1 Temperature
Prepare specimens at (23 +- 2) ºC, unless specified otherwise.
6.6.2 Mixing
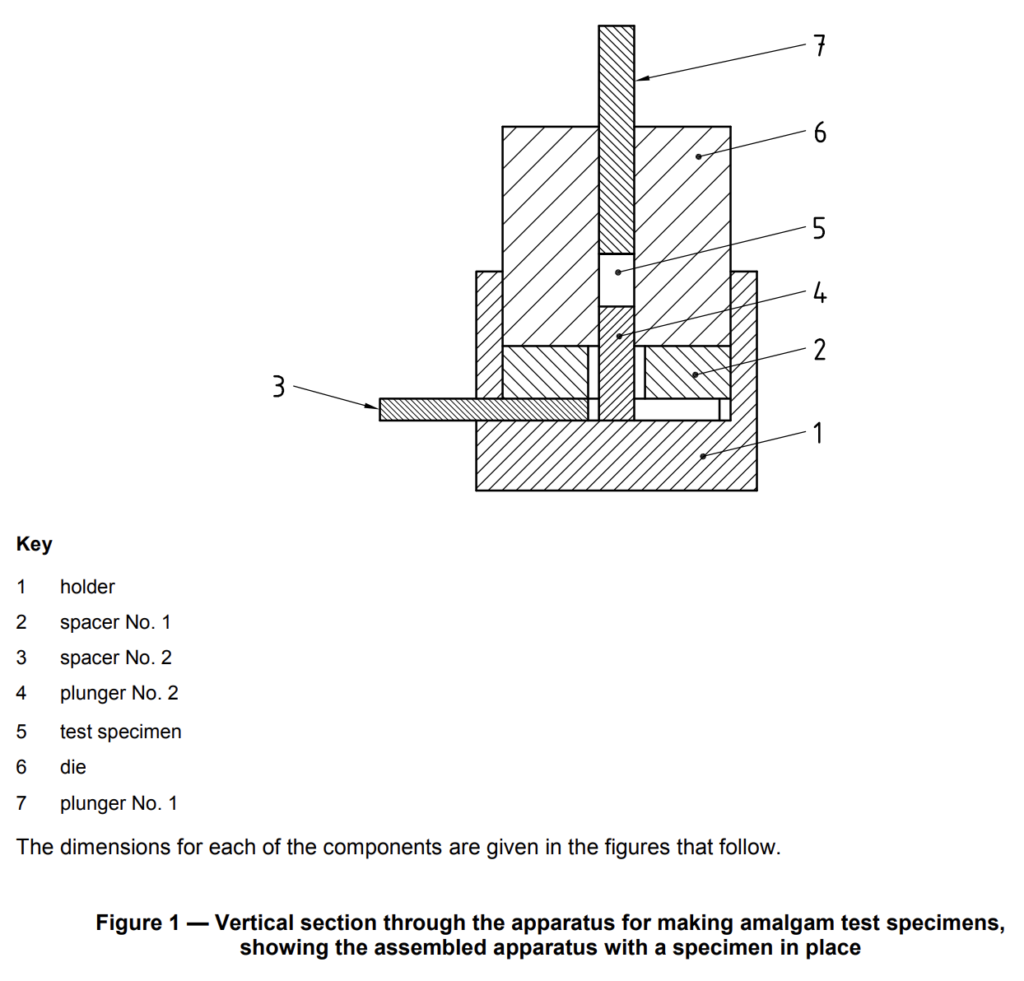
Mix a mass of the amalgam sufficient to make a test cylinder (8 +- 1) mm high after condensation into the die shown in Figure 1. If necessary, adjust the height of the cylinder by condensing only a portion of the amalgam mix into the die.
For alloy supplied either as tablets or as a powder in bulk, the alloy mass and the mercury mass to be mixed, the capsule, the pestle (if needed), and any other mixing accessory required shall conform to those
recommended by the manufacturer in accordance with 7.3.2 and 7.2.1 h). Use dental mercury that complies with requirements 4.5 and 4.6 of this International Standard.
For products supplied in predosed capsule form, use as many capsules as needed. If more than one capsule has to be used, mix them simultaneously using equipment of the same type.
Use an amalgamator that complies with ISO 7488. The manufacturer of the amalgam product, in accordance with 7.3.1 b), shall specify the amalgamator’s setting and the mixing time.
6.6.3 Apparatus for the preparation of test specimens for determining creep, dimensional change
and compressive strength
6.6.3.1 General
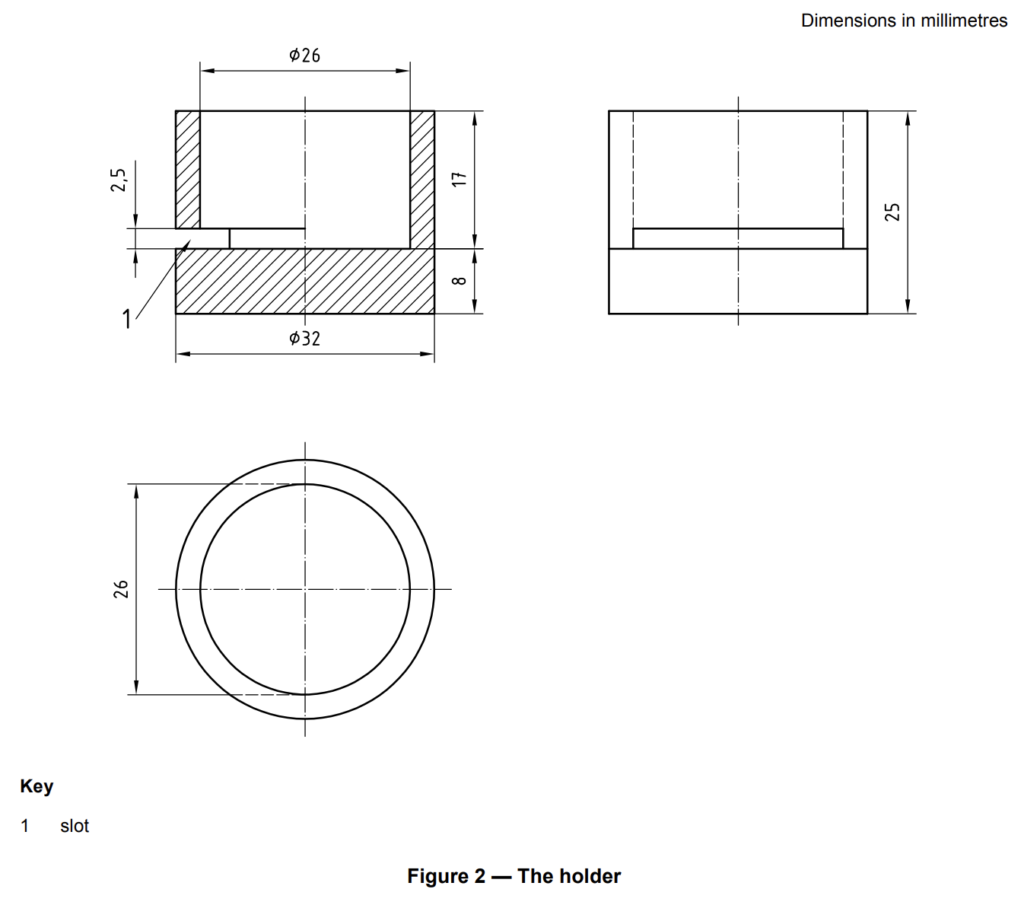
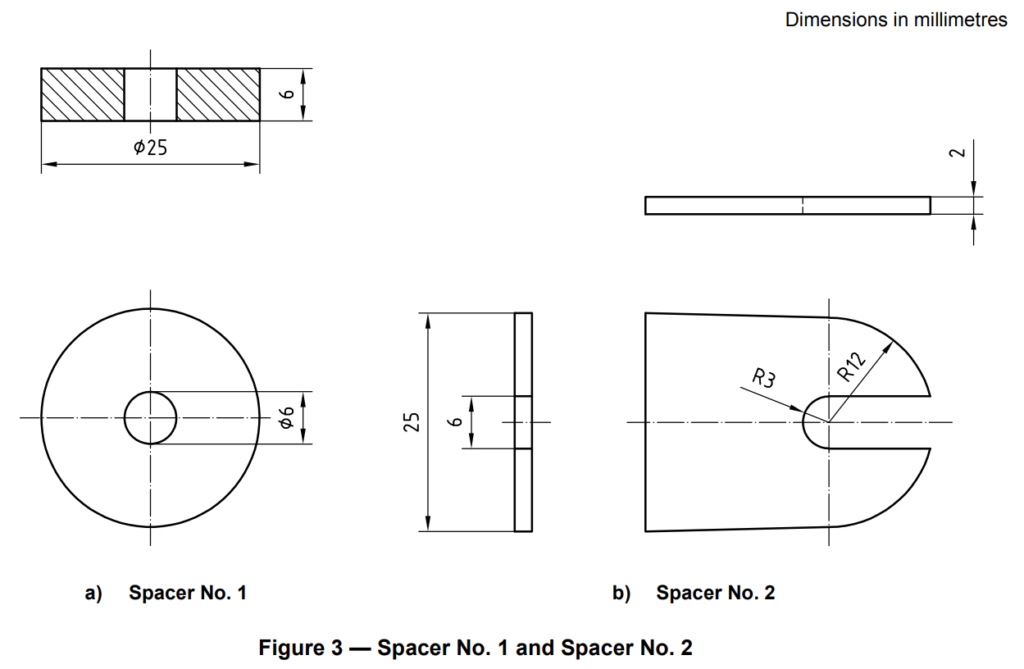
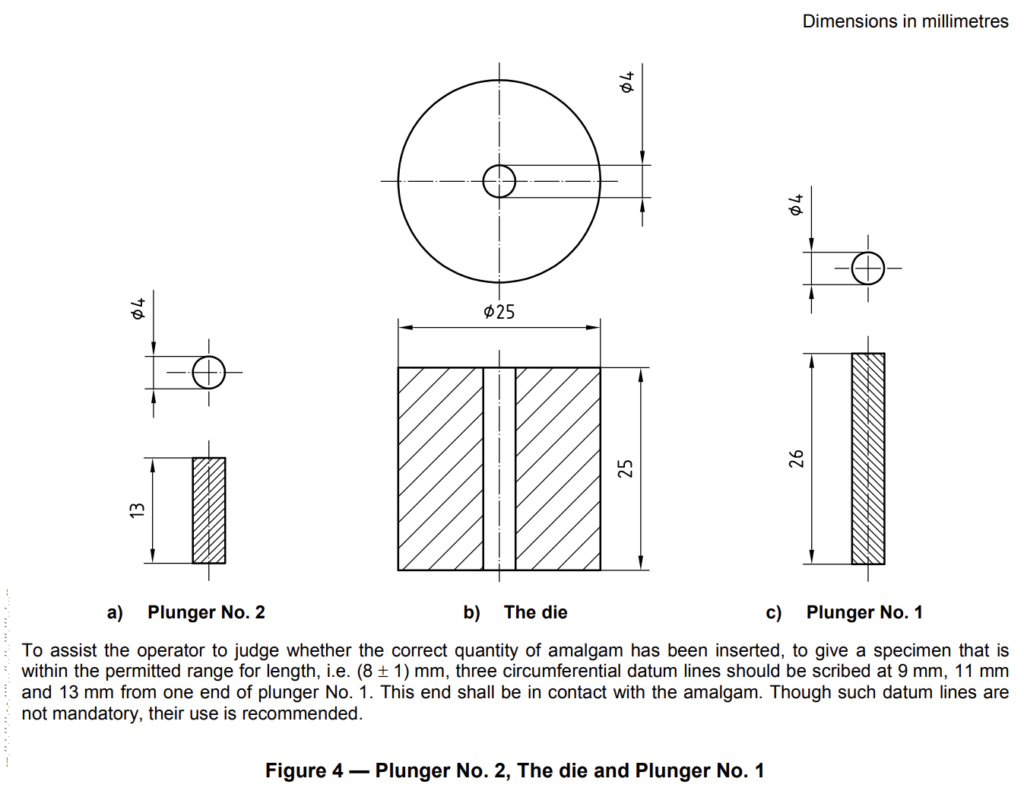
Use the apparatus as shown in Figures 1 to 5.
6.6.3.2 Materials and tolerances for construction of the apparatus
Make the holder, the spacers and the cap of cold-rolled or stainless steel. Make the die and the plungers of hardened tool steel or hardened stainless steel. Hone the working surfaces of the die and the plungers to a core roughness depth (Rk) not greater than 6,3 µm when tested in accordance with ISO 13565-2. Limits of clearance between the die and the plungers shall be F7h7 in accordance with ISO 286-2.
6.6.3.3 Assembly of the apparatus
For production of creep and compressive strength specimens, assemble the holder, spacers Nos. 1 and 2, the die and plunger No. 2 as shown in Figure 1.
Particular measuring instruments used in the dimensional-change test (e.g. interferometers) may require an impression on the end surface of the specimen that is produced by the cap that is shown in Figure 5. For production of dimensional-change specimens, include the cap in the assembly if this is appropriate for the measuring instrument that is to be used. In which case, position the cap on top of the plunger No. 2.
6.6.4 Condensation
Empty the coherent mass of the mixed amalgam on top of the die cavity and insert immediately, using several thrusts of an amalgam condenser slightly less than 4 mm in diameter. Do not express mercury during insertion.
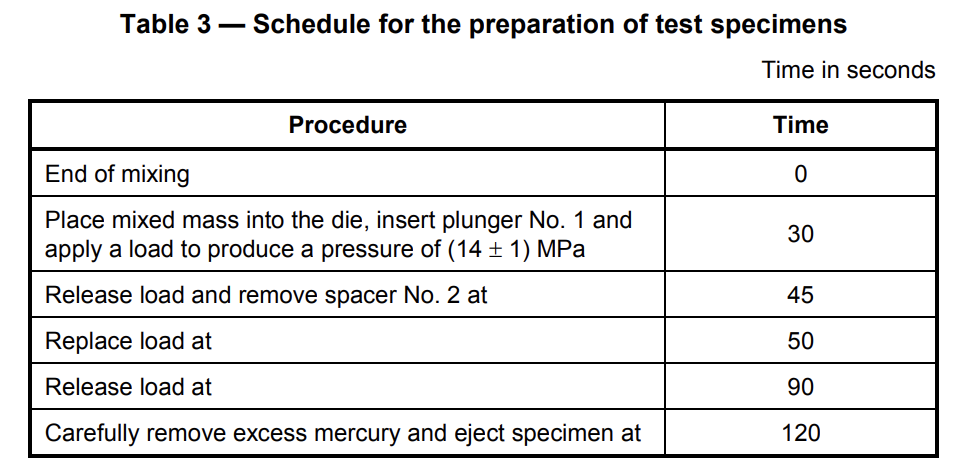
Insert plunger No. 1 and follow the schedule in Table 3. The specimen shall not be trimmed. After ejection,
transfer the specimen to air maintained at (37 +- 1) ºC.
NOTE If plunger No. 1 has circumferential datum lines scribed on its cylindrical surface, they will provide reference points to determine whether the amount of amalgam inserted will give a specimen that is within the permitted range for length. The lines are at 9 mm, 11 mm and 13 mm from the end of the plunger that is in contact with the amalgam.
If the cap (Figure 5) is not present in the assembled apparatus and the 13 mm datum line alone can be seen, the specimen will have a length that is (8 +- 1) mm.
If the cap (Figure 5) is present in the assembled apparatus and both 11 mm and 13 mm datum lines can be seen but the 9 mm line cannot, the specimen will have a length that is (8 +- 1) mm.
6.7 Determination of creep
6.7.1 Preparation of test specimens
Prepare the specimens in accordance with 6.6. Make five specimens. Store these at (37 +- 1) ºC for
(7,0 +- 0,2) days. Prior to testing, grind the surface of both ends of each specimen plane and perpendicular to the axis using wet, coated abrasives that comply with microgrit size P1200, according to ISO 6344-1:1998.
Measure the length of each specimen and record it, to the nearest 0,01 mm, as the original length.
6.7.2 Procedure
Apply a stress of (36,0 +- 0,2) MPa normally and uniformly over the cylinder ends, continuously for 4 h at a temperature of (37,0 +- 0,5) ºC. Record the change in specimen length between (1,00 +- 0,05) h and
(4,0 +- 0,1) h to an accuracy of 0,01 mm.
Calculate the creep strain, to the nearest 0,1 %, as follows:
Test three specimens. If all three results meet the requirement in Table 2, it is not necessary to test the other two specimens.
If one of the three specimens fails to meet the requirement in Table 2, test two more specimens.
Test no more than five specimens.
6.8 Determination of dimensional change during hardening
6.8.1 Preparation of test specimens
Prepare the specimens in accordance with 6.6.
6.8.2 Procedure
Place the specimen in the measuring instrument. Do not subject the specimen to a restraint greater than
0,02 N during the test. Maintain the specimen at a temperature of (37 +- 1) ºC during the test. Measure the dimensional change that occurs between (5,0 +- 0,1) min and (24,0 +- 0,1) h from the end of mixing, to an accuracy of +- 0,5 µm. At (24,0 +- 0,1) h measure the specimen length to an accuracy of +- 0,01 mm.
Calculate the dimensional change, to the nearest 0,01 %, as follows:
6.9 Determination of compressive strength
6.9.1 Preparation of test specimens
Prepare the specimens in accordance with 6.6.
6.9.2 Procedure
Determine the compressive strength by means of a suitable mechanical testing machine. During the test,
maintain the specimen at a temperature of (23 +- 2) ºC. Apply the load normally and uniformly over the cylinder ends at a crosshead speed of (0,5 +- 0,1) mm/min. For each specimen, record the compressive strength to the nearest 5 MPa.
6.9.3 Compressive strength at 1 h
Determine the compressive strength of five specimens at (60 +- 2) min after mixing.
If only three specimens meet the requirement for compressive strength at 1 h in Table 2, determine the
compressive strength of five more specimens. Test no more than ten specimens.
6.9.4 Compressive strength at 24 h
Determine the compressive strength of five specimens at (24 +- 1) h after mixing.
If only three specimens meet the requirement for the compressive strength at 24 h in Table 2, determine the compressive strength of five more specimens. Test no more than ten specimens.
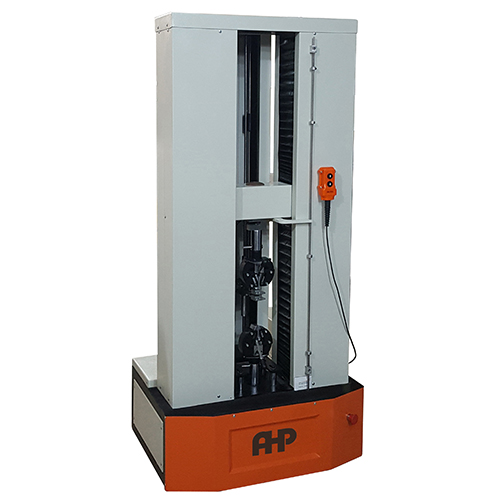
Universal Tensile-Compression Tester According to ISO 24234
- According to ISO 527 , ISO 24234
- Servo controlled
- Ball screw
- Double column
- USB port for computer connection
- Windows based software
- Load resolution 1/10000
- Speed range up to 200 mm/min
- Compression grips for testing of strength of amalgam
- Easy operation and clear visualization (test curves, calculations)
- Easy to change the grips via male-female connection
- Accuracy ±0.5% of full scale
- Precise self-cleaning ball-screw
- Brush-less servo motor quarantine maintenance-free operation
- Easy calibration of load-cell
- Training video included
- Software is included
- 7/24 online distance support
- Amalgam test specimen making mold is as option (will be quote separately in case of request)
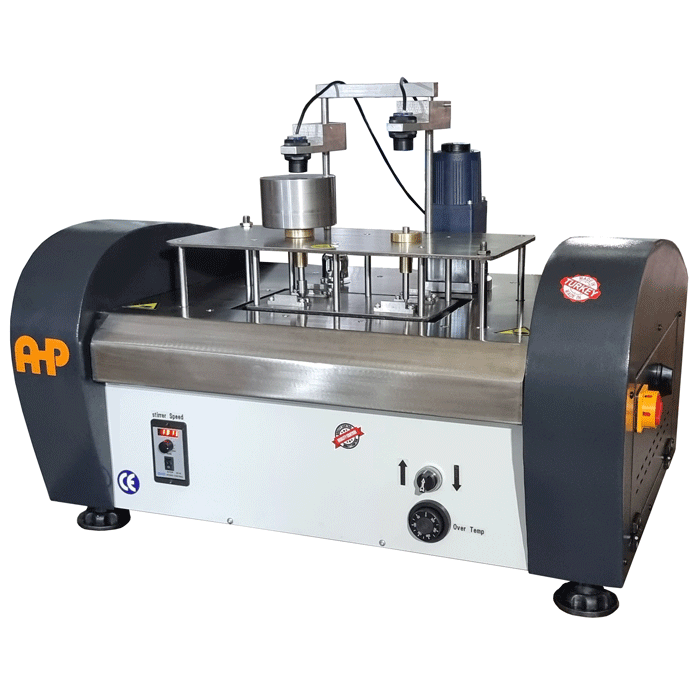
Creep Tester for Amalgam According to ISO 24234
- Amalgam test specimen making mold is as option (will be quote separately in case of request)
- Sensor for displacement measurement
- Number of stations as per customer request
- Weights for applying 36 MPa stress on sample piece
- USB port for connection to PC
- Temperature control for the chamber of sample piece
- Graphical display of temperature and displacement
- Recording data for 4 hour
- Air circulation for sample chamber
- 7/24 online distance support
- Software in included
- Windows based software
- Training video is included
- Computer is as option (Machine can work with any computer with any version of WINDOWS)

